
How to PAINT A PORTRAIT in OILS | Beginners Guide. BABY Portrait of Max
Apr 25, 2026
Thank you so much for clicking the thumbnail and being interested in my work. In this video I
share with you my techniques and tips on how I did this portrait of Max in oils. Be sure to watch it
right through to the end because here and there I'll be slowing things down in real time so you
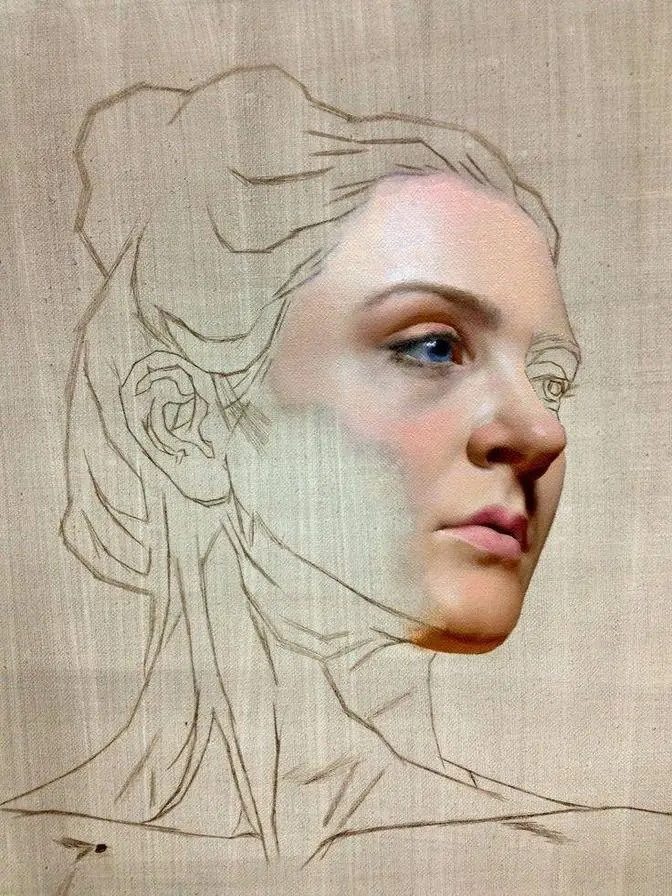
can take a closer look. So let's dive in and take a look. I've just come to the end of the outline.
Now use a combination of freehand and cross-reference method. Now there's a link in
the description below if you want to find out more how I do that. I'll shine up a thumbnail
on the screen. Here's the colours I'll be using for this portrait. First up then is cadmium red
with titanium white. I tend to put a lot of pigment on the canvas to start with. You've got to build
up that sort of vibrancy. So don't starve your palette, just put plenty of mixture there. Then
the next one up is the cadmium red with yellow ochre. I'm doing the same there with the tinting.
Then yellow ochre and white, burnt umber and red with white as well just to tint it down.
For the shadows I'm using blue and brown and then slightly tinting it but mixing it in with the red
just to create like a bit of a warmth to the shadow there.
And then finally mixing the green, it's like an olive green. Now mix this with the red to create
natural shadows because anything that you want to create a natural shadow to just add the
complementary colour to it. Now this is a great medium to use, very quick drying. It's Liquin
Original. Brushes I'm using is Hogair brushes. There's three number fours, three number twos
and then there's some synthetic rounds there. Now what I'm using here is a kneadable razor
from Faber-Castell. Amazing to have in your kit, really good. So just ghosting the image there
before I start putting the paint on. So what I tend to do first is get the whites in. So what
I'm doing is just placing in certain areas where the highlights are but adding a little bit of
pink in some places and a bit of lemon yellow in other places. So you have to sort of open your
eyes to see the colour, squint your eyes to see the values. Now for the shadows I'm using a small
round Hogair brush, mixing the red and the green together to create different subtleties of shadows.
What I tend to focus on is just trying to get some colour notes in there to start with. So I'm
working on the hole so I just put these areas that look similar and I'll just place little sort of
colour notes there and then what it does it helps me to create the balance initially. It gives me
something to judge and to compare with. To help you relax and not be too concerned about the details
at this stage just see it as blocks of colour and don't worry about it don't look so subtle or
or the colour shades are not quite right. All you're doing is building up the foundation and all
this will be changed later on. Be only concerned about the feeling and connection. So while you're
painting just open up your heart, let go of the mind and then just focus on all these different
colour tones and just place them in as little blocks of colour. Now the idea of this underpainting
is to get everything in the correct position so I'm not really concerned whether the colour is
correct or not it's it's just the tonal value really is more interested in. So what I'm using
here is a combination of umber and ultramarine blue just to create an underpainting and getting
the structure right of the eye and just getting that feeling correct because all that colour will be
put in on the next stage. Using number four round hog airbrush here just to keep everything nice and
loose and just let go and just open your heart and just feel your way through. Just showing quickly
I'll get the background in here a combination of umber blue yellow ochre and a touch of red in
places. Now I've put this background in at this stage because I need to have that dark area in
there so it gives me an idea then to what the tones will be in the face. If you're enjoying
this video why not subscribe it's absolutely free and then you're sure not to miss any future videos.
It's time to sort of tidy up the actual skin tones now make those blocks of colours smaller
so I've remixed my colours on the palette just so it's nice and fresh because liquid tends to
make things a little bit sticky after a while. Now what I'm doing now is joining all those sort
of blocks to a smoother more sort of finished underpainting. So I'm using a small hog airbrush
and what I tend to do is put a little bit of colour in then wipe the brush with a bit of
and then just keep applying wiping applying so using a dry brush to actually blend it.
So you're putting the colour on there wipe the tip of the brush and then blend with it.
Now I always spend a lot of time making sure that the shape of the eyes are right
and the value because it just makes it so much easier on the next coat then.
Right just using a synthetic round now number two. Now I forgot to mention earlier that I have three
brushes of each size and the reason for that is to keep one for lights one for mid-tones and one
for darks it keeps everything nice and fresh then you don't get all mixed up and get muddy keeps
everything clean. It's really important to realise that at this stage you're not going to get it
perfectly coloured right it's going to be as close as you can get to it it's just in preparation
for the next coat. The reason for this is that the titanium white actually makes things a little bit
milkier and the next coat will be sort of translucent paint with less white and so that
sort of shines through this coat shines through the next colour layer but this is all preparation
for that stage. I'd just like to take this opportunity to thank all my patrons for all
their wonderful support every month. I can't thank you enough it really means a lot to me.
If you're considering joining me on Patreon I would like the benefit of longer slower and
more in-depth videos. Please check out the link in the description below. This portrait of Max
is all in real-time audio real-time video and you can actually hear and see exactly what I'm doing
every moment and I discuss with you my thoughts and feelings as I progress. So please check out
the link in the description below for more details. Now for the actual clothes I'm just
putting that in nice and loose I just don't want to make it too detailed but it's all in preparation
again it's very similar to what I've done on the face just blocking it all in. Now I've just added
another stripe or two there just making it so it fills the actual picture area. Left the painting
to dry for a few days before I put the rich colours on so this is the rich colour stage it's the same
sort of colour layout but less white so what I'm doing now is making translucent paint so I'm
mixing a little bit more medium to it not too much though but just making it so it's more
transparent so what's underneath shines through then. What I tend to do is focus on one area
and this particular point I started to look at working on the nose getting the values in there
so trying to get that glow in the shadows as well by adding that little bit of lemon yellow to the
mix and just using sort of lemon yellow with red and the green together it created that sort
of natural shadow and the saturation of the skin tone and then using the hog air brushes just to
sort of melt things together so it's a combination of really putting the paint down drying the tip
of the brush and then just blending it in then with a dry brush just working on the actual values
here just making sure they correct because you don't want them too dark it's just got to be right
so squint your eyes and compare with one shade against the other so you could look inside the
nostril and look at the shade inside there and see how it relates to what you're doing here
and if it's same make it the same so it all becomes one then. These little highlights here
but they're not pure white and what I'm doing is putting a little bit of red in that and maybe a
little yellow just to give it that zinginess but it's not pure white because if you put pure white
in it'll throw all the balance out. Now on the tongue here it's quite glowing so what I've done
is added lemon yellow warm red and a bit of cold red together to create that zinginess within the
shadow and added a little bit of green with it as well so it's a mixture of all this to create that
sort of subtlety I'm looking for and then just creating a little bit of texture with a small brush
as well as blending with the hog air. Now there's two things that I do regular and that is to open
the eyes to see the colour and then squint the eyes to actually see the value so you open your
eyes wide if you're not sure what colour is because all it is really is trying to find the temperature
some parts are warm some are cold and it's just adjusting the paint accordingly really and just
keep mixing it up and using those three brushes so things don't get too sort of muddy so you've
got a light brush for your lights one for your mid-tone and one for your darks and that keeps
everything nice and clean then. What I tend to do is add that little bit of blue if it's colder
there's some purpley colours there so add that touch of blue creates that colder colour and then
to warm it up just add that lemon yellow or yellow ochre depending on how much it is glowing
and then you can't go far wrong with that really just keep mixing those together but if you wanted
de-saturate something so if you've put down a colour that is too rich just add that little bit
of the green to it or light green and it just does the trick it just sort of subtles it all down
as you can see here I'm working on quite a few different areas at once so I'm constantly
comparing the shades and adjusting accordingly so even something I've done earlier might be a
applied so I adjust to what is happening so something I'm aware of as well is that some areas
need a little bit more liquid a bit more translucent but other areas might need a
little bit more pigment to create a different sort of vibrancy so it's a case of sort of trying
the different approach see which works sometimes you might need that little bit more pigment
and some a little bit more liquid now for the hair I'm just putting it in very very loosely
not too much pigment almost dry brush so it's just a little bit of pigment on there but like
scrubbing it on really this created the texture I was looking for so you don't want to do it all
the same just having these different sort of marks and that just makes all the difference
if you're enjoying this video why not give it a like and share it with your friends
it would mean so much to me because this would help the channel to grow
I always spend quite a lot of time and attention to the eyes because the old saying is the eyes
are the mirror of the soul and there's so much feeling and energy in there so what I'm doing
here is actually using brown and blue very thinly mixed and creating my own black so I'm not using
black at all just using the brown and blue but adding that touch of white just to tint it here
and there as well because you don't want it pure black now in the iris there's always sort of sort
marks a little dash dashes here and there and lighter marks and darker marks but what I'm doing
is actually not trying to do it exactly like what I see in the photograph it's my interpretation
I go as close as I can but it's more about feeling so I'm really connecting to the energy
and personality of Max and letting that flow through me out of my hands and how I do that is
and then just really be aware of everything at once not just his eyes but every part of his face
it all becomes like a feeling of oneness so if you can actually sense this then it starts to
show in the work then it just flows from you without even thinking about it
now the eyelashes and the part above the eye there I'm just preparing my way I'm not putting
the details in that'll be the next stage I'm just creating this sort of preparation for it
just making sure the value is similar to what I'm looking for and also the chroma and the
temperature of things now the background is just scrubbed in again just with brown red
and yellow ochre and a bit of blue in there in the mix and it's just a combination of those colors
but put on very very thinly using a little bit of liquid in there but do more or less
scrubbed on really to get that sort of texture I'm looking for now for the detail stage I'm
using zinc here combination of zinc and titanium white 50-50 mix reason I'm doing this is because
zinc is more transparent I'm always experimenting and according to Michael Harding paints this
combination of zinc and titanium together is the lead substitute so but with just a little bit of
yellow ochre in it which I'll mix in it anyway so yes I'm giving it a go see what it's like
now with the final coat I tend to have it more translucent the colors so there's less
white been put in that's reason I put that zinc in to make it more transparent
and it'll create more of a glow so it's just a case of experimenting with this really see how
it goes but it seemed to work out all right in the end but I'm always trying different things
you've got to experiment so this is me showing you how I'm experimenting with things
now for the brushes for glazing I'm just using these synthetic rounds number fours and number
twos again using three of each size now marking this up with two white stripes for the mid-tone
brush and then what I do is put three stripes for the dark one and a couple of hog air brushes
there number four number two I focused on the highlights to start with with the detail stage
so if it needs to be warmer I'm adding that little bit of lemon yellow with it
and there's some areas which is pink so I'm putting the the red mix with that and and just
sort of getting it all in all these sort of highlights and getting that balance first
in place before I start with the other values just a little dab on the finger just makes
all the difference as well just softens things up and it's just the case to just keep mixing
very very thin colours a bit of red here you know you have to change up with the temperature just
like the other stage it's just just thinner colour that's all but you're building the texture
on this stage rather the other one was still a little bit blocky on the rich colour stage
this one's actually softening things up so you're softening the edges
so all this stage is about getting the correct edges values chroma and just the basic energy
of it so you're really feeling connecting and if you find that there's a place that doesn't feel
right then you know you need that place needs attention so I just that's why I do is open up
and just go with how it feels and then I'm just going from one place to another now just
illustrating here I'll wipe the brush just a little dab on the actual paper there kitchen paper so
what you do is you put your pigment down and then wipe your brush and then soften the edge
of the paint what you've put in so you're sort of blending with a dry brush then it's not
completely dry there's still paint on there but you're just taking the excess paint what you put
on and then just blend with it now here I'm glazing with a hog airbrush putting some colour on there
to start where you have to be careful though when you start putting sort of very thin colour on
you might have to go over what I'm doing here is just a little bit more white again
just to soften it all up and bring it back into sort of a feeling of softness because sometimes
when you put these glazes on it can seem a little bit too sharp and a bit too glowy so you have to
sort of kick it back a little bit by adding that little bit of white to tint it but it still keeps
a glow but it's not as harsh as just putting neat sort of colour on there without that little bit of
a shine now to the eyes just glazing over with very thin paint mixing a little bit more blue
to make them a little bit more blue but they are blue a greeny colour so I've added a little bit
of lemon yellow as well to the mix but yeah just going over now try and work on both of them at
the same time and also around the pupil there I have put a little bit of brown like a burnt
sienna colour I've mixed it myself with a bit of red and umber this really adds that little sense
of aliveness to them just adding more blue now to the pupils as well which gives us more depth
to the eyes and then white of the eyes is ultramarine blue umber and a little tiny little
bit of cold or warm red right I'm just about to do the eyelashes now so I thought it'd be good
to show you some patreon footage which is real-time audio real-time video try on this side
first where I can get to it's a very very light pressure that's it it's just a few whisks here
and there that's all going to that brown now a little bit to be warming up it that way I don't
need to add wire in there that's all we don't want to go mad it'll look like a spider even though
there's a lot more on the reference image it don't seem to look right when you put it on
painting it's a light pressure tip there down just go into the movements of it like that
that's all you need so be sure to check out the link in the description below if you want to see
this as a four-part series all in real time or real-time audio real-time video so you can
hear and see me every step of the way and I discuss how I'm feeling and my approach at that
particular moment now for the background here I'm using burnt umber and ultramarine blue
very thin glaze you can go away we're using a bit more liquid on this as well
you can just scrub it in there and mix different colours with it just to create the actual
tone and shade you're looking for adding that little bit of white and I'll add a little bit
of tint and a bit of lemon yellow as well to create that sort of chroma shadows just a little
bit more sort of pigment with it as well just mixing that brown and blue together
same with the other cushion as well above the head there just using the brown and blue just
to create soft shadows everywhere and same on here as well so that brown and blue together
makes a perfect shadow now using impasto medium here which dries very very quickly
the reason I'm using this is because the white if you mixed it with liquid would get too thin
where the impasto medium will keep it thick with a nice body to it so you could actually
use it for getting that texture on the clothes you see it's ideal for the beard
now using a selection of flat brushes here and a little round brush as well just to get the texture
in here it's actually a wool beard but what I've done is made it more fleecy so I took away all
those lines because it is a little bit distracting trying to paint those I wanted all the focus to
go on to the flesh tones and that so I just kept it nice and loose and just really just piling that
pigment on mixing plenty of that impasto medium so I know it'll dry quick and just creating that
sort of texture and putting a few marks here and there mixing a bit of blue and brown with the mix
just to create subtle shadows here and there and just using the same mix just add a little bit more
white to it and that's for the highlight of the white t-shirt there and put that little bit of a
stripe in there by using the brown and blue again it creates a natural shadow that does
it's great for all sorts of things yeah so just keeping it nice and loose not too fussed about
getting the details it's just like say loose so all the tension goes straight to the face
the peachy colour is just yellow ochre red and a little bit of lemon yellow and just put that
in there as well again keeping it nice and loose just put plenty of pigment on there to get that
vibrance here as well yeah and just basically with the stitching I just put a little dot here and
there with a lighter colour of what that peach is and a little bit of dark brown and blue for shadows
so thanks very much for watching the video till the end so here's the actual portrait of max at
the correct angle rather than being perspective on the easel if you'd like to see more of my work
please check out this link here take care bye for now