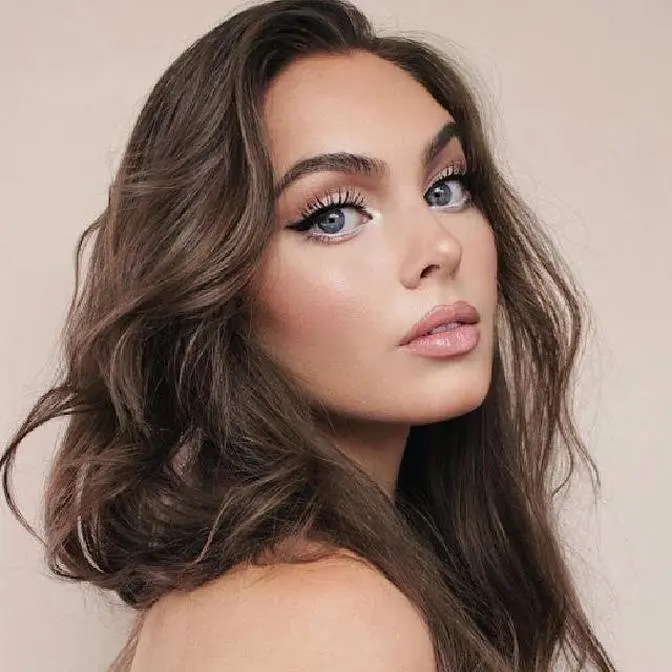
Hey it's jackie wyers & welcome back to my channel for this renaissance angel🕊 soft e-girl aesthetic makeup tutorial! Inspired by TikTok makeup tutorials with blushy cheeks & nose, faux freckles, winged liner, and vintage rose details, painted with makeup! Follow my tiktok here: https://www.tiktok.com/@jackie.wyers/video/6812333082574720262 for more aesthetic tik tok makeup tutorials / aesthetic videos xo
How would you describe your online aesthetic, would you want to see more videos like this to find your aesthetic? are you an art hoe? soft bbguuurl? emo e-girl? lol I could do more bang on transformations than loosely inspired! lemme know xo
Disclaimer: Not sponsored! I used products that work best on my hair. Some links are affiliated!
if you are reading this... comment, “IM A SOFTIE“
Hey, it's Jackie and welcome back to my channel.
For today's video I wanted to show you guys my take on the soft e-girl aesthetic.
So I love the super blushy cheeks, blush on the nose, faux freckles, and then I've seen
quite a bit of face tattoos and I thought it was really cool but I wanted to do my own
spin on it and just use what I had in my kit and create this rose design.
I really wanted to do florals and roses because I love florals for one and also I was inspired
by this picture of a renaissance angel.
There's a lot of angel imagery within the soft e-girl clothing style so I thought it
was appropriate.
I know this is a little bit random but it's a really rainy day and I was bored and wanted
to have fun so I hope you guys like some of the makeup techniques in here.
Just having fun with me playing with makeup and some cool products as well.
They're all really pretty products that I picked out and anyways, let's get started
with this soft e-girl look.
I already have my hair curled.
This is the same method I used in the Lily Collins as Rosie Dunn prom hairstyle.
I'll have that linked and these big brimlet type of curls are super angelic and youthful.
I also have white iridescent nails like angel wings.
And for foundation, I'm using one of my favorite high-end primer and foundations by Guerlain.
First the L'Essentiel Pore Minimizing and Shine Control Primer.
It's super fresh and lightweight.
It's mattifying, has avocado extract, so pretty cool.
It's all very natural and the packaging is very luxurious.
And another super angelic option is the YSL Touche Eclat Blur Primer.
I kind of wish I used this one today, but then I went and applied some of the foundation.
I already have it on my cheek to test the shade already, but it's my favorite natural
glow foundation that's higher end.
If you are on a budget, the L'Oreal Lumi line is also great.
You'll see in this video, I'm using some new Sephora Pro brushes.
They sent these over and they're really nice.
And I'm using the Can't Stop, Won't Stop Concealer.
This I do find if you have dry skin flakes, it kind of clings to it a tiny bit, but it's
the lightest shade I have and it's higher coverage for dark under eye circles and it
definitely brightens up the high points of the skin since I'm super pale here.
And for powder, I'm using this Benefit Silky Mattifying Powder.
I thought the packaging really suited this look.
Just pat it over the concealer to set.
Another matte product up next.
This is again from Benefit and it's the Hoola Light Bronzer.
I've hit pan on this bronzer several times.
If you want a bronzer for fair skin that's matte, it warms up the skin without being
too dark or orange, this one's great.
I'm going a little heavy handed around my face to give some dimension, but once we have
the bold cheek and lip, it won't look as harsh.
But if you go in with a light hand, this is like a very barely there product.
And for the millionth time, my favorite palette is coming out to play.
This is the Too Faced Natural Lust Palette.
I usually use the Natural Love, but I love them both.
And it's just this big lightweight palette that folds over.
It has so many natural earthy shades for everyday and the packaging is just super intricate
like this look is going to be.
First up, I'm using the Slightly Gray Brown Matte Powder on a tiny brush for my nose contour.
This is how I normally do it.
I'll do two little lines where I already have little divots and then I'll fade lightly above
the nose tip and then start from my brow on an angle to my nose bridge.
I love slightly connecting the face like this.
It just adds a bit more structure and you can barely see it, but it is there.
And then for brows, this is my favorite way to do them for a natural and full look.
I keep grabbing for the L'Oreal Paris Micro Ink Pen in the darkest shade they have.
This one, you just brush up and it doesn't come out super bold, just a tint, but the
little comb applicator creates a really nice fade and fills out the front of the brow.
Again, I love this for just the head of the brow.
And then I'll go on to my other favorite, which is the Benefit Precisely My Brow and
I'll use this to fill in the tail.
And also with the Benefit Brow Pencil, let's add some faux freckles.
Just dot and blot with your finger.
I'm concentrating this on the nose and this is just my spin on the soft girl look, like
what I was inspired by, but you can go bolder and more drawn on with the freckles, more
over the top with the blush, which we will do later.
And brush out and then add your favorite brow gel.
Mine is the Benefit 24 Hour Brow Setter.
I wanted the look to be natural and textured, so I'm keeping the ends of the brows slightly
brushed up.
Eyes we're keeping it pretty simple.
I took a peach shade, very similar to my skin tone anyway, and applied across the lid as
the base.
Use the contour shade that I used for my nose in my crease and then I wing this out following
my brow shape.
Under the eye, I went with a warm medium tone brown, still keeping everything matte.
And I added this shade to the inner and outer corner of the eye for some definition.
Angelic pearly white in the tear duct.
And you can do whatever you want with the eyes.
I wanted to keep it simple and clean and focus on the lips, cheek, and rose art, but there's
no rules.
Just have fun getting creative with makeup.
Also bring that iridescent white to the brow bone to make it pop and show off those textured
brows.
This green liner I'm using is from Tease.
It's actually years old, but it's a great earthy green.
I probably should not be using this on my eye, but anyway, it's a great liner if you
want to buy it new.
And I'm creating a wing focused on the outer corner in a pretty dramatic shape here.
Then I trimmed some demi lashes from Ardell.
And I'm adding these on the outer corner, kind of angel wing inspired.
And then to blend, I'm using the Damn Girl mascara by Too Faced.
It's so huge and over the top.
I'm blending the lashes after a quick curl, and I'm really just adding some mascara to
the inner lashes to blend the falsies.
I actually trimmed these lashes in the front instead of the side.
You want to go on the outer corner to trim them so that it's easier to blend in.
I messed up a bit, but this is how I'm trying to blend and fix the problem.
A little bit of glue was showing, so I added some black liquid liner.
And this was unintentional, but I dragged the black through the green and it kind of
looked like a leaf, so it was kind of fun.
And then time to get blushy.
I started with one of my favorite drugstore matte blushes.
This is Rimmel's Maxi Blush in the shade Wild Card.
And I know I'm going to use some deep rosy shades for the roses, so I'm bringing this
lightweight matte blush to the bottom of the apples of the cheeks so they stand out.
And also through the tops of my cheeks and temples because I'm going to start the roses
with a white pencil.
My skin is so light, so I thought it would be hard to see for my demo.
So that's why I added some color there.
And then my fave Chanel blush.
I love Chanel blushes.
They have a very distinct smell.
Some people find it too intense right out of the pan, but I just think, ooh, this is
Chanel.
And it's a really smooth and silky formula.
I'm building up the color to make the apples of the cheeks pop as well as on the nose tip
so it doesn't look too bulbous.
I'm still keeping the same shape as the contour.
I like it more subtle, but hey, if you want to go intense, soft eagle, then this is the
step to really amp up.
Onto the roses, I'm using a mix of products that I randomly had.
If you have several liquid liners with fine tips like white, pink, and a magenta or red,
you can create precise roses.
I used a mix of a cool white pencil as a base I had, and then I etched in lines with a pink
and magenta liner for an abstract painterly look.
And don't worry, I will slow this demo down.
So I did the same steps each time so they would be easy to follow.
And with this style, it's so small that if it's too detailed and perfect, from afar it
won't read as a flower as much.
Just start with a dot for a rose bud, and then under, create a couple comma-like strokes
for the tips of the petals.
And next, add your pink around the bud on one side, and then under those initial lines.
In a rose, the petal will be darker, curving into the base of the flower, but you don't
have to be perfect with this.
You'll see, even if it doesn't look like a flower at this stage, which it doesn't, with
a couple petal-like strokes in the deepest shade and added green buds, from a step back
you'll start to see those vintage-y flower shapes form.
So let's take the last liner.
This one is so dried up, oh my god, but it turned out kind of cool with more of a textured
look than smooth straight lines, kind of like an oil painting on a canvas.
So create a little dot or squiggle in the center of the white bud, and then a couple
strokes following the other lines.
You can go a little bit more squiggly with these as well.
Doesn't have to be perfect.
When you step back, maybe add a couple more white lines to make the rose pop, or add more
petals at the top of the bud.
And then taking that green liner again for little leaves helps bring this together, and
it's a great step if there are any smudges or like portions of the flower you don't like
how it turned out.
Just add a little, a little leaf, and then boom, you covered it up.
Then I had some fun creating some buds of the temple.
I did a little squiggle, and then I went with a white bud and added the pink liner on one
side and then the pink and magenta with a squiggly line through the center like it's
a bud that has a petal that's about to bloom.
You can stop here, just do one rose and call it a day, but it's pretty fun when you're
loose with these lines and not too precise about it, and you can start to see the shapes
form themselves using these quick steps.
I thought it would look cool in the inner corner.
I feel like you don't need my explanation, and it might just be helpful to see some different
demos, so enjoy some angelic music.
Also, it looks really cool to have the pink or white have a bit of sparkle, so when the
light hit, it picks up the detail and looks more 3D.
These are totally imperfect, but I could do this look over and over until it was like
super realistic and whatever, I could be a perfectionist like I typically am, but I
feel like the more abstract vibe looks really cool, and I would love to see how yours turns
out as well.
Lips, I wanted to go with a red.
On WeHeartIt, you can see some of my inspiration photos, so I'll have my Fave app linked down
below.
I'm scared of copyright because it is fair use, but is it?
I don't know, and I forgot how much I love the Revlon Ultra HD Matte Lip Colors.
I'm using the shade Keep It Real.
It has Ashley Graham's signature on it, and I started with painting it on, and then I
just went with the awesome plushy applicator.
The product does feel really lightweight.
It's super velvety, and the smell is my favorite part.
It's creamy mango and whipped vanilla fragrance.
It's so good.
Finally, some finishing touches with More Chanel Blush.
I also like to bring the shade to the eye, a bit on the chin and forehead for some harmony
around the face when you're looking straight on, but totally optional.
And we can't forget the nose highlight.
I see a lot of bright nose tip highlights on TikTok and Instagram, and I think when
the dot is large on me, it makes my nose look bigger.
It's cute, but how I prefer to do it is two tiny dots just above where I put the contoured
lines.
It gives kind of a fairy-like appearance, makes it a little bit pinched and more structured
while still adding the cuteness of a highlighted tip.
Gotta fluff up my curls, and I'm adding my favorite hairspray by OGX.
This is the Bodifying in Bamboo Fiberful Big Hairspray.
I've gone through at least four cans of this.
And then I added some dried-up roses that I kept from Valentine's Day.
Dried-up flowers sit really well for photos or in updos, so I love keeping dried flowers
around.
And there is my very inspired soft girl renaissance angel look.
I hope you guys enjoyed my take on this soft, very feminine look, and if you did, make sure
you give it a thumbs up and subscribe for more pop culture videos.
I'm super inspired by the TikTok generation.
Girls are so young, so good at makeup, and have their own aesthetic.
I never thought that way when I was in middle school or high school.
I had no style at all, so it's just really cool to see, and I'm definitely inspired by
the TikTokers out there.
I do have a TikTok if you guys want to follow it, but I don't really post on it, and I'm
not good at dancing, so I don't dance.
I won't say never say never, though.
I might dance one day.
And I don't really know how to do makeup videos on my phone, so I'll try to attempt it.
But anyways, that was the inspiration for today's video, and I hope you guys will try
it out as well while you're stuck at home.
I've been loving your 60s recreations.
You guys look amazing, and a bunch of you have tried out the messy bun.
I love it when you guys tag me on Instagram so I can feature you in my videos.
And anyways, I will see you in my next one.