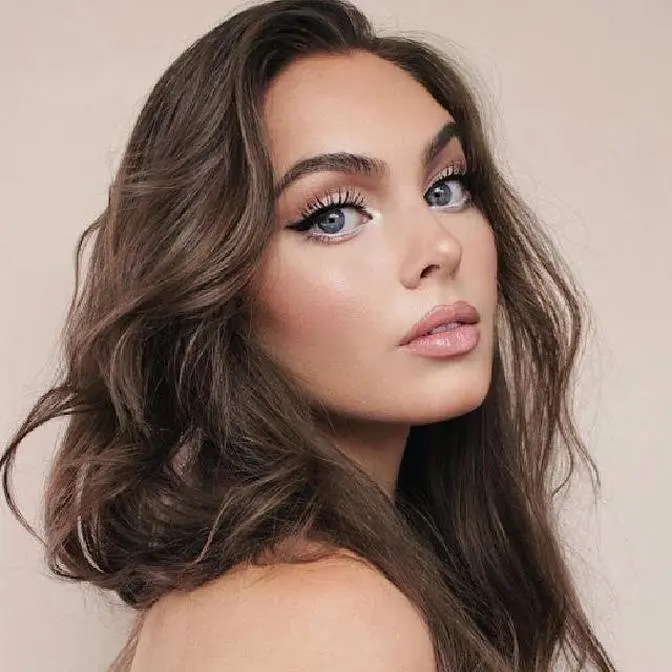
HI!!!! I’m finally back with a Nina Park makeup tutorial, inspired by Emma Stone’s romantic, lived-in celebrity makeup look. Makeup Artist Nina Park is known for her soft sculpting, fresh skin, and subtle definition and in this video I break down the Nina Park makeup method step by step, focusing on natural skin, brows, faux freckles, and that iconic “lived-in” lip.
This Emma Stone makeup tutorial is my take on Nina Park’s techniques adapted to my rounder features, keeping everything natural, romantic, and wearable. If you’re searching for natural celebrity makeup, romantic makeup looks, or Emma Stone inspired makeup, this one’s for you!
Celebrity makeup artist Nina Park has worked with Emma Stone, Mia Goth, Zoë Kravitz, and her approach to makeup is all about enhancing features without overdoing it. I hope you enjoy my interpretation of her techniques!
PS: Be gentle about the hair 😅 I almost deleted this video but powered through haha hope you enjoy! xo
🔗 All products are linked below! Tag me if you try this look - I’d love to see your recreations too! 💕
Don't forget to subscribe :)
timestamps🎨 0:00 Emma Stone Makeup Inspiration (Nina Park) 1:12 Hydrated Skin Base - Nina Park Makeup Method 3:45 Naturally Sculpted Skin (Celebrity Makeup Technique) 6:30 Faux Freckles Tutorial 8:10 Lived-In Brows 10:05 Soft Eyeshadow & Micro Liner 13:20 Dimensional “Nina Park Lip” 16:45 Romantic Valentine’s Day Makeup Looks
🎨All Products I Used for my take on the Nina Park Method🎨
These are my personal favorites that you see in lots of my tutorials but Nina Park has been using Clio cosmetics recently, so K-beauty is another perfect option. Here’s how I went about getting a similar look:
Nina Park uses lip tints more frequently, but to match the shade, it really looked like one of my all time favorite lipsticks! To get a similar look, work it into the lip qith a patting motion.
REVLON Super Lustrous Glass Shine Balm - try 005 Glossed Up Rose, I grabbed the wrong shade but they are sheer so it was forgiving lol https://amzn.to/3MarVP1
Comment the 🔑 POP CULTURE PASSWORD 🔑 Emma Stone the Oscars' queen!
Disclaimer: This video is not sponsored. Links to makeup items are affiliated, meaning if you purchase through them, I earn a small commission at no extra cost to you. I recieve many products in PR, but many I buy or rebuy with my own money - these are my go tos!
AI Generated·May contain errors
Hey, it's Jackie and welcome back to my channel for a talk-through makeup tutorial covering
Nina Park inspired makeup. If you can't tell, I am inspired by Emma Stone at the moment.
I was between these two shots, both absolutely stunning, but I kind of wanted to try Pixie Cut
today, so I played with this wig. This is my first attempt at Nina Park inspired makeup,
so I'm using all of my all-time favorite products that I know I love and that are easy to use.
So I did pull high-end, but if you want to see a fully drugstore version, I can do that for Mia
Goth. I'm not starting 100% bare face. This is out of my comfort zone, okay? This hair,
I'm sure it'll look good when we're all done. I mean, I really hope so. So I did even out my skin
tone a little bit, but I'll show you exactly what I did. Illuminating primer for a little extra
hydration and glow. I noticed Emma has quite a glow down on her shoulders and then lightly onto
the face. And my holy grail high-end foundation is the Luminous Silk by Armani. Added a little bit
of foundation through the center of the face and then buffed it out with the other side.
Armani just reformulated this product, so now it feels a little bit lighter on the skin.
I can still see my skin through the foundation, which is very Nina Park.
The light is shining through this window. Hopefully it's not too distracting, but my
was a little bit too pale and I wanted more variation, so I'm using my Makeup Forever
Favorite HD Skin Palette. Use this to death. I'm taking this shade and I'm bringing this through
the cheeks, over the nose, and everywhere we're going to contour, just a little bit softer,
bringing it up the chin. This will make a huge difference. We'll get a lot of dimension. We won't
have just one kind of flat skin tone. And why I'm so obsessed with this product is it's very
thin on the skin, so you can add the tiniest amount of product. Now I'm going in with the
Cooler Tone Contour. I'm just sculpting those cheekbones. Usually I'd wait for the light to
pass, but hopefully you can see what it looks like in natural light. Even adding in the lightest
shade here, which I'm almost out of, on the chin and right underneath the contour.
I have this beautiful blush from Em Cosmetics, Autumn Sky. This would look really nice and then
I'll add a bit of rose as well. This looks so pretty. Emma's brows are very full. I'm using
the Precisely My Brow in shade 4. This is deep, but it does have a little bit of warmth to it,
creating hair-like strokes at the head of the brow, filling in any sparse areas,
and then making sure I have a nice arch and a shorter tail. Mine actually goes a little bit
longer. I'm working with how far my natural brow goes. Reminds me of Audrey brows a little bit,
especially with this hair. A lot of Nina Park's clients have very natural looking brows, whether
they have little, you know, stray hairs that they just brush up. And then for a little bit more
brow separation, this is the 24 Hour Brow Set. Oh, it's stuck. Taking most of it off,
just making sure the head of the brow stands up. Ends up looking pretty lifted.
Nose contour is one of my favorite steps. I'm going to give myself an Emma Stone nose job here
with the Smashbox Precision Contour Stick. I've never tried this before, so this is the first time.
Smashbox sent me over some of their contour products, and I thought this looked really
nice and creamy and perfect for the nose application. This was so easy to blend out,
and it isn't too dark. This is the shade Light, so it worked really well if you do have fair skin
like Emma Stone. And I hate to jump around too much, but I did add this same contour shade
just above the cupid's bow. And starting on that lip line and blending out.
This already feels very Emma Stone right now. Let's add some faux freckles and then powder.
You can totally use your brow pencil. I just got a new freckle product.
How cute. This is by Etude. This one is medium brown. So let's add some freckles. Oh, it's a pen.
Let's try it. It's great because we haven't powdered yet, so we can add the little dot
and then blend it into the skin so it doesn't look too artificial. And if you have any little
bumps on your skin, it's great to conceal them as a freckle. Cute.
And when we powder, they'll look a little bit less visible.
Finally, let's set the skin. I love the Makeup Forever powder. This one is HD Skin Perfecting
pressed powder in lavender, but it just goes on translucent and I never swipe. I just pat.
Don't want to disrupt all the work we've done, but I leave some shine going through the skin.
I'm prepping my lids a little bit. I'm taking Pillow Talk Beauty Light Wand. This has a tiny
bit of pink shift to it. Inner corner of the eye, tip of nose. Okay, there we go. We're finally done
the skin. Actually, I do want to add a little bit of a rose blush. Oh my gosh, this is my favorite
high-end palette of the cheekbone. It often looks like Nina Park uses two different blush shades,
which I love. You can even diffuse. Moving on to the eyes. The eyeshadows will be subtle and
polished. We're using all matte shades. First up, I took Espresso from MAC, a classic. I'm taking it
on a blending brush. This is by Ruffer. This is 14 Max. Love Ruffer brushes. Make eyeshadow so easy.
Apply to the outer V. Nothing too perfect. We're going to blend it out. You can even use your finger.
Okay, next up, I have this warmer shadow palette, which I destroyed accidentally, but this one is
from Makeup by Mario. Master Matte's palette. Going for something slightly warmer on the lid.
And I don't want to go into my crease because my eyes are a little bit bigger and more deep set.
Making sure everything's really soft. Tiny brush and an even warmer shade.
Adding this underneath the bottom lash line and a bit of a wing.
This liner is MAC Glider Dye. It's a gel pencil. It's really creamy. Using this to tight line the
eye. And then take your favorite liquid liner. I really like this one by Lawless. It's the Easy
Eyes liner. I personally find the pen liner's the easiest. And starting about halfway, start pressing
this right against your lash line as close as you can. And then follow that brown shadow that we laid
down in a tiny wing. Also add a little point in the inner corner. Give you that cat eye effect.
And maybe I'm seeing things, but it looks like brown liner in the very inner corner, so I'm taking
Limitless Brown. Because my eyes are so round, I'm going to lightly limb my entire waterline.
But you could skip this if you want to. Curling my lashes and going with my favorite mascara. This
is MAC Stack Elevated. Not too much, just coating my upper lashes and then dotting along the bottom.
You can totally stop there, but I picked up these lashes from KISS. They have an invisible band
and I'm using two mediums and one small to fill out my outer lash line. This helps kind of taper
them out and give more of a cat-like effect, even though my eyes are quite a bit rounder.
Wow, I love this eye look. I think it's so understated and pretty. It still took quite a bit
of work, but it looks fabulous. And let's finally do the Nina Park lip. Oh my gosh, I just filmed
the whole lip tutorial and it got deleted. I guess my camera like overheated. So let's take this off
and we'll just do it all over again. Won't take too long. Did this earlier, but let's start again.
This is the Smashbox Precision Contour Stick in Light. Applying in the cupid's bow. A little bit
over lining the sides of the bottom lip. Let's blend this out. This is a good shade because you
get some dimension without it being too ashy. It can start to look funny if you go with a shade
that's a bit too cool. Usually I go with Makeup Forever for my lip liners. They're some of my
all-time favorite, but I do find if we're blending, sometimes they're actually a little hard to blend.
So instead I'm going with Peripera. Love this brand for lip liners. And this is the shade
Chocolate Brown, but it does come off like a deep rose, which is perfect for this look.
First creating a bit of a rounder cupid's bow. Very subtly over lining the top lip.
I'm underlining my bottom lip and then softly filling that in. And let's blend. This is a
brush from Charlotte Tilbury. It's an eye brush I think, but I love it for lips. I don't want it
too hazy though because I do like the definition. We already have a bit of haziness from the contour
stick. Another step that I like to do is with Endless Cacao. This one is quite a bit cooler.
Where the light hits, where you can see like my natural lip line,
just patting it over top. It kind of camouflages it a little better. Finally for the lip color,
it looks really similar to one of my all-time favorite lipsticks, which is by Charlotte
Tilbury. It's the Pillow Talk Medium. Weirdly I hate Pillow Talk on me, but I love Pillow Talk
Medium. It's just too like light and pink, the other one. But this is such a pretty deeper shade.
Patting it along. We're doing lots of layers for the lip. I also have this Revlon Shine Lipstick.
I guess it's more of a balm. This will help add some moisture, but also pick up a little
bit of texture on the lip. You could leave it totally like this if you want to really
emulate the photo. I see a little bit of a highlight, so I'm just using what I already
used on my nose and inner corner of the eye. I think it looks so pretty. What do you think of
this Nina Park inspired makeup look? For me, I find my lip line is a little too harsh to make
it too blended. Then it does start to look funny on me. So I didn't blend it too much,
but I do have that little bit of contour above the cupid's bow, and I think it looks really nice.
So let me know what you think. All the products are listed down below, and let me know again if
you'd like to see a part two. I was thinking Mia Goth, but if you have any other iconic
Nina Park faces you'd like to see me try to recreate, let me know, and I will see you in my
next one. Take a look at this wig, by the way. It was like $25. It looked so rough when I first
applied it, but I cut it, I styled it, added some texture. If you want to catch up on some of my
latest videos, I did a really fun decluttering. Could inspire some organization. Or for more
makeup tutorials, I do have a Valentine's Day playlist with some of my favorite looks I've ever
done. Hope you find one that's perfect for you.