
Building A Custom 1 of 1 E91 M3 Wagon! (Part.8)
9 Video Views·Aug 31, 2022
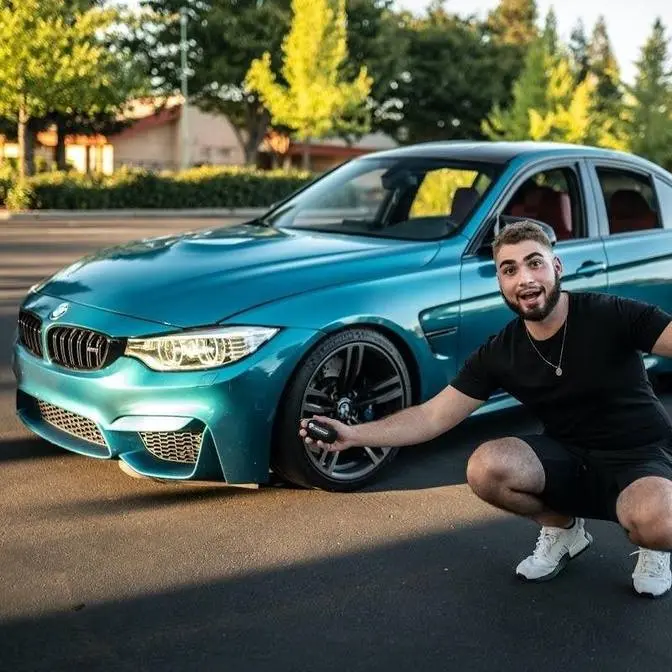
Did we make the right decision with the paint color 😎?
Shop Real Carbon Fiber Accessories: https://www.simplycarbonfiber.com/NOUR
Use NOUR10 for 10% OFF
●My Ebay Store: https://www.ebay.com/usr/nadiandcompany?_trksid=p2047675.m3561.l2559
● Merch: https://NADIPERFORMANCE.com
● Follow me on Instagram: https://www.instagram.com/nour_hummadi/
----------------------------------------------------------
SPONSORS! (CODE)
KiesMotorsports (NOUR5)
SimplyCarbonFiber (NOUR10)
BurgerTuning
FCP EURO
AzaAutoWheel
Suvneer
SSR Performance
Valvetronic (NOUR)
RoughCountry
----------------------------------------------------------
What's up guys welcome back to another video and in today's video guys we're gonna be finally trying
to paint this engine bay getting this engine bay fully ready so we can start taking things off the
e90 m3 and start transferring it onto our e91 m3 i really want to get this thing as a running
drive as soon as possible but first things first um we need to start working on this engine bay
that being said guys i went to my local paint shop and uh this is a bunch of stuff that they
actually had um i had i made a couple mistakes but uh not too big of mistakes thank the lord
first being and the major one is the paint so i ended up getting the proper paint this is lime
rock paint so yeah guys here's the surprise we ended up going with a lime rock paint for those
of you guys who don't know what lime rock paints which i don't think there's much people that don't
that's a bmw enthusiast lime rock paint there's only 200 i know i have three fingers up 200 of
them released ever in the world for the e92 chassis and it was only for the e92 chassis
and it was only for the year 2013 so you had to have a 2013 lime rock edition which is only 200
in the world that had like a custom interior i believe a custom material custom steering wheel
um or like an m performance interior only like black guts and i believe they only came in bct so
like a very very specific package and they have custom badges and things like that and they're
very very sought out for like one just went out of the auction yeah it only had 200 miles on it
but one went out of the auction recently for 260 000 that just really comes to show you guys how
much this color is really loved and it is a car i personally always wanted for an e92 m3 i just
couldn't even find one that's reasonably priced because all of them are more than double or triple
and normal e92 m3 with similar miles and i couldn't really justify just primarily for the
paint color so that being said i'm going to be doing some custom things to this car to make the
ultimate lime rock edition which is definitely going to make it a one-of-one i know there's
some other people out there that built e91 m3s but not with the engine swaps like just the body
i know there's like one or two people that actually done the entire conversion with the engine and
everything um but i think they use the standard chassis color and i've never actually seen one
that has an individual color let alone this color that is so sought out for by almost every bmw
owner so yeah guys so that's the news we're going to be building an e91 lime rock edition wagon
which i think is going to be pretty insane because that that is a definitely a one-of-one car and if
we actually get that lime rock sticker because i don't know if you guys know but there's a lime
rock sticker gets stick on the side of the window for the e92 coupes i believe it goes somewhere
along the lines of like lime rock park edition uh m3 coupe we're gonna put m3 wagon i think
and there's a few other little detail points i want to do to this car to make it a lime rock
edition but i'm gonna have it to where it says somewhere on the car made by yours truly because
this is not made by bmw this is made by your boy and obviously because bmw never made an e91 m3
so anyways that is the exciting news about the paint color i'm very very happy with this and
i'm very excited for it and uh so yeah the mess up was i got this can first which came with clear
coat and paint this one's just paint i actually called the man the myth the legend v-tune he
recommended that i don't actually use the paint and clear it just not going to have a nicer finish
and if there's any mess ups it's hard to go back and fix this rather than just paint we can easily
fix it and then put some clear on top of it this setup right here was just a hundred dollars alone
for just these four cans which is crazy um these ones are actually cheaper i don't know if you mix
up clear i guess it ends up being a little bit cheaper but also i heard this is the good clear
coat with hardener in the can as well so yeah this is going to be so yeah this is pretty much the
best of the best setup you can possibly get for cans and i'm hoping this is going to come out a
now we did get some scuff pads because the engine bay is pretty much painted we don't really need to
use primer primer you normally use it on stuff that doesn't have any paint like this section
right here if you really want to paint that perfectly but for the most part as long as we
scuff down this engine bay degrease it we can just use a harder scuff pad the red ones and then the
black scuff pads and then after the black scuff pads we're going to be using a 400 grit sandpaper
and then a 600 grit sandpaper and that should pretty much get it fully smoothed down to actually
start doing the painting process painting is the most exciting thing but just like any job
the primary thing is prep so that is our main mission with this engine bay so without further
ado guys let's go ahead and just degrease the entire engine bay you guys saw in the last video
we just kind of washed it off now we need to degrease it once we get everything degreased
we can start the sanding all right guys so something i'm realizing as i'm degreasing
this entire area we're gonna want this entire side painted as well the back side i don't want
to paint this side and then paint this side because then the splash should go on to this
side i rather paint the inner wheel well first so any splash that goes on to this side can end up
sanding it down and then spray from this angle because this is obviously the primary area if
there's a little bit of overspray that comes up back here as long as this side is painted first
we're not gonna have any overspray in the engine bay because that's gonna that's gonna be the
primary thing people gonna be looking at when you open up the engine bay so that being said
we're gonna have to drop this subframe i think the only thing that's pretty much holding it on is
gonna be the three bolts up here the three bolts up here and that will also allow us to paint
underneath that and then obviously the subframe bolts and this whole thing should just pretty
drop down so uh yeah looks like we are gonna have to do a little bit more mechanical stuff but once
we actually drop all the suspension we're gonna have literally full access to the front end of
this car and guys after removing the subframe we honestly have so much space now we can actually
move inside the engine we actually sand it down so much easier instead of trying to reach over
and we can easily paint all this stuff now we even got the bolts out of the strut over here
so we got to get all this sanded down properly and get this all painted properly um i might
actually remove this bracket as well i think it's held on by three bolts and this whole bracket
comes off we'll paint that off separately as well but yeah now that the subframe is also gone this
entire uh wheel will be so much easier to paint as you guys can see this part is glossy the rest of
this is kind of like whatever um so i'm i'm gonna try to get this all sanded down properly but it
doesn't look like this needs to be absolutely perfect it just this section right over here
but you guys know our goal is to try to get this thing as perfect as possible so i'm gonna go ahead
remove these brackets as well on both sides just pretty much remove anything else like this little
guy right over here and like i said earlier guys we're just gonna go ahead and get started with the
wheel wells first so any paint that goes in the other way we can just go ahead and sand down and
make the engine bay absolutely perfect and just like that guys we have all this section degreased
this entire section degrees we have that section degrees just a little uh puddle of dirt over there
that i need to get out but other than that this entire section is degreased as you guys can see
looks so so so good definitely happy that i removed this up for it made life a whole lot easier
so now the final part that we need to degrease is this whole section back here so once we actually
degrease all of this we can finally start doing the scuffing process all right guys so it's time
for the scuffing process we're gonna go ahead and use the red scuff pad and now i'm gonna go ahead
and use the black scuff pad and now that we're done with the scuff pads i'm gonna go ahead and use the
and now we're gonna go ahead and use 600 grit
let's just go ahead and dab all this with some alcohol just clean it all up make sure
the surface is perfectly clean and then start laying down some coats of paint
all right guys moment of truth i know what i'm doing
and guys about an hour and a half later we finally finished our first section unfortunately
it cost me two cans i'm learning what paint thinner is i'm learning what paint is um i'm
learning the steps and that's what's important as you're painting you learn what's important
you learn what's not important and eventually i'm going to start getting into the paint guns
um that's what i'm going to start doing panels this is why i'm actually just using cans for like
the wheel arches and probably like the the under paneling right here and like this section right
here because it doesn't need to be perfect it doesn't matter if it has a little bit of fish eye
but as for this section guys i'm really digging it it looks super super super good it just needs
right now to dry off it actually took me two cans just to do this section right now and that might
be a little overkill considering these are $28 a can i'm gonna try to call them up and see if i
can get four cans um or six cans for about $20 a piece so i can knock out two cans for this one
two cans for right over there two cans right over here so we have all the wheel arches pretty much
complete i do have two cans um for the engine bay which i don't know if that's going to be
enough just be considering how big this area is i might try to get two more cans for the engine
base of four cans in total for the engine bay now this is probably going to cost me roughly that's
what what is that 50 um 100 200 probably like three to four hundred dollars to do this all
with the paint can and these little detail sections you're really not going to see but
it's just the details that matter because once you remove a panel or for example you're taking
off a wheel you don't want to see grade it just doesn't look good at all it just looks like this
car has been painted before and we want this car to look like this was the factory paint at least
for our personal satisfaction so any years this came out really really really good i'm really
happy with this so that is the first section it's 100 complete this was mixed clear coat and paint
and i can see why clear coat and paint is not a good idea there's a lot of fisheye right over here
but considering again this is the wheel liner the wheel area as long as it's the same color that's
all that matters so all that being said i'm going to go ahead head down to the paint place and uh
pick up another two hundred dollars or three hundred dollars worth of cans um so we can 100%
get the painting stuff done so again we can we can start working on the m3 and start transferring
over the wires and everything now i know guys probably getting a paint gun and a compressor
and everything it's that one-time fee of like maybe like four or five hundred dollars for a
decent setup and uh you know we can paint as much cars as we can with a lot cheaper material cost
because paint in a gallon would be maybe like 60 70 maybe a hundred dollars or something like that
rather than paying it by the can which gets really really really expensive just because how easy it is
to actually use but also because i've never done this before with a paint match can i really really
really want to see the results when we do the wheel arches all with paint cans and then all the
panels the quarter panel the hood the roof everything with a paint gun at a professional
shop i want to see how close the color is so i know is paint cans really worth it from here on
out this is kind of an experiment if you guys are wondering i'm wondering too so let's head down and
pick up the rest of those cans now that we have the goods guys let's go ahead and head home and
paint the rest of this thing i'm so excited because again once we get all this stuff painted
it's time for the assembly of the e91 m3 and it can actually be called the e91 m3 because we're
gonna actually start assembling i'm so stoked and guys let me know down below if i chose the right
color but imagine a lime rock one of one in the world e91 m3 i have never seen a lime rock if you
literally type in just a lime rock i don't even think i've seen anyone even paint an e90 m3 in
lime rock or a convertible or anything so i think it'd just be absolutely insane because unfortunately
it looks like we did hit rush hour let's head home and just continue more sanding i'll catch
y'all when i get there probably like honestly 45 minutes unfortunately and just like that guys we
knocked out the passenger actually the driver's side wheel well so now you have both wheel wells
done i could honestly start sanding down this section but but since the paint is still fresh
on this side i don't want any like dust and stuff like that hitting that paint so in the meantime we
do need to actually remove the rear subframe mainly because we need to relocate the dmtl pump so we
can actually put the m3 exhaust and at the same time we need to obviously get rid of the suspension
because we won't put the m3 suspension we want this thing literally like as you guys can see
it's completely stripped front end like literally everything we want everything from the m3 to go
onto this car so uh yeah i guess the goal is right now i'm going to try to drop it little by little
it is a little bit sketchy right now because all the weight is in the back of the car this thing's
not even sitting on there so i'm gonna probably take my time trying to lower this so that i can
actually start working on uh releasing this rear subframe and guys about a day later we pretty much
got everything disconnected we had the brake lines disconnected the e-brake disconnected i mean at this
point we could pretty much just drop the subframe i was gonna do it last night but then uh i don't
know what happened with the quick jacks i think all the weight sat on these two wheels and then
one of the quick jacks failed and the car literally almost slid into the fence and we would have we
would have had to scrap this project but thankfully thankfully i was able to save it we do have the
front suspension out we will be removing the rear suspension pretty soon now this is a pretty
sketchy setup but in the meantime guys we have the front frame rail painted on this side and on this
side as well so the goal is right now i want to get this entire engine bay sanded while the
temperature of the outside is really really really nice when i say temperature i mean weather it's a
good time right now for some paint so i'm gonna go ahead and get all this stuff sanded down get it
fully prepped up start the painting process on this entire engine bay because later in the day
when it's actually super hot then we can actually drop the rear subframe i don't really care we can
do that whenever but guys if you also noticed that i had barely any paint on there i literally
just dabbed a little bit of orange paint on there um i really didn't really care the primary focus
is in the wheel well but anyways let's go ahead and start prepping this engine bay because i'm
so excited to see this portion right here become orange well guys uh time for the clear coat and
safety first and just like that guys we have the full engine bay finally painted i noticed that
the cans that come with clear coat and paint in the same can um wasn't as like bright and clear
and gloss as the the paint and clear separately so what i went ahead and did actually is actually go
over this entire section with clear coat and this side clear coat as well so it all actually matches
and guys this car looks so so so good right now i mainly focus my paint cans because this took me
five paint cans for this engine i think actually no six paint cans for this engine and you guys can
see this section right here still has some darker spots in there and that really doesn't matter
mainly because originally the paint back there wasn't perfect anyways and this all gets covered
up by heat shield so all of this stuff right here other than like this section so this section forward
all of this metal gets covered up by heat shields so i really didn't really care if it was absolutely
perfect back there um as long as there's paint on that that's perfect as long as it's gloss it's
perfect it at least shows that's the color that we're going with and then as far as this whole
tower brace and everything it looks absolutely perfect this section right over here we do need
to sand down uh this like over drip of clear once we do that it's gonna be literally perfect guys
like this thing came out way better than my expectations i'm super happy with the results i
mean you guys just check it out it looks so good um the vin number we do need to actually uh scrape
that out but hopefully when everything actually dries up but again guys very very happy with the
results this is something that i didn't think you can do with just some cans i mean this is the
highest quality can so far um you guys can see how many cans i used over there um just those cans
like in a bunch right there what is that two four six eight ten twelve twenty five bucks a piece
we're looking at three hundred dollars in cans to do pretty much this entire engine bay and the wheel
arches now that's a lot of money honestly to do it yourself but at the same time the results i'm very
happy with it because of the quality of paint now honestly guys um after doing this and learning like
the steps and the clear coat and the paint and everything i think the next time we're going to
paint something on our cars we're going to end up getting battery died but uh what i was trying to
say um next time we're going to try to get a compressor and a paint gun um now honestly with
the results that i got that's pretty much like that's amazing considering that was cans like
honestly like if someone looked at that engine bay that looks like it was painted professionally
it really comes to show you guys that the proper paint can really come out with the best results
but in terms of cost effectiveness um i think yeah next time what i was trying to say before my
battery died was if we actually get a gown and mix the hardener within it and just you know get
the the compressor and everything that's like a $500 setup i recently just spent over a grand for
my welding setup you guys saw um for the supra so i was like i don't want to spend a whole another
grand right now like right right now on a painting setup and honestly i really want to see how cans
would work and guys that is spectacular let me know down below what you guys think of the results but
uh the goal for right now is to drop the rear subframe out of this car um just so we're gonna
be 100% done with this car we could direct your focus towards the m3 so without further ado i
disconnected pretty much everything we needed on this car um like the the e-brake lines the the
brake lines and everything else the the drive shaft everything not to mention we disconnected
all the cables for the sensors so hypothetically we should be good to go let's just go ahead and
drop this subframe now that's what i'm talking about guys yeah buddy and just like that guys
that is gonna have to conclude the video um yeah we've made so much progress in the e91 is literally
ready to start taking apart the e90 m3 in the next video so if you guys are excited for that make
sure to smash that like button if you guys excited to see mocarita over here relax girl make sure let
me know down below guys did we go with the right color i think we want the absolute best color but
let me know down below guys what you guys think but without further ado i love y'all so much
remember to stay humble i'll see y'all in the next one peace out