
Alla Prima: Painting in Oils from General to Specific
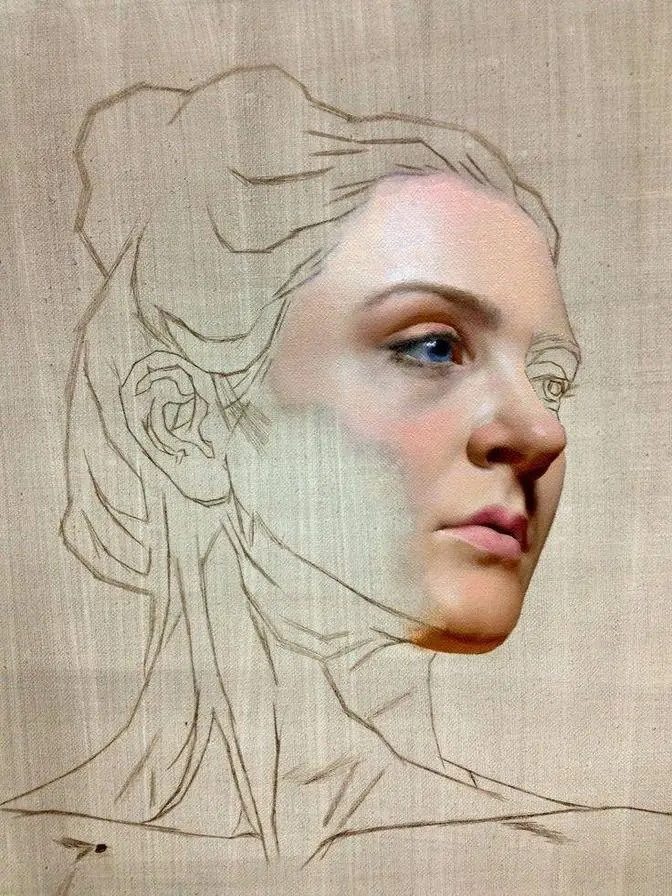
#GJWart #portraitpainting #portraitart #oilpainting #oilpaint #potrait #painting #drawing #art #arts #traditionalart
AI GeneratedMay contain errors
Video Summary
AI GeneratedThe artist demonstrates an alla prima portrait painting process, emphasizing a \"shadows-first\" approach to establish structure and value. By prioritizing construction, alignment, and temperature over immediate likeness or detail, the artist creates a flexible foundation that allows for adjustments to the gaze and features in later stages.
Okay, so here I'm starting with the warm green mixture,
using mostly phthalo green and transparent red oxide.
And in the right corner of the screen,
you can see what actually I see when I squint,
when I squint heavily.
So this is what I tried to represent
and in the very beginning of the process.
So these dark shapes, they will work as a wireframe
for both for composition and for the likeness,
for the representation of the head.
So on this stage, the most important is just
to create representation of the shadows, as being said.
And the placement of the features is,
the size is not so important,
although the placement and the alignment
of the features is really crucial.
Because I don't want to indicate,
I don't want to place the mouth off of center line,
for example, or I don't want to place the eyes on the line,
which is not parallel to other constructive lines
in the head.
So mostly I just focused on the general
and basic things now.
Like you can see that distance between the eyebrows
is way more narrower than I see it on the photo.
It doesn't matter because I'm going to paint over it anyways.
What is really important is just the placement
of the most crucial features and landmarks of the head.
As usual, I use, I work on the oil ground panel.
So it makes easier, it is easier for me just to erase
and to move paint around.
It is why I prefer to work on such panel at such grounds,
oil ground or lead ground, both panels or canvases.
So now I've started to feel the approximate colors already.
I just squint and I see just desaturated pale pink
and yellow shapes in the lights.
And my goal is to feel everything as soon as possible.
So I don't want the ground, the color of the ground
of the canvas or of my panel to distract me
from judging the values in the head.
As you can see, I work with my favorite palette now.
Two yellows, one is really bright and high value
and second is darker in value and also very strong in chroma.
Transparent red oxide, vermilion, alizarin crimson,
ultramarine blue, tallow green and cerulean blue.
And in the beginning there was an umber
just below the cerulean blue.
So I've mixed my initial greenish brown using umber,
transparent red oxide and tallow green.
So you see the point is to map the shadows
as soon as possible.
And it makes half of the construction already done.
So when we have these shadows,
it doesn't really matter the actual color of the shadows.
What is really important is to keep the temperature
of the shadow the same as temperature of the shadow
in our reference.
So the shadows are relatively warm,
so yeah, it's like I do the same.
Even if I use green, I mix it with a lot
of transparent red oxide to make it warm green
or greenish brown type of color.
The muzzle of the mouth, lips, the nose, the eyes,
everything is slightly bigger than I see and than I need
because I'm going to paint in these areas,
going on top of them with a lighter mixture.
So I can refine the shape, I can bring back the likeness
and I also can just adjust the placement, the shape,
the centerline, everything without repainting,
rather just going with the next, with the upper layer.
And the point is that the lights are going
to be thicker anyways.
So I keep in mind that the lights are going to be thicker,
there will be more paint.
So I prefer to start with a shadow first
because I like to keep the shadows
as transparent as possible.
First to reduce the glare in my painting
and second, which is probably even more important
to have textural variety in my artwork,
which is pretty nice effect.
So now the modeling of the muzzle of the mouth
and you see I'm making the lips thinner all the time
because they've been really, really thick before
and they are going to be thinner later.
So now I focus on these distances and relationships
between the feathers, the lips,
and the lower part of the muzzle of the mouth and the chin.
And if we squint and if we analyze,
we can see that it is just an arrangement
of different triangulars.
And when you deal with a simplified forms,
it is way easier to make decisions
or just to find out the structure.
And sometimes it's very helpful just to try
to explain to yourself what exactly do you see,
like the properties of triangulars, the angles,
the distances between the corners and et cetera.
So here I continue the modeling.
Still the same brush, long, flat ivory brush from Rosemary.
Ideal for blocking, ideal for big, bold decisions.
And to be honest, I don't really care about the details.
I don't need them.
All I need is just the proper foundation,
proper structure, mostly with values
and understanding of the planes.
And each plane, especially in the light,
should be slightly different in chroma and temperature.
So I always try to break it down to certain checklists.
And in my mind, I constantly ask myself these questions.
The value, the shape, the temperature,
the actual hue and chroma of each mixture
or each plane which I'm painting.
So now I move towards the eyes and the forehead
and what is going on is just a refinement
of the transitional halftone,
which is just next to the core shadow.
And I try to implement the warm,
cool relationships already.
Reinforcing the shadows.
I keep in mind that the nose is going
to provide the darkest dark
because the nose is the nearest part of the head to us.
So it means that the shadows in the nose,
especially occlusions and the beginning of the cast shadow
are going to be darkest dark
because the rest of the shapes
are situated slightly on the distance.
So due to atmospheric perspective,
the shadows in the ears, for example,
the shadows are going to be slightly lighter
and slightly cooler.
Now with the lower eyelids,
I try to reduce, to make the eyes slightly smaller.
And also I'm preparing myself to change the gaze
and it is already changing as you can see.
And it is why I like this approach so much
because I have freedom to change the tilt,
to change the perspective, to change the gaze.
Because if I'm relying to my reference too much,
if I want just to copy what I see on the photo or in life,
I will end up sometimes making weaker painting
but spending more time and effort.
So I prefer to process the image
instead of just trying to reproduce the information
which I have in my retina already.
Now with a long comb, Eclipse brushes,
I smooth everything.
And I try to make my brush strokes vertical
because they are reducing unnecessary glare.
So if you have this problem when the glare is too strong
and sometimes it's kind of a random
and annoying glare on your canvas,
try to take soft flat brush or fan brush
and gently move it down,
make some down strokes to reduce this type of glare.
So now I'm revisiting the shadows.
First, just to redesign them in certain areas
to make them better, to make them more correct
and just to make them darker.
Because in the beginning,
there is no point for me to jump into darkest darks
because what I really need is just relationships
and some type of transparency in the shadow,
as we discussed.
And now I can go in certain areas
to make certain shadows darker,
like in the hair, for example.
Again, I'm revisiting the lower part of the face
because for me, it is most difficult
and mostly sophisticated part.
So many small shapes, so many small planes,
subtle planes changing.
So normally I spend probably half of my alla prima time
on the mouth, nose and the chin area.
And it is also greatest challenge for likeness.
If you paint alla prima
and you feel like likeness is going in and out,
like you're losing it,
you're finding it back and you're losing it again,
try to not rush and do not overthink things.
Try to focus on proper construction,
alignment to the center line,
placement of the lead marks of the face and the values,
subtle changes in small planes
that are really important for the likeness
and keep it like this.
And sometimes with the second layer,
you can easily fix likeness issues,
which is really difficult is to fix construction issues,
especially if the problem in construction is very severe.
But the likeness, sometimes just what is enough
is just to fix some small relationships in the mouth
or in the brows or in the eyes.
In any situation, I prefer proper construction
and nice design to likeness.
Now I try to find the values in the transitions
in the lights.
You see that they are slightly darker,
the cheekbone areas, side of the head,
and also that side of the eye socket,
they're slightly darker and they're also cooler.
And I try to find the same relationships
to establish them on the canvas.
So now it's time to introduce some lightest halftones,
not even lightest lights, not even highlights,
but lighter halftones.
Because before, everything was built with using shadows
and halftones like transitional halftone
and normal halftone.
Now I mix cooler and lighter halftone in the light.
So if we say about five value structures,
I have two values in the shadows.
And now I have, I think, two values in the lights.
And the highlight will be the lightest value.
Redefining small shapes in the brow ridge.
And at this point, the structure is there,
and I can slow down and try to make it even better
to prepare it for the next layer.
Because normally at this stage,
I can make a decision about the future of the sketch.
So I can finish it a la prima,
or I can decide that I will work more on top of that
with the impastos, with a thicker paint,
with the textures, with more modeling.
So here I thought that it will be nice
to have more finished portrait in the end.
So more refinement, more smoothing everywhere,
like the hairline.
I don't want to be too abrupt to contrast.
So I just use some soft brush with a light mixture
on top of the shadow, just to make it optically look softer,
to blend it with the skin tones a little bit.
So now it's time to model the nose.
And just a few highlights to begin with.
And sometimes I can place the highlights,
and later I just blend them inside
and place another highlights on top,
better, properly,
and sometimes with different temperatures even.
So for me, I prefer to have some freedom
when I paint a la prima.
I really like to do something,
and if I don't like, or I want to change something,
I just blend the wet paint into previous layer
because everything is very wet,
and I can just blend things in
without making it look dirty.
But for this, I focused all the time
on the proper temperature,
because if the temperatures are wrong,
the result will look very muddy in the end,
and this I don't like,
and I recommend you to focus on the temperatures.
So you can make certain mistakes,
or you can deviate in value,
you can deviate in actual color,
but better to stay with just general temperature,
warm, cool, neutral, something like that.
So now it's time to finally model the eyes.
And why I did it in the end?
Because I don't have actual reference
for the eyes which I want to paint,
because on my photo, the eyes are different,
and I decided to change the gaze
and to change the color of the eyes.
So for that, first I've built the actual structure,
the everything.
So now I don't look at my reference,
just maybe a little bit in general,
but I focus only on my canvas.
And I want to model the eyes
as good as possible for this layer.
So when it is dry, I can focus on modeling
of subtle forms or textures,
and then making portrait even better and continuing.
So this is absolutely important for me
to have nice representation
without going into details at this stage.
So this is actually the end.
And just last thing remains,
and this last thing are the highlights in the eyes.
And for highlights,
I am using just the tip of my palette knife like this
and that.
So this is the end.
I hope you liked it and happy painting.