
How to paint a male portrait in oils? Instructional video by MFA Sergey Gusev.
May 7, 2026
Hi, my name is Sergey Gusev. Welcome to my portrait tutorial.
Today I'm going to show you how to paint a portrait of a young man in oils on canvas.
You can just watch it, hopefully get inspired, and paint your own artworks.
Or you can also paint alongside with me. In that case, you need a canvas, oil paints,
The size of my canvas is 60 x 80 cm, which is about 24 x 30 inches.
But you can always choose any size you wish. I don't want to advertise any oil paint brand,
so you can choose any one you personally like. For this tutorial, I'm going to use Van Gogh
oil paints. The list of them you can see on the screen. We also need a medium.
I'm going to mix Demo Varnish, Linseed Oil, and Turpentine. But you can use any other medium
you like. Don't forget to pick up a palette and brushes. We need 2-3 bristle brushes,
flat middle size, a couple synthetics, also flat small size, and one tiny synthetic with a round
pointed tip for the very small details. And the first part is called the underdrawing.
I suggest you having a graphite pencil and eraser. Okay, I think we are ready to start off.
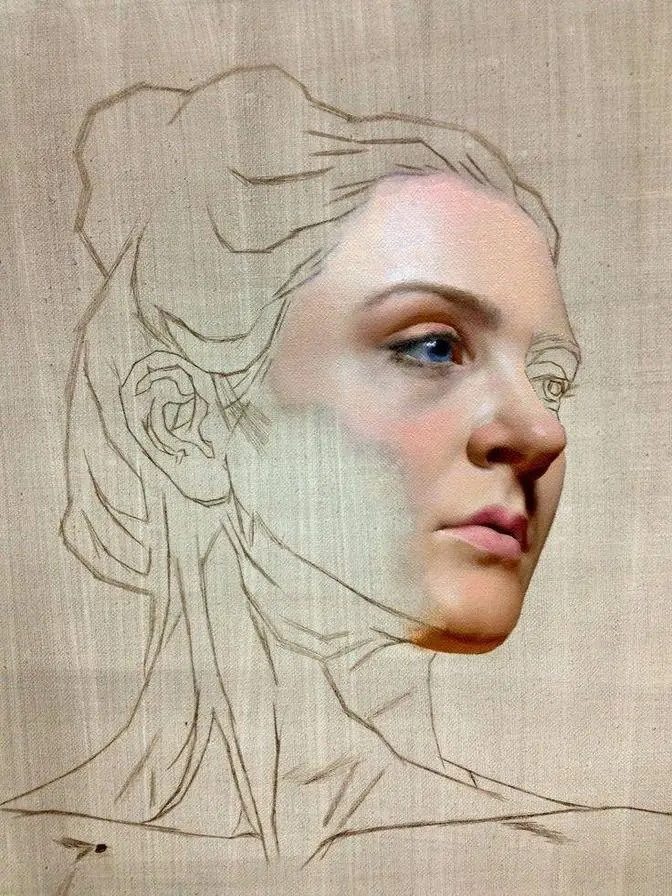
So, let's begin. The first part of this tutorial is called the underdrawing. I start working on
this portrait from a very quick sketch on canvas with a graphite pencil. The size of my canvas is
60 x 80 cm, which is about 24 x 30 inches. I have stained my canvas before painting.
I used pure ultramarine and turpentine to paint over it to slightly darken the surface
and give it a cool shade because the entire painting is going to be quite cold.
After that I let it dry for one day and now it is ready for painting. You can start working
on the drawing with either charcoal or a graphite pencil or even a brush,
which needs some experience of yours. If you don't have enough experience, I would suggest
using a graphite pencil, but do not take a very soft pencil. I personally prefer using HB or B
pencils because they are not very soft. In the beginning of any painting I care mostly for two
basic things composition and proportions. If you do not do it at the beginning, then later,
when you start painting, it's going to be very difficult to change the proportions.
You will have to remake the entire portrait, which takes a lot of time and doesn't make a
lot of sense. I always first outline the overall silhouette of the head, the eye sockets, but not
the eyes or eyelashes, only the big shapes. I also outline the nose and shade a little the
core shadow on the tip of the nose to add some volume. I do it with a few very light lines
and don't press the pencil hard. I do it just because tone helps us to separate one plane
from another one. And now I quickly start drawing the eyes, both of them almost at the same time.
I draw the irises, pupils and eyelids. Right now we are not working on the details,
we only outline the overall shape of the head, the big silhouettes and proportions.
There are many ways of making the underdrawing. Some artists make a rough sketch,
drawing every even tiny plane of the head. In my opinion, it doesn't make a lot of sense to spend
so much time on that. I personally never work like that. I like making quite a quick sketch,
set up the right proportions as I mentioned, make a good composition,
work on the details a little bit and then spend more time on paint, finishing the details while
paint. But I do not deny any other method of drawing. You can use any other one you personally
like. I'm darkening the shadows very lightly to add some volume to the underdrawing.
And highlight the borders between the light and shadow. Now you see that the shadows added
some volume to the head. The head isn't simply flat anymore. We already see lights and shadows,
so the volume slowly shows up. Once in a while, check the proportions.
Especially when you start painting, don't think only about colors and paints.
Sometimes go back to the drawing, check the proportions of the large distances.
They also affect the resemblance. On this picture you see the main planes of the head.
These planes turn towards the light source or away from it, getting either lighter or darker.
Thus we perceive the volume. You can slightly darken the eye sockets,
just a little bit. Don't spread the pencil too much. Now I'm finishing the underdrawing.
It is time to move on to the second stage. At the end I'm making the final touches here and there.
I adjust the inner corners of the eyes, the tip of the nose and nostrils. At the end of the drawing,
check the proportions once again. Make sure that the width of the face and its height
match the original proportions. I think that we can finish the underdrawing and begin blocking in.
And now I'm gonna tell you what paints, brushes and mediums I will use for paint.
I also must say that if you use charcoal for drawing, it is necessary to spray it.
Otherwise it will mix with the paints and make mud. If you use a graphite pencil,
it is not necessary to spray it. Especially if you haven't used a lot of graphite.
I'm not spraying my underdrawing. Now I begin to work on the second part of the portrait.
This stage is called blocking in. I'm going to explain you how to do it.
Usually I make an underpainting, but this time I stained my canvas instead.
So I will skip the underpainting stage and start blocking in. First of all I'm making my palette
ready and put paints on it. I use a limited palette, only seven colors. So you see all my paints on my
palette. And now I begin to mix the color for the shadows in the eye sockets. There are different
ways to start painting. In this tutorial I start from a detail, from the eyes. Because I'm not
making an underpainting and in the beginning I want first of all to find out how dark or light
the portrait should be. Therefore I start from the darkest area, the shadows in the eye sockets.
After I paint it, it's gonna be easier to paint the rest of the head.
By comparing other shadows and semitones with that dark area. As this time I'm not
making an underpainting, I can use white paint right from the beginning. I start
from mixing a few dark colors. Raw umber, burnt sienna and a bit of ultramarine.
I get a fairly warm brownish color, which fits very well for the dark warm shadows in the eye
sockets. It is very easy to make the color lighter or darker by adding more or less raw umber or
burnt sienna. It is time to paint the pupil and iris. The pupil is simply black. I do not like
using black paint so I choose the darkest colors like raw umber and ultramarine and
mix them together on the palette. I will be talking much more about the eye structure later.
Right now I don't care so much about the small details. But I keep in mind that the sclera
is not simply white. Usually it has a tinge of blue or yellowish color and it changes in tone
when turns towards or away from the light source. In this case the light comes from above which
means that the forehead will be light and cold. When I work on the lower eyelid I add white paint
to make the color lighter. I also add a bit of cadmium lemon and cadmium red.
Generally when you are painting don't forget to draw at the same time. Remember about the
construction of the details. Remember about their silhouettes. Don't forget about the proportions.
And once in a while go back to the drawing. If you made a good underdrawing in the previous stage
now you feel quite confident blocking it. Some beginners try to make a very quick drawing
and immediately start painting. I don't think that all the nice paints will make a great portrait.
It's not working like that. I'm mixing titanium white, cadmium lemon and red to get a cool tint
and apply it to the nose and forehead. At this stage the painting looks a little rough
but we can always soften the brush strokes when we begin the next stage of the painting.
You will see that it is very easy to make the skin tone smoother but now it is more important
to get the right tonal values and construction. It is very important to care for the tonal values
when blocking in. It means that we should pay attention to the tonal difference between the
Now when we are working on the chin we must understand that it is a little further away
from the light. So it will be warmer than the forehead, cheekbones and the tip of the nose.
Now I'm darkening the hair. Don't make it simply black. I picked up a little bit of amber and
ultramarine. I keep the hair as one big dark spot. I will talk more about it later on. Now I just
darken that area to surround the light skin tones of the face with darker colors. Paint the ear a
little bit. You can see that I use quite a dark color mixed of amber, burnt sienna and a bit of
I am not drawing the ear right now. I care mostly for the right tonal values on this stage.
Now it is time to start thinking about the head's construction and soften the transition between
the light and shadow. Remember that the border between the light and shadow is always darker
than the other part of the shadow because it is closer to the light source. The rest part gets a
lot of reflections and also goes a little further away from the light source. Therefore it is lighter.
Let's continue blocking in the lips. I start painting the lower one. The central part is
lighter. It comes out closer to us. The corners of the mouth go away from us. I slightly darken the
corners of the mouth. It makes the lips look more volumetric. Now I'm finishing this part
of this tutorial. Somewhere I put the final touches. So you see that we have a big spot
of the light. Another spot is the shadow. In this part we worked a lot not only on the colors but
also on the tonal values and the volume of the hair. I think it is time to start working on the
details of the face and talk more about their construction, anatomy features and finish them
quite well. I start a new part of the portrait. In this part I continue working mostly on the face.
I'm going to spend a lot of time working on the semitones and facial details.
I start working on the portrait from the core shadow of the face correcting its tonal value
especially on the border with the light. At the same time I'm softening the transition between
the light and shadow. I'm using all the same colors from my palette as in the previous part
but this time I'm going to paint thicker. Put more paints on canvas. When you work on a portrait
especially if it is your first portrait or one of the first I would advise you to look at the
paintings of the old masters especially if you have some favorite artists. You definitely need
to borrow some of their techniques. I keep working on the skin tones. Now I'm painting the cool
semitones of the face. You see that they are slightly bluish not very warm not yellow ochre
mixed with white. You can even make the color slightly stronger. Sometimes it is possible to
use stronger brighter colors. Make the shadows warmer the lights a little colder and then closer
to the end of the painting you can correct them if it is necessary. Soften or glaze as I have
mentioned before. The main thing now is to understand the basic rules of painting and then
when you understand you can apply them in any portrait even when you do not have video
instructions. We can see tones more clearly when a direct strong light falls on an object or subject
like in this case. We can definitely see the lights and shadows because of the really big
which is called contrast. When you work on the tip of the nose it is necessary to understand
this construction. As I said in the first part when we start painting we have to draw
at the same time. So now when I'm painting I also draw of course. So don't forget about the
features. The eye is a sphere. There is a pupil in the center of the eye surrounded by the iris
and the cornea which is transparent. We do not see it but we see only a highlight on the surface
of the cornea. The eye is surrounded by the upper and lower eyelids from above and below.
They lie on the spherical shape of the eye so they are also semi-circular. So when you paint
the eye remember all the time that eye is one big shape and all the details the pupil, cornea,
eyelids align on this large form and they all either turn to the light source or away from it.
Also don't forget that the upper eyelid casts a small shadow on the surface of the sclera and
iris. Therefore the sclera is a little darker from above than below. Don't forget that the eye has
inner and outer corners. The inner corner is closer to the nose. Usually it gets a little more light.
Now the first part of this tutorial is slowly coming to the end.
You see that generally I have made this portrait quite finished. I have painted the big spot of
the face, hair, worked on the background and clothing. In the last part I will continue
talking about big spots, light and shadow. I also will show you how to work on the very small
details, how to better complete them, which colors and brushes I use. I will paint the eyes,
nose, lips and ears. And of course I will devote more time to each detail, its construction
and individual features. Now I'm going to dry the painting up for one day
before moving on to the last part. So I begin the fourth part of the work on this portrait,
the last part of this tutorial. I will show you how to work on the details, how to complete
the very small details of the portrait. Now you see that I'm working over the lower lip,
correcting its color, adding cooler tints. When I paint the lips, as you can see, I keep the
corners of the lips quite soft and therefore the corners of the lips go back a bit. I have already
said that the central part of the lips goes forward. If you look at the portrait on the
head in profile, you will see that the central part of the lips comes forward compared to the
corners. As I said, the shape of the lip depends on the shape of the teeth and jaw. Its shape
changes, so its color and tone change too. Don't forget that the eye is a large form
that consists of many details. All the details obey the large shape of the eye,
so it does not matter what you draw. The eyelid, eyelashes, pupil, iris.
We must remember about the spherical shape of the eye, because all the elements of the eye
turn to the light or turn away from the light, becoming either darker or lighter,
warmer or cooler. Now I'm slightly adjusting the iris, because this part gets a reflection
from the lower eyelid. It becomes a little lighter, though it still stays in the shadow.
The upper part of the iris gets darker because the upper eyelid has a shadow on its surface.
When you are working on the tip of the nose, again, remember about its structure.
It is important to understand very well that its lower part is in the shadow. It is darker
than the upper surface. The same happens with the nostrils. The nostrils will be much darker
than the wings of the nose, because the light comes from above. Remember this. Choose warmer
colors for the bottom of the tip of the nose and cold colors for the upper surface and the wings.
Now I'm back to the other eye and start painting it. I want to adjust the shape of the iris.
You have to check all the time if the eyes look in the same direction. Also remember,
when you paint the iris, that inside it is lighter than on the edges. The edges
are always darker and softer. Add a little white, ultramarine and raw umber to paint the reflection
in the iris. Now I start working more on the hair. In general, we should work on the hair
only when we have its big spot, because if you start drawing each single hair,
you risk losing the integrity of the big spot. Though the hair looks quite dark, it also has
a light and shadow. Now I'm going to work some more on the eyes. I slightly darken the eyebrow
and start refining the pupil with pure umber. Remember that the pupil is the darkest part
of the eye and usually the darkest part in the head. Actually, the sclera is never pure white.
It has a tinge of either ultramarine or ochre and it also turns toward the light or away from it,
so it changes in tone. The eye is a sphere. There is a pupil in the center of the eye,
surrounded by the iris and cornea. The cornea is transparent. We do not see it.
We can see only a highlight on its surface. When you paint the highlight, don't forget that it is
on the surface of the cornea, which we do not see. The highlight comes always from the light source.
Sometimes it is difficult to see the tonal difference between the areas that are very
close to each other. Therefore, beginners usually start learning basics from drawing
plaster casts, which are white, and so any tonal changes are very visible.
So, look at this picture I took with the same lighting as it is on the portrait.
We definitely see that the darkest spot of the tip of the nose is the nostrils. The border
between the light and shadow is also quite dark, but lighter than it is in the nostrils.
The reflection in the shadow is much lighter than the border. The cast shadow is darker than
the core shadow in the place where it starts from, but it also gets a reflection in the central part.
So, all these things are very close in tone, but still are a little different from one another.
At the very end of this tutorial, I am finishing some tiny things, which are almost invisible.
I am making the portrait more and more alive, correcting the shape of the nose and nostrils.
Then I am going to spend a few minutes on the lips. Now it is time to finish this painting
and take a look on how it turned out. You've just watched my tutorial. I hope it was inspiring
and helpful for you. If you have any wishes for my upcoming tutorials,
if you want me to change something, add more information, examples or explanations,
please contact me via email, send me your feedback and I promise I will do my best
to make tutorials better and more helpful. You could also help me out and share this video
with your friends on your favorite social network. Don't forget to subscribe to my YouTube channel,
find me on Instagram and Facebook. I wish you good luck with your artworks, guys, and see you soon!