
How to Mix SKIN TONES | Oil Painting Tutorial | PORTRAIT Study for Beginners onwards.
Apr 21, 2026
Hi there, thank you so much for clicking the thumbnail and being interested in my work.
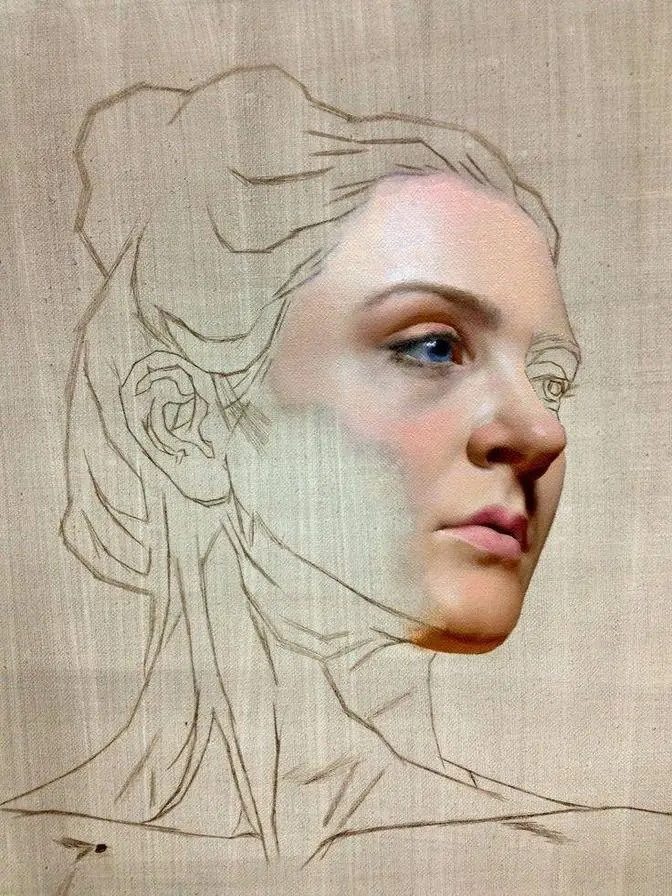
In this video I share with you my techniques and tips on how I do three stages to create
this finished skin tone study. I go through the underpainting, the rich colour stage
and the final detail stage. So be sure to watch it right through till the end because here and
there I'll be slowing things down in real time so you can take a closer look. So let's dive in
and take a look. As this is a study I'm just using a simple board which is MDF with two coats of
Michael Harding primer, non-absorbent primer. I primed the back to seal it to keep it sort of
moisture resistant. The second coat of the primer was a mixture of acrylic ivory black with the
primer itself to create that tone to work on. Now I'm just showing it at this stage but the
outline was done freehand but if you want to know more information on how to do the
outline freehand I've got loads of videos in my channel. I'll leave a link in the description
below for you. Here's a look at the reference image I'm using on my computer. It's of my great
niece Olivia. It's just a cropped image just for this study. I'm using Michael Harding paints
mainly. There's only one that isn't here and that's the cadmium red which is a Winsor & Newton
artist quality. I'll give you the names as I put them out so titanium white to start with,
this is lemon yellow, yellow ochre, cadmium red, elysium crimson, ultramarine blue and burnt umber
and the medium I'm using is the Liquin original. I'll show you how I mix then. So it's cadmium
red and white to start with then a cadmium red and yellow ochre then a yellow ochre and white
on its own then I mix the green by using yellow ochre and ultramarine blue adding white to that
and then a brown and red and then blue and brown and that's how I lay my palette out.
Now I use three brushes of each size there's three hog hair brushes number fours three number
twos. I use three because I use one for the lights one for the medium and one for the darks
so it keeps everything nice and clean and not muddy. Just for the details at the end of the
underdrawing I'm using these three number two synthetic flats. First thing I did was just to
ghost the outline a little by using the Faber-Castell kneadable razor just starting off with
the number two hog hair round putting the white in first I've added a little bit of lemon yellow
to this just to give it a little bit of zinginess. Sometimes just white on its own can look a little
bit sort of dead so you just add something with it so I used a bit of a lemon yellow with it just
to give that zinginess like I do when I do my pastel work and then what you do from there is mix
in then variations by just finding that color on your palette and then just just just dab it on
really and just work with it. I mean here I'm just adding a little bit more pink to it and then you
see that green there I'm neutralizing a little bit with a little bit of that green put a little
so you have to play about with things and it's just a case of just going through
blocking it in to start with this is the basic stage really what I'm doing as well is is actually
checking my drawing as I'm going as well because I've done this freehand so I'm always checking
making sure just like I do when I do my pastels it's just a case of having a go and mixing it
really and just seeing what happens but if it's too bright just add that little bit of
green now if it's a light pink you're putting on you want a light green with it to sort of
desaturate it now if I need to change the color what I do is I get a piece of kitchen towel and
just wipe your brush just turn it around just to get take that excess pigment off so it helps you
to control what you're doing then now I'm just using a mid-tone brush so I've swapped brushes
and I'm working in now some a bit of brown and red trying that see what that's like
so it's burnt umber red mixture here's the view of the palette again just showing you the brushes
you know the three different tones for each brush you've got your light your middle tone and your
darks and it's just a case really of finding those colors and then blending them together
onto your surface so you're forever moving from one brush to another so it's like the mid
mid brush and then the light brush you're only using the really dark ones for like the shadow
in the nostrils there but basically that's it it's just a case of just keep playing just keep
moving the color around just if it needs a bit pinkier just add a little bit more of that cadmium
red a bit more white just to get it sort of to the right tone and then you're on to the
mid-tone brush again and so what we're doing and you should continue a little bit more then
at the side of that so it's a case of just um keep keep persevering really with it
now I hold my brushes I put them in between each finger so the smaller brushes are separate then
to the big ones reason being if you cut if you grab them together you're just going to get paint
all over those big brushes it's going to speed this up a little because I'm conscious of the
actual time I've got all the three stages to go through yet so basically it's just going
through everything now just mixing up the colors that are similar to it it's all intermixable
just mixing the warm red with the yellow ochre and white and then just using a little bit of
green here and there to desaturate it I'm using the green mix which is the ultramarine blue and
yellow ochre and mix it in with a warm red now to create the shadow rather than using that brown
it seemed to be a lot fresher and I went around everywhere then doing that similar sort of thing
so you're mixing in these sort of tones all together and they're all intermixable because
the green is ultramarine blue and yellow and everything sort of is very subtle
and it can be changed very subtly just mixed a peachy color for the background there using a
flat brush number five covers the area more and it makes it softer actually using them brushes
for the background now for the underdrawing the lips I'm using a bit of blue here to mix with
the warm red which will create a cold red so that's what I'm doing here and then putting that
into the lips then so it's slightly different to the skin tone where that's warm and in some
places on the lips it's quite colder looking so you have to play about with just adding that
little bit of blue you could use a little cold red if you wanted to but for the underdrawing
I just tended to pour a little bit of blue with it best keep wiping your brushes as well so you
make sure you haven't got too much pigment on there so it makes it easier for you to move around
and easier to mix as well because you've if you've got too much pigment on your brushes
you're going to take ages to try and lighten it with a white so you have to take that pigment
away before you can mix white with it if you're enjoying this video why not subscribe it's
absolutely free and then you're sure not to miss any of my future videos see I'm not really that
interested in getting the details correct at this stage it's just getting everything into
the position similar to the technique I do with pastels it's just a matter of getting all the
shapes in the right place ready for the next stage I'm not mixing a lot of liquid with this
using a dark brush now actually you see there so you keep changing those brushes so make sure
everything don't get muddy and then just trying to work on these shadows here so I'm using the
green and the red together and just a little bit of liquid you don't want too much liquid
for those deeper shadows there I use burnt umber ultramarine and a little bit of red
so it's just a case of swapping brushes over just making sure that you don't
get too muddy on the brushes so be aware what's light and what's mid-tone and what's dark
and basically I'm just like I say just shaping things up of the underpainting stage the next
stage will be the rich colour stage right so I left the first stage the underpainting for about
three days for dry and then I'm starting now the rich colours now the palette is laid out similar
as you can see from the previous palette so no need to go into that but what I used to mix
the background colour was Elysium Crimson and Yellow Ochre to make a peachy colour and it's
a cooler colour than the skin tone because I'm using a cold red and so that helps to sort of
bring the the warmth out then having a cold against warm skin just using a smaller brush
against the skin tone there but I've not used a lot of liquid again on this background here
um just a small amount of liquid when I start putting the skin tones in there will be more
liquid mixed in with the mix to make it more translucent which I'll go into in more detail
later on in this video now for the rich colours of the skin so I'm using a warm red yellow ochre there
adding a little bit of liquid there just putting a little bit in not too much though
attempt to dab it onto the palette first the liquid and then you know take a bit more off it
then so rather than going straight in with what you get on your brush you just dab it on your palette
first and then just see how much is there before you mix it with your paint because you don't want
to put too much in it makes it too slippery then don't don't you don't you can't sort of work with
it now I'm desaturating it a little bit here by adding a little bit of green you can see what's
happening there just mixing the red and the green together and if you need it warmer just add a bit
more yellow ochre and that does the trick really it's just getting a balance between all the colours
you notice I'm not mixing it very thickly as well it's very thinly I'm just putting a little bit of
liquid in there but it's just creating translucent areas then it's more opaque in the bright areas
but as you get less and less brighter more towards the darker it gets thinner and thinner the paint
does here's a close view of me mixing a shadow up you have to keep playing about with the different
tones different tone of green against the red you might have to pull a bit more yellow in your
case of moving around and until you get it right if you would like to see this study as a real-time
audio real-time video please check out my patreon page for more details link is in the description
below now I'm just going to give you a taste now I'm just going to give you a section of it
and so you can hear how I approach it so slightly different to YouTube I've got more time to cover
things to white and then I'm going to create sort of like a light white area there I'll add a little
bit of lemon yellow in it just to create that a little bit of a zinginess with the white it's not
there to start with and then I'm going to move into the red now with the same brush but just
wipe it with a bit of a tissue I've got some kitchen roll layers just fold it up like that
and just keep wiping it in between picking another color so a bit of white and then we put that on
here
it's better if you want it a little bit warm you just have a bit of
yellow ochre with it just freshen up these areas first and it gives me an idea then
of the other the values then so I wanted to I'm trying to create a chroma with it as well because
um so I'm not trying to put too much white in so I'm mixing the yellow ochre and red together
make like a transparent mix on it so when it goes over what I've already done it'll glow a little
bit so that was a little taste of what I cover when I do do these videos in Patreon a lot more
in depth even the pastel one step by step is a very similar thing every you hear everything
and every choice I make step by step so please check that out if you want a more in-depth
look at my technique it's just a case of using different subtle colors just mixing it on the
palette but then just keep wiping your brush as well and to blend it in that way and also
using a dry brush in between placing the colors down here you can see me using the cold red now
just to put a little bit of cold color into them cheeks and what makes a difference then
the warm and the cold together it creates more realism as well
because the skin tone is not one shade it's all sorts of subtle differences just adding a little
bit more liquid with this as well and just scrubbing it in so it's very thin paint but
it's transparent because that Elysium Crimson is very transparent and what you've done underneath
shines through so it glistens a little bit so it gives it that sort of freshness about the
skin tone now for the lips I'm using the same again the warm red with a little bit of blue
just to create a cold red and see how that goes on and that's just a case of putting
here and there then some lemon yellow to mix in with it and and for the shadows you're using a
little bit of sort of the green with it as well but here I'm trying a little bit of Elysium
Crimson mixed with it as well so I'm trying two different reds so we'll try that in case of trial
and error and just having a go and then you can always sort of you know change it all and these
are the synthetic rounds I'm using here I think this is number four I'm using but just very very
small circles while I'm doing it similar to when I do my pastels you're creating that texture
you're not just putting a line in there you're just creating that sort of movement with the brush
to create the texture you're looking for and it's really important to get that softness
where the lips start and the skin is because if it's too sharp it'll look like plastic lips
so you really have to sort of make sure that everything's subtle so what you do is keep wiping
your brush make it a little bit drier and then you put your paint down wipe your brush and and then
just use that to blend it in now for the darkness in the shadow of the lips there I'm using blue
and Burnt Umber mixed together with a little bit of red in there just to give it a warmth
now here you can see how I'm mixing that vibrant red now by adding a bit of lemon
yellow with the red the warm red just to get that sort of zinginess to the that area of the lips
what I tend to do is mix in two places really I'm mixing on the palette and then I'm moving
it around then with a dryer brush on the actual canvas and if I need to change that red into a
colder red I just use neat red a cold red and then just mix that then with the actual warmer
red on the actual on the lip itself so you're sort of mixing in two places really and then if you
need to subtle it up just wipe your brush and then just use that dryer brush to blend everything in
if you're enjoying this video why not give it a like and share it with your friends it would mean
so much to me as this would help the channel to grow you might have heard this if you've watched
a lot of my pastel videos now a really important part of my method is my approach to how to connect
to the reference image and how to let go of the mind open the heart and just relax and just let
it happen the more you open up your heart and send this energy to the reference image you'll
be surprised how much energy comes back and then this energy goes through you out of your hands
and into your work now these little touches here it's very very thin paint using that very small
brush now I think this is number two brush and then just really subtly putting those shadows in
by using the green and red together making sure things are not too dark as well because you have
to be aware that the next stage is the glazing stage so it needs to be slightly lighter at this
stage so when you glaze over it creates that sort of subtlety of this lighter colour coming through
right now for the last stage which is detail and glazing I left this to dry for three days
and so it's ready now for the actual glazing now the colour is laid down the same on the palette
as previous stages I'm putting a very small amount of white mixing in with a small amount
of paint because it's going to be put on very thinly so I don't want to overload the palette
and then what I'll do is I'll mix a bit of liquid with this as I go along colours out
same sort of procedures I've done on the other previous stages but just adding that little bit
of white mainly going to be using these synthetic rounds for the detail stage but I will be using
hog air brushes here and there which you'll see as we go along so pop your medium on the side of
your palette like that so you can make sure you don't put too much on so I'm going to try and
liven up these areas here so I'm going to use just see what it's like putting it on to start with
just have a little play because it's all about playing really let's get some medium I'll stick
the medium there so I know where it is right so let's just try you can almost put it on
on neat I'll see how I go with it so I'm just scrubbing it in really just putting a little
bit in here and there you've got to be careful not to to make it too glowy because it's you know
it's actually skin tone at the end of the day so I'm just going to put a little bit of white in
there just to make it translucent mixing in the reds there as well just got to play it's just
going to make it makes it a little bit more glowy you see that's it you can see how that's changing
that already because the paint is so thin it's very difficult to see it on the brush so what I
like marks three for the darkest two for the mid-tone and one without the mark is the light
tone I really love doing this stage it's very subtle changes it makes to the actual painting
it creates that chroma but you can put that very subtle detail in and do the actual movement very
similar to when I use my pastels very small circles very small sort of marks creating that
texture but skin because the skin is not smooth it's not like plastic so you don't want to make
it too smooth but so so creating this sort of sort of random sort of marks very small little
marks here and there it makes a massive difference to the look of the actual skin tone and when
you've got your color down and you want to soften it up a little bit just wipe your brush and make
it a dryish brush and just go over what you've already done and just softening it up just moving
it around slightly here and there now my focus is on keeping everything as a whole so I'm looking
at the whole of the reference image and trying to create that oneness so I'm not trying to put too
much detail in because it can look a little bit separate if you're not careful so it's best to
always keep this awareness of of it being a whole so you're connecting to the whole of the energy
and then just letting it sort of just happen and not be focused too much on trying to get every
detail exactly the same mainly with the detail and glazing stage I focus on creating the correct
balance of the edges and chroma so some areas need to be softer some need to be sharper and some need
to be sort of glowier and some need to be more subdued so I'm checking all that sort of thing
all the colors how it looks how it feels comparing one shade with another one color with another
what glows more than another one and it's just getting the overall balance correct
now adding that darker shade in the lips is creating a more of a 3d look as well so it's
getting these these values right there's four lights four darks and a mid-tone so even though
you look at it and you think oh that's dark don't make it too dark it's got to be the just the right
amount of shade because if you make it too dark it can throw it out throws all the other colors
and the balance and the soft softness of everything out so you really have to squint your eyes to see
the values open the eyes to see the color and then just be aware of how it feels and just get that
balance now to get the softness i'm actually glazing now with a hog airbrush so i'm putting
very very thin amount of paint on there and then just going over the skin and it creates that sort
of freshness and aliveness to it so i'm using both the small brushes for the detail but the softness
i'm using those hog airbrushes now it's really important to put a lot of attention on actually
subtling the lips where it joins the skin because if it's too sharp it will create a like plastic
lips look so you really got to soften those edges at where the actual skin tone meets the lips
and the shadows is just important get that subtle shadow and there's a little glint just in the
corner of the mouth there which makes all the difference just adding those little details in
i'm just putting a bit of chroma in the nostril there because even though it's in shadow
it sometimes you can see the glow there and you need to actually put that in as well just to
create that sort of realism and it's just getting those shadows just right and at the right tone
that makes all the difference it's a very subtle stage this is it's it's quite interesting
and it does make a difference and you're forever just changing this sort of values putting white
in here and there and it's like it's transparent colour and translucent colour translucent means
a little bit of white so it's not transparent it's just half and half so it's just sort of
changing it up here and there and it's quite intriguing to just get that sort of feeling
and that aliveness and it just make this stage really does bring everything to life
now i'll just briefly go through what i did with the white top there i use that impasto medium
which is quick drying it's very thick liquid but it's actually a faster drying time so i'll mix
that with the white now i've added a little blue with the white to create a fresher white
and then to create the shadows i'm using alizarin crimson
ultramarine blue and a little touch of umber and that created that subtle shadow within that top
what i try and do is create a a feeling of reality to the work but not a detailed
replica of what the reference image is because it's more than just a copy of a photograph it's
a work of art so what you're doing is actually putting feeling energy and expanding on that
and enlarging on that rather than trying to put every little detail in here's a look at the study
at the correct angle rather than being in perspective on the easel thank you so much
for watching the video right through to the end please like and subscribe and if you want to see
more of my work how about checking out this video on how to create panels take care and bye for now