
Oil Painting | Ageing SKIN TONES and GREY HAIR study. Narrated Tutorial... how to mix colours & more
14 Video Views·Apr 7, 2026
Hi there, thank you so much for clicking the thumbnail and being interested in my work.
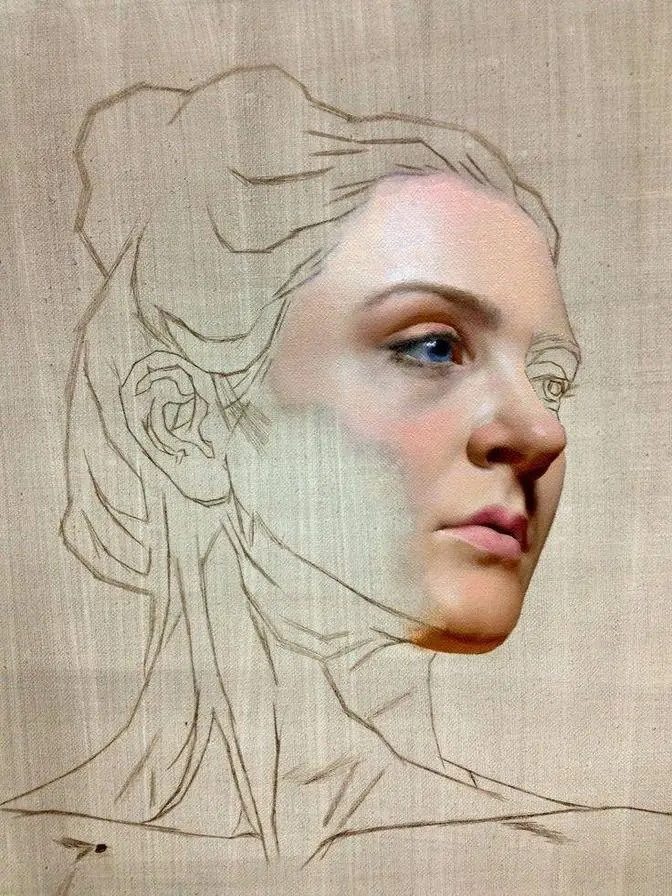
In this video I share with you my techniques and tips on how I do three stages to create
this ageing skin and grey hair study. I'll go through the underpainting stage,
the rich colour stage and the final detail stage. So be sure to watch it right through to the end
because here and there I'll be slowing things down in real time so you can take a closer look.
So let's dive in and take a look. Just running through the outline pretty quick,
I didn't want to spend too much time on this part of the tutorial, but I've used a quarter grid.
I mean it's a great way to learn how to do freehand. You start off with an inch grid,
two inch grid, three inch, then you end up with a quarter grid and then eventually end up with
a centre point. The quarter grid is close to freehand because you've got a lot of area there
to sort of find the location of things. And how I do that is use imaginary angles,
comparing one shape with the other, using my pencil on a horizontal plane, also on a vertical
plane as well, to find where these areas are. Now there's plenty of videos in my channel that
explain how I do the freehand method. I'll show a couple of examples here for you to check out if
you wish to. I'll put the link in the description below for you. Starting off with the palette then
using warm red and white together, yellow ochre and warm red, yellow ochre I'm tinting with white
again, umber and red, and ultramarine blue and brown for the shadows there. Now for the
desaturation of the skin tone I'm using green, so it's yellow ochre and ultramarine blue.
Now the brushes, three number five hog air brushes, rounds, three number two rounds,
and then a selection of synthetic brushes, flats and rounds there. So firstly just ghosting the
outline with a Faber-Castell kneadable eraser, just to get the excess graphite off the canvas
there. You've just got to lay some colour down first. I'm using the biggest round brush here,
number fives, and then just blending the light red with the yellow ochre mix with it as well.
And it's just a case of mixing it on the actual canvas. Now the reason I have three brushes,
I have one for the mid-tone, one for the lights and one for the darks, so it's best to do that
so you don't sort of get everything sort of muddy. Now here I'm using a mixture of brown and red
together to create the shadows and then subtling it up with a little bit of green and red. So I'm
using smaller brushes now, so you've got to sort of experiment and see what's, you know,
the best thing for you to use. Sometimes you need a bigger brush just to lay some paint on because
really this underpainting is just a matter of recorrecting the outline and just getting the
basic form in there. I'm not really interested in getting the colour right, the value or the chroma,
it's just about getting everything in shape. Now using synthetic rounds here to mix a colour
for the eyes. So I'm using brown and ultramarine blue for the blacks. I don't use black, I just
mix it by using those two colours, brown and blue, and then I'm adding a bit of lemon yellow to the
mix to create the actual greeny blue colour. So like I say, it's just a basic sort of structure,
so I'm not too worried about the colours at this stage, it's just a matter of getting that basic
form in. Now my approach these days is to try and be more painterly and more sort of spontaneous,
so I'm not trying to put every detail down. This is not the detail stage anyway, but
it's just a case of just getting that sort of feeling, and the way you connect to the feeling
is to open your heart, let go of the mind, and really focus on the energy of the reference image.
The more you can send this open heartness out to the reference image, the more you'll see
and the more you'll feel the actual feeling of the person you're actually painting. I'm running
through this quite quickly, but if you're interested in seeing the whole of this actual tutorial as
real-time audio, real-time video, it is in my Patreon at the moment, four parts, the link is in
the description below. Just a little information about the actual board I'm using here, it's a
canvas board I've made myself, it's actually a flax canvas stuck to a 6mm MDF and it is actually
primed with Michael Harding non-absorbent primer. It's amazing stuff, I really recommend it,
makes all the difference. Please check out the video in my channel, it's a beginner's guide
how to prime canvases, it's ideal for when you're starting out. Now for the hair I'm just using
these brushes here, big brushes, three again, one for lights, one for medium, one for darks,
and basically just getting again the actual drawing correct, so I'm correcting the outline,
getting a feel for the placement of the actual shapes. So if you look at the hair as shapes
and flow, so get the rhythm and flow to the hair and just paint that rather than trying to focus
on the details. Now the mix I'm using is quite straightforward, it's just burnt umber and
ultramarine blue, which creates nice grey as it is, but then I'm just adding a bit of lemon yellow to
it, to the mix, just to create that sort of greeny tinge to it. And so you're just sort of again
mixing it on the board, just feeling your way through and then just enjoying the flow of it
and the spontaneity. It's mainly paint straight out the tube again, not too much liquid. If you
put too much liquid in it goes a bit sort of slippery, so you just need enough just to get
the flow. It depends on what brand you've got, I mean I use Michael Howard in paints which are
light buttery, but if you've got something which is a bit stiffer just add that little bit of
liquid just to get that sort of flow to it. Now the background colour I'm using is burnt umber,
ultramarine blue, a bit of yellow ochre and also a little bit of red if needed,
just to desaturate the greeny feel to it. I use quite a bit of paint here and then what I'll do
then is just to sort of smooth it out I'll use this fan brush here, a synthetic fan brush,
and just very very lightly go over it and you can see it's smoothing out. You don't need a lot of
pressure but just enough and it's a case of just keep adding pigment and then just keep smoothing
out and just doing the same thing time and time again until it's right. Once your canvas is dry
then you're ready for the second stage, the rich colours. Now I've mixed the paint the same as I
did on the underpainting but less white because you need it more translucent and then additionally
I've added some more chroma to it now so I'm using lemon yellow and red to create more of
a zingy colour, the cold red and cold blue to create cold colours. Here's the brushes I'll be
using for the rich colour stage, all listed on screen there for you. Starting with the shadows
then under the eyebrow there, just a mixture of green and red together and then just working it
in, so more or less scrubbing it in really, hardly any white in there so it's just translucent.
I've not put any liquid at all in and I'm using the brown and blue here for some of the areas
where they're a bit darker. I'm just mixing it up really, sometimes I use the brown and blue,
sometimes I use a bit of green with it as well, just see how it goes. Here I'm putting pink in
there, if you desaturate, if you need to desaturate it you have to use light green with that which is
the complementary colour, but just scrubbing it in, just getting more pigment down, just going
over what's already dried from the under painting. Now here's a darker area here so I'm using a bit
of brown and blue then mixing a bit of green and red to get the subtleties of that shadow.
Now it's still a blocking stage, this stage, a little bit of detail but it's not the
subtleties, that'd be the last stage, which is when this is dry I'll go in with the details,
but what I'm doing is preparing the way for that detail stage, so I'm getting everything more and
more refined and I'm looking at the value, the temperature and the chroma, so I'm focusing on
that with this stage and just preparing my way, so you have to think ahead what's going to be
needed when you actually start doing the details, but that all comes with experience.
I'm also aware of the texture that's needed as well, so I'm building that up.
I'm not using much liquid, that's because I'm using Michael Harding paints, now if your paint
is quite dry you just need a little bit of liquid with it, depends what brand you're using,
but here I'm using like a colder red, so I'm using the ultramarine blue and the
Elysium Crimson making like a purple and putting that in areas. Now in the pupil here I'm using
brown and blue, so I don't use black really when I'm painting, just mix my own and then just
putting it on very thinly and just glazing over what I've done underneath and just changing up
the actual feel of it. Again it's all preparation for the next stage.
Now I'm using the flats there in areas and the rounds to create a little bit of texture
just under the eyebrow there, just playing about moving things around. One thing about when you
put a lot of paint down you can move it so you can push and pull paint around, so it makes it
quite enjoyable to sort of mix on the actual canvas so it's not too dry. Now preparing the
highlights now in the hair ready for the next stage again. You have to think this is just a
blocking stage, so it's really good if you keep in mind that these stages you can only go so far,
so then you're not really looking at the detail so much, you're just really interested in getting
the feel right, getting that movement right, getting the highlights, the chroma, the value
and the temperature something like, so when you do start putting the details in
the next stage it becomes quite straightforward then. If you're enjoying this video why not
subscribe, it's absolutely free and then you're sure not to miss any of my future videos.
The mixture I'm using for the hair is burnt umber, ultramarine blue and a bit of lemon yellow here
and there. Now once your painting is dry you're ready for the last stage which is the detail and
glazing. Palette laid out exactly the same but now I'm not putting so much white in so it's a very
small amount of paint and a very small amount of white, so you don't need a lot of paint with this
one because you're really just scrubbing in these really fine details and subtleties and
it's just a case of just making sure you don't put too much white in there because it makes
it milky if you're not careful. If you're in a country that allows lead white I would recommend
using a mixture of titanium white and lead white together because it'll create more of a pearly
look to your painting. Adding now some rich vibrant colours by using the warm red and lemon
yellow together and also mixing cold colours there, blue and Elysium Crimson. Brushes all listed at the
side there. Two sable number 00 for the very fine details and the two rigger brushes for the actual
fine details of the hair. Gonna just get a bit of pink here, it's just a case now of getting that
sort of glazy, less white in it and it makes it glower then you see, create a glow and then you
might need a little bit of just a tint once you put it in. It was just a quick preview of my Patreon
page where everything is real time moment by moment so if you want to check that out
please look at the link in the description below it'll send you to a library page where you can see
what's on offer. Now I'm adding the texture in there now so I'm very very small sort of marks
like I do when I do my pastels using that white to tint it and then adding that sort of glaze over
the top and then just creating this sort of feeling of skin then because skin's not smooth
there's all sorts of little squiggles and marks in it. Now for the shadows here I'm using a cold
red with a green mix really so it's just like desaturating it and then adding that little bit
of lemon yellow in the lighter areas just to create that sort of chroma. So it's just trying
to get that sort of balance of the temperature, the chroma, the value, everything's all sort of
taken into account really in the detail stage. Here I'm using a mixture of brown blue and a
bit of lemon yellow like it is in the hair and then just putting very very fine details here
and there mixing it up and creating the texture but I'm not trying to put every fine hair exactly
like the reference image I'm trying to keep it spontaneous and my interpretation because I'm
trying to be more spontaneous and more sort of painterly really not like hyper realism making it
realistic but not trying to get it exactly like the reference and it keeps it sort of I feel more
relaxed and more sort of alive by doing that. The key thing really when I'm painting is to open my
heart let go of the mind and really focus on the reference and bring that reference image into me
rather than going too far forward and being outside of myself trying to get every detail so
the more you can relax and more you can bring that image into you the more it's free flowing.
The eyes of course as the mirror of the soul so really are focusing now on the personality and the
energy of the person and just letting these details take care of themselves and just feel your way
just getting the balance look at it as seeing the colour the temperature the value the chroma
and focus on that rather than detailing the details just take care of themselves then you're
just putting a little bit of colour here a bit of different colour there and it just appears
to what you're actually looking at then so just have faith and just let go.
Now using blue and orange mix for the white of the eyes it's a really great way of getting
greys it's a natural way with the complementary colours and then adding that little bit of
lemon yellow if it needs that sort of vibrancy in certain areas when you're putting the white in
there it's just playing about really with the different temperatures. Now here you can see
how I'm putting that texture into the skin there's no liquid mixed in with the paint just
more or less straight out the tube but mixing it on the actual canvas there and just moving it around
pushing it and pulling it putting a bit of highlight here a darker colour there I'm playing
about with temperatures and just moving things because skin is not smooth especially with an
ageing skin so it's just really again just open up and just be spontaneous and just feel your way
really I don't try and put every little speck the same as what's on the reference as well it's my
interpretation so I'm just playing with different sort of shades and that and and just enjoying it
really just enjoying that feeling but all the time connecting to the energy and the sort of
personality of the person and bringing that out and all the colours and everything else seems to
just take care of themselves really it's a strange sensation but more you let go the more these
things just happen. If you're enjoying this video why not give it a like and share it with your
friends it would mean so much to me as this would help the channel to grow. If something is feeling
glowier just add that little bit of lemon yellow it just does the trick no matter what colour it is
just adding that lemon yellow to it it seems to really give it that sort of kick. Now for the
eyebrows they're quite unusual eyebrows these are what I thought it might be best if I give you a
clip of what it's like on my Patreon page where you can actually hear and see me all in real time
in the moment the here and now I'd like to know more about Patreon the link is in the description
below. I want it to look like a you know a caterpillar over his eye it's going to vary it up a little bit
they are quite unusual eyebrows yeah turn your brush when I start putting the lighter colours
over these dark ones it'll look better just a moment it looks a bit strange
but when I start putting the other colours in with it
so you've got your grey mix it's obviously grey colour a bit of a reddy colour to it so a bit of
a zinginess to it as well so I'm just going to grab a bit of this and mix in with this
grey here look that's how you're going to move things around on your palette
and then just see it's not white enough so you've got to put lighter it looks whiter when you look
on palette but when you put it on your picture
sometimes it's not the same colour so just a little example there on my Patreon if you want
to check out the library there's loads of tutorials on there and they're exclusive to
Patreon in real time so please check out the link in the description below just changing up the
colour of the hair in the eyebrows here and there with a bit of red mixed in with the
light grey there background is brown ultramarine blue a bit of lemon yellow and I've also added
a little bit of red to this mix just to sort of desaturate it you can see it there in the background
now for the highlights to really achieve that really vibrancy I've not put liquid in there
because normally when I'm using this rigger brush I put quite a bit of liquid in to get that sort of
flowing with it that flowing movement but here I've just put in neat paint because I want it to
really be sort of vibrant what happens with the liquid it does actually kill the sort of
vibrancy out of it sometimes with the white so here I've not used any just turning the brush
quite a lot just to get a sort of point to it but just flowing again with it just being spontaneous
just let it happen feel the rhythm of the hair and the movement and I don't try and put every hair
exactly the same as reference again it's just a matter of just getting that sort of feeling
of flowing rhythm and aliveness to it adding a little bit of liquin where there's a tonal value
to it to make it sort of translucent and the colour underneath seems to sort of change the
colour of the actual mark I'm putting on as well now for the wisps of hair over the background
there it makes it easier when you've got the background in because you've got a vehicle
you've got some paint to actually get that flow on top of so that helps so sometimes it's a good
idea in some areas to scrub a bit of colour and glaze a bit of colour over it before you put the
fine hairs over so it might be worth playing about with that because sometimes I do that
again mixing the brown ultramarine blue but a yellow ochre with this as well and a bit of
lemon yellow for really sort of vibrant areas now you can see how I'm doing it over the
background it's keeping things nice and flowing
free flowing keep turning that brush to get a fine point and just flow with it so I'm bearing
the pressure on the brush as well because some areas are more sort of highlighted and some are
not it's like broken lines really it's not one straight line there's little glints in these
strands of hair here these wisps of hair there's like little bits of glints and what I tend to do
is add those at the end so here you can see me doing that just here and there just adding that
little bit more white just to give it that sort of liveness feeling to it. I hope you enjoyed this
example of my Patreon oil painting study and here is the actual study at the correct angle
full-on view. If you want to see more of my work please check out this link here
for more. Take care. Thanks for watching.