
Portrait painting: How to make transitions and soft edges. By Ben Lustenhouwer
1 Video View·Mar 23, 2025
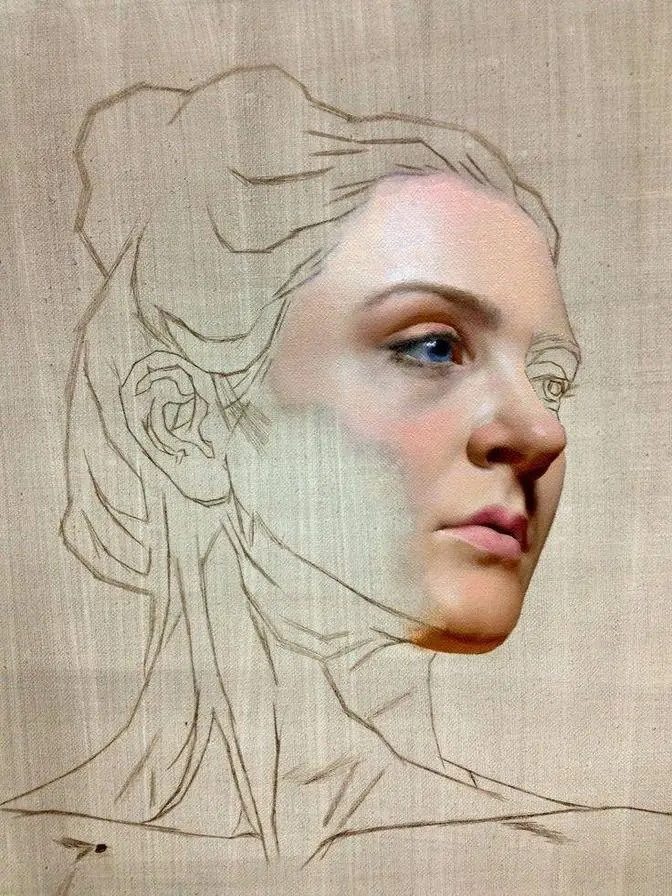
In this example I want to show you that I try to achieve softness here, here and
here in order to get the maximum attention to her eyes. The connection of
the hair and the forehead is important here and also like I said the softness
here. I don't want to articulate here in order to have the maximum effect on this
eye. It is not the complete version of the video. Next week you will see the
real-time two and a half hour of demonstration. This time only the start
and the end. Have fun!
I start with the light flesh tones. White and some Terra Rosa.
My intention is to make the light flesh tones a touch too dark because it's
easier to make lights lighter and later darks darker. So if you start too light
with your lights then it's difficult to get them even lighter. If they are a touch
too dark, let's say a touch darker, then it's easier to make them lighter.
That's my first light and the second light with a touch more of Red Deep for the cheeks
and a light with some more green in it. It must be dark enough once again but I have
to make first a lighter green and you've seen this before. Viridian Green
with a touch of Ochre makes it a lighter green so you see with this this color is
less, let's say less red. I think this is for the chin and I put these pre-mixed
colors here so I want to have space for the other mixtures and I always say keep
your kitchen clean and that's what I'm doing now because I need that space.
So these are three basics for the lights. Now I make a dark one for the hair and I
start with Transparent Oxide Red with a touch of green, Viridian Green, so that's
for the dark, the dark parts of the hair. Later I can change this color
whatever I want. Now I must make a shadow under her chin and the nose and
maybe in the eye sockets and I make a very simple one just this red and a
touch of this green. Well that's not deep enough so more Viridian Green.
If it's too red I can add always some green and as I told you in the other
demonstration as long as you don't add blue or black you are safe.
First I gave a wash of Raw Umber diluted with a lot of turps, a little bit of Ochre
and some green. Let's see what it looks like. I don't want to make it very dark
so maybe I will wipe it off later a little bit. Maybe a step dark and not too much.
First I start with the hair, the darkest part and I prepared this color for the hair.
I start just covering the whole area with a basic color.
Now what I want to show you is when you want to end here later you go a little
bit over the edge and later you come back and that is because you want to
make a good connection. If you leave white lines you will meet difficulties later.
Here again on the forehead there is a cast shadow of the locks of hair on her forehead
and I prepare first, let's say I'm painting now this shadow,
the cast shadow of that lock of hair. Later I come back with the color of the skin and of the hair itself.
Once again I load my brush and I don't use any medium still.
Downwards the hair has some more blonde colors so maybe I should prepare first
a sort of more reddish and less paint because on top of that I will make some
lighter indications and later some darks of course for the color change of her hair over here.
Now come back with a darker one here. Already I can make some darkers here.
I must not forget to make this connection also prepared.
I want to end here so on top of that I go a little bit more down.
Yeah well that's a nice combination Viridian Green, Ultramarine Blue and Yellow Ochre.
I start with the shadows in the face and I made one basic shadow and well let me do first
some indication of the deepest darks around her eyes and that's the way I usually start.
I give it a dark wash, let's say a wash burnt with Raw Umber
and still I can see my underpainting, my under drawing, my charcoal under drawing.
Very thin and then I push it around so still I can see the form of the eye
and maybe some connection for the shadow here.
That will do. The shadow under her chin and her cheek is dark but I want to make it
more reddish and I'm not sure if this is too reddish but I want to play a safe game let's say.
So I started, I start this one with a fairly reddish one and it's later easy to
let this change a little bit. Usually shadows you can make transparent,
the light parts you always make more opaque. Also the cast shadow under her bottom lip.
Always that shadow. It's a nice accent under her lips.
Now I go to my lights that I have prepared. The forehead and I must check if this is right.
Well let's give it a try. Now you see that with this color I go back into this one.
You see I go back into that prepared, maybe a touch lighter.
The preparation that I did for the hair, I can always make this light tone lighter.
Here the connection. You see now there is already a soft connection.
Towards the temple I make it more greenish.
So I added a little bit of ochre and a little bit of that ochre-ish green.
Towards the nose I prefer a touch of this cool one.
Maybe a little bit of this green.
Now her cheek once again has that more reddish one.
Touch lighter maybe. Now the connection that I prepared for the hair
where the cheek turns away, that receding plane toward the dark of the hair.
I see some sort of grayish color so that connection I must make more gray.
And once again maybe I can do it with my mauve. Let me see if this one would do the job.
No I think well maybe with some green makes it less purplish.
I softly go until that edge and I take some paint with my brush into her face.
From the cheeks here I go to the chin and there is usually less red and more gray.
I told you that in the three color zones of the face so less red or less ochre-ish.
Also here I try already to make a soft connection. Maybe I have to come back with a shadow.
I do the color for her lips which is red, white, usually a touch of ultramarine blue and let's see
for the bottom lip. I think this will do for the bottom lip.
Now the upper lip, darker, more red, a touch of crimson.
Be careful that I don't take too much of that stuff.
I think I add a touch of that green because I don't want it to be so so red.
The corner of the mouth has this lovely accent and here as well.
The darkest dark that I had. Transparent oxide red and Viridian green. There we go.
White of the eye never is white. You see it often people paint it far too light.
I start with the tone and my tonal value here is far too dark but it's easy to make it lighter.
She has brown eyes, brown greenish eyes so this red and this green
makes it a sort of brown I think.
And I paint a little bit as if I'm hovering on top of that whole area.
I don't want a crisp circle over there. I think that's ugly.
I also connect it there. It comes out of the shadow so I connect it over there.
I paint the whole ear red. Going down I add more light.
So it's a very schematic solution for the ear.
On top of it I can make a shadow and a highlight and then the ear is painted.
Now I have a rest for a second or two seconds and then I continue painting.
I jump now to the end of this demonstration.
Next week I will publish the complete video in real time.
More or less two and a half hour.
For this time thank you for watching and see you next week.