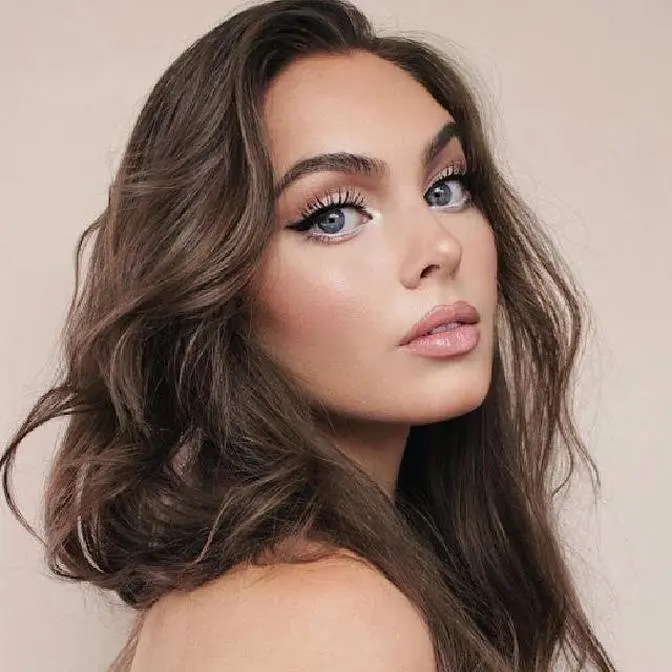
Hey hey, I'm excited to show you my Audrey Hepburn as Holly Golightly makeup, updo & costume from the iconic Breakfast At Tiffany's film! Please give this video a thumbs up & share it if you got some Old Hollywood inspiration. I post new videos every Sunday so make sure you are subscribed for more beauty tutorials: Open for more info!
Are you following me on Twitter & Instagram? I love talking to you guys and updating you on what tutorials are coming, drop me a comment and I might just follow you back!
Products Used: Stila AquaGlow Serum Foundation Anastasia Cream Contour, lightest shade as concealer under my eyes COVERGIRL TruBlend Powder in Fair COVERGIRL TruBlend Bronzer Too Faced Nudie for Contour MAC Soft & Gentle MAC Life's A Picnic, Pink Flamingo Collection Urban Decay Primer Potion in Eden Maybelline Brow Satin Duo Ardell Brow Kit MAC Phloof, Omega, Coquette, LUNA, Bronze Too Faced Heaven COVERGIRL TruNaked Liner in Brown Chella Eyeliner in Ivory Lace NYX Matte Black Liquid Liner Maybelline Push Up Mascara Quo Glamour Lashes (806) & Duo Glue Revlon Pink in The Afternoon
H a i r Garnier Texture Tease Spray Pantene Airspray I'd recommend Pantene Volume Up for more hold!
[Music]
hey guys it's Jackie and for today's
tutorial I have this complete Audrey
Hein inspired look if you haven't seen
my latest tutorial I did four hairstyles
that are all very 60 and inspired by
Audrey as well so I will have that link
down below and make sure you're subscrib
to this channel so you don't miss any of
my uploads but today's look is all about
Audrey hein's character Holly Go Lightly
in Breakfast at Tiffany's such an iconic
movie and look so I thought I would try
to recreate it as best as I can and put
my own little twist on it so I hope you
like this makeup look I think it would
be perfect for prom and then this updo
as well as the costume so let's get into
it jumping right in I have started with
a light Bas of foundation I love the
Stila Aqua glow serum foundation and I
also did add some concealer underneath
my eyes and now I'm going in with a tiny
bit of subtle bronzer to add some
Dimension to the face but this is not a
bronzy look at all I'm just softly
contouring before going in with a deeper
Contour
[Music]
shade with a matte ashy Brown Shadow I'm
sculpting out my cheekbones I'm taking
my time with this making sure I'm right
under the cheekbone and then I'm
dragging it downwards so it's kind of
replicating the look of her very high
cheekbones and I'm also contouring my
nose to slim down the bridge and shorten
it a little bit this is totally optional
I always say this cuz you don't have to
change the look of your natural face but
for me I like when my nose looks a
little bit thinner it helps balance out
my features a little bit and lastly for
the nose Contour I'm just adding Mac
soft and gentle on the
[Music]
tip her cheeks had a bright pop on the
tops of the cheekbones in her more Glam
scenes I'm using this MAC blush from
their flamingo pink collection so this
is limited edition and it's so pigmented
you only need a tiny bit super bright
and I'm just applying it to cheekbones
and blending
out and a step that I never skip is
using an eye primer so this is urban
decay's eyeshadow primer in
Eden I'm starting with brows hers are
farther apart than mine and the arch is
higher they're a little bit more square
at the front so I'm playing with my
shape a little bit and keeping them full
but still natural I started with the
Maybelline brow satin Duo on camera it
turns off looking a little bit greeny so
I added a little bit more of a reddish
powder from Ardell and then I'm going to
move on right into Shadows I am starting
with ploof from Mac so just a light
shadow that has a bit of Sheen to it and
I'm applying this all over the lid as
well as in the inner
[Music]
Corner next take a matte light cream
shade Like Heaven from Too Faced and
apply it to the brow bone to help erase
the brow and then I'm going in with a
medium brownish gray tone and I'm
applying this on the outer corner and
fading it in gently I'm using a really
cheap brush here but I use it all the
time it's by coastal sense and all my
coastal sense brushes have really held
up so I don't think you need to spend a
crazy amount some mac Brank blending
brushes are amazing but I tend to go
with Coastal Scents a lot of the time
and I use Sigma also so anyways I am
also taking a gray shade and I'm
applying this on the outer half of the
lid as well as it down onto the front
portion of the lid still keeping the
center of the lid bright but adding in a
little more
dimension in the photo I'm referencing
there was definitely some blue in the
makeup I'm using this Navy from Mac it
is so pretty I used it in my Selena
Gomez hands to my self video as well and
I'm running this along the Lash line as
a base for the
liner my eyes aren't as deep set as
Audrey's so I took a little more of the
deep Navy shade and I sculpted out the
outer crease in a rounded shape so I
just placed it a tiny bit above my
crease and I just did a tiny bit you can
bring this all the way in but it'll look
more dramatic and more like cut crease
so I wanted to keep it soft like her
look and I also took a blending brush
and quickly Blended everything together
a bit to give a nice warnin
look I love this next step take a brown
or bronze Shadow and line underneath the
Lash line starting in the center and
then into a soft Wing I like to keep it
so that there's a space between the blue
and the bronze sh Shadow it'll really
open up the eye and I love bringing in a
warmer shade when I've worked with all
neutral and then the deeper Navy shade
just because I prefer warm shades on my
eyes because the bronze really makes
blue eyes pop so it's up to you you can
use any Shadow underneath the Lash line
but I decided to go with the
bronze to further open up the eye use a
white or cream eyeliner here I'm using a
brightening one by Chella and I'm just
lining the waterline and also making
sure it hits right to the outer corner
to help emphasize that little space
there you can go in with gel or liquid
liner I'm using liquid to line the upper
lash line and create a small flick
depending on how thick you drew the wing
you might have to go back in with the
blue shadow and make sure that you can
still see it above the liner and next
just curl your lashes and apply mascara
to the top and bottom
lashes so here's the eye look without
lashes and then I'm just going to pop on
a pair of flut lashes from quo and I
added some dual glue let it get tacky
and then I pop it on so the center is
touching and then line up the outer and
inner corner and then I'm just blending
the lashes together with a little bit
more
mascara now for lips Holly Go Lightly
wore a coraly pink in the car scene
anyway so I'm using revlon's pink in the
afternoon lots of bloggers have said
this is the closest shade they could
find to hers so if you want to feel like
Audrey pick this up and to me it looked
a little bit more Coral in the scene so
you can always add more of a coral tone
to this but I prefer pink on me so I
really like this look and I think that
the pink and just freshness of it with
the shape of the eye really makes this
look so I hope you like it and then I
decided to mattify the lip with a two
ply tissue I just put it in half and
then I applied it to my lips and applied
some powder over top to take off the
excess product and set it in place
now for hair I recently did a quick bun
option for this updo so you can click
here if you want to see that version but
otherwise this is my more advanced
awesome updo and it's really not that
hard to do but there is some extra steps
so first I am sectioning off the front
portions of my hair and then once I've
sectioned off the very front pieces I
realized I need more hair in that uh top
section so I'm just grabbing more hair
and and then I am going to section off
those uh front Pieces Just with a bobby
pin they will be the finishing touches
and then I'm taking that section of hair
and I'm going to uh add some texture
teas spray and just add a little bit of
teasing so that the hair will stay
together when I put in my bun
insert I made a makeshift fake bun with
some old extensions and then a hairnet
so you can use a normal BUN maker for
this but I think it's easier to use a
hairlike substance so you can get fake
hair at wig store
to get that volume because you're really
just stuffing your hair with more hair
and they do this a lot in uh movies and
photo shoots there's a lot of extra hair
being put in those people's heads so
anyways I'm just pinning this down in
front of that hair portion and then I'm
pulling the hair up and I'm creating a
loop and then I am just rolling it over
top and pinning it back in place then
those pieces that fold over I'm going to
just polish off and pin them in place
too I didn't use too many bobby pins
because of course the more bobby pins
you use the more they could potentially
show so I just used about two or
three so if you want to be a rock star
or do something Amy wine hostes then you
can try this front method but now I'm
going to finish it all off with a very
loose French twist I know French twist
can be hard on yourself so I did it
loose and it's not the uh main part of
the look but I'm just brushing my hair
to one side and then having pins go
upwards all up that section and make
sure you cross some of the pins to make
sure it stays in place and then you're
going to twist the hair inwards so
you're going over top of those bobby
pins and then add more bobby pins into
the hair so you're crossing over the
bobby pins again underneath and once you
have this all set in place you have this
tail of extra hair so I went in and I
just created a loop and that's the
detailing at the back just a big loop
and now I'm going to work at the front
section with the smaller section just
bring it into the Twist and then curl
the pieces that are left over and tease
the front a little bit we want this this
to have a slight poof so I'm slightly
twisting poofing it out and then taking
the extra curl at the end and creating a
pin curl for a little extra detail now
I've just gone in and added some
hairspray to the poof went in and made
sure that some of the bobby pins that I
could see weren't sticking out anymore
and there is the completed look once the
poof is all perfected I hope you guys
like it and then here are all the
accessories to match
[Music]
finally for the complete costume I got
this accessory set from I am an Audrey
it's a Etsy shop so I got the Tiara the
necklace earrings gloves and extended
cigarette holder cigarettes are bad but
it's all for the costume and the
earrings are clipons so I do have my
ears pierced and I found wearing clip-on
earrings really painful but other than
that it's a great set and then the shoes
I got from modcloth.com I thought they
were very Vint inspired and this midi
dress is from lulu.com I thought this
dress was perfect for the look and if
you want to add a little Audrey to your
everyday style this is a really cute
spring coat I got from U modcloth.com I
thought it was very vintage and had a
little modern take on it with the uh
black detailing there and bow I added
some leather gloves as well these are
from uh Urban Outfitters last year but
or maybe like 3 years ago wow time flies
but you can also find a pair of gloves
like this from H&M and that's where I
also got the little scarf I added so I
hope you guys like this complete look
and let me know what you think in the
comments down
below thanks for watching I hope you
guys enjoyed this look and if you did
make sure to give this video a big
thumbs up if you like old Hollywood
icons I also did a video about a year
ago for briet Baux so I will have that
Linked In the down bar as well to check
out because that one's really cool I did
um an updo and I have this big bun but
then I also created fake bangs with my
own hair and it turned out really cool
so I hope you guys uh like those two
tutorials if you want to check out that
one and if you have any other icons
you'd like me to try to recreate
definitely let me know in the comments
down below also um this is if you're new
to my channel you won't know what I'm
talking about but if you like how I do
my Jackie jams at the end of these where
I'm just like dancing around and singing
as I do in the bathroom when I'm doing
my hair uh I won't be posting them in my
videos anymore because I am worried
about like copyright so I decided I'm
just going to post those little videos
to Twitter so make sure you're following
me there @ Jackie wires as well as on my
Instagram if you want to see what looks
are coming up and I will see you guys my
next
video does it look that weird
[Music]