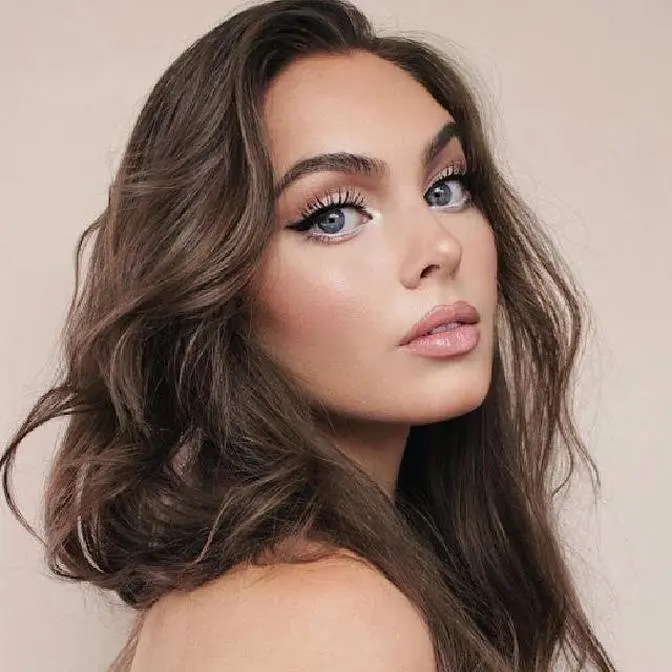
Hey, it's Jackie & THUMBS UP if you enjoyed this Recreating ICONIC Vogue Photos | 60's Jean Shrimpton Supermodel Transformation! Today I'm recreating Jean Shrimpton's Iconic 1965 Vogue photographed by Bert Stern! Jean Shrimpton "The Shrimp" was one of the first Supermodels and considered the face of the Swinging Sixties! Since I'm always inspired by BOLD 60's trends I've teamed up with Revlon as a part of the #Revlontourage for 2018 to celebrate the #Liveboldly campaign by recreating this look and sharing my personal bold moments!
Would you rock a doll-like eye & a pink pout? What is the boldest beauty trend you've tried or the boldest move you've made in your life? I'd love to know in the comments!
Let me know if you like my vintage vibes tutorials, you know I love Audrey Hepburn, Twiggy, Brooke Shields - so if you have any ICONS you want me to re-create, comment below! Don't forget to subscribe & put those post notifications xo :)
A l l P r o d u c t s U s e d : REVLON PHOTOREADY Pore Reducing Primer - LOVE! REVLON PHOTOREADY Insta-filter Foundation (220 Natural Beige) REVLON KISS Balm - Tropical Coconut REVLON PHOTOREADY Concealer (Light) REVLON Insta-Blush (330 Nu de Kiss) REVLON Colorstay Creme Eye Shadow (715 Espresso) REVLON PHOTOREADY Insta-Fix Highlighting Stick (Pink Light) REVLON PHOTOREADY Translucent Finisher REVLON Powder Blush (024 Bronze Beauty) REVLON Colorstay (210 Soft Brown) REVLON PHOTOREADY Shadow + Primer (523 Rustic) REVLON PHOTOREADY Shadow + Primer (520 Watercolors) REVLON COLORSTAY Liquid Liner REVLON COLORSTAY 2 in 1 Angled Kajal (101 Onyx) REVLON All-In-One Mascara REVLON COLORSTAY Lipliner (650 Pink) Revlon Super Lustrous Lipstick (406 Rosedew) - I'm obsessed with this shade for everyday now! Revlon Super Lustrous Lipstick (415 Pink In The Afternoon)
Lashes used: Revlon Beyond Natural, 91294 define on bottom, 91305 & 91303 layered on top!
H a i r I took 3 clip weft extensions, divided the length in two and clipped to the very top of my head horizontally for shorter length. hopefully this makes sense, but anyways use a small barrel and curl the ends upwards and pin in place to cool in their shape. Brush out and apply hairspray, adding slight teasing to group the hair together.
H e a d p i e c e Found all craft supplies at Michael's - sadly I made mine massive lmao
Disclaimer: Disclaimer: Sponsored by Revlon! I am a part of the #Revlontourage again this year, and am having an amazing time working with a brand I love.
Ps. If your reading this, comment "FLOWER PARTY!!!"
hey it's Jackie and for today's tutorial I've teamed up with Revlon and as you guys
might know from a couple of my previous tutorials I am part of the Revlontourage
for 2018 and Revlon's new live boldly campaign is all about being bold and
unapologetic in every aspect of your life so I decided to celebrate that and
recreate a 60s look, the 60s were such a cool time of social change and there was
a lot of diversity in beauty trends so I am recreating one of my favorite bold
portrait of Jean Shrimpton in a 1965 shoot in vogue and I love the floral... I
tried to recreate this flower crown and I made it way too big so I don't really
know how to proportion my props apparently but the boldest thing I ever
did was definitely creating a youtube channel because I was quite timid at 16
when I started and I've had a couple knocks to my self-esteem and middle
school in high school like most of us do and you guys have really helped me get
out of my shell and have given me so many cool requests that have really made
this channel awesome so thanks so much for being a part of it and I want to
know in the comments what's the boldest thing you've ever done, it can be if you
love to rock a red lip a black lip smokey eye or just something that you
did in your life that was risky but paid off in the end
let me know because I think those would be really fun comments to read make sure
you give this video a thumbs up if you like my vintage vibes tutorial and let's
get started!
got some clip-in bangs on and starting with a bare face I'm
applying the new Revlon Photoready at pore reducing primer I was so impressed
I already liked the Revlon Photoready primer but this one is my new fave it's
been more of a liquid base and it glides on smoothing over the skin I used quite
a bit and this is my absolute favorite drugstore primer that I've tried and for
foundation I wanted to even out my base but still look fresh my go-to pick is
the Revlon insta filter foundation and I like to use my finger sparingly and then
build up if they need to with a sponge I'm not adding any foundation on my nose
bridge because they will highlight with concealer don't want to put on too much
unnecessary product where he don't need it while doing the rest of the face prep
the lips this is one of my favorite balms coconut kiss for smooth lips
and with Revlon Photoready concealer in a lighter shade than my skintone
I'm following my inspiration photo and mimicking at the brightened areas like
on the chin jawline sides of the nose and most importantly under the eyes and
blended up the cheekbones for contouring I'm using a cream blush this is the
Revlon insta blush in nude kiss and apply under the cheekbones and also
through the cheek where you'd naturally blush all these product I find blend so
easily with my fingers at before setting with powder and for nose contour I'm
using the Revlon creme shadow in espresso like I did in my Efft tutorial to
reshape the nose slightly for the recreation Jean has quite a distinct no
shape very button like with a slightly wider nose bridge that's very straight
and contoured right up to the brows I also added slight under-eye
discoloration just to match the photo and more shadows in two rounded bumps
for an upturned look at the tip of the nose under the bottom lip shadow for an
extra pout
now I'm finishing up the nose contour with highlight using concealer and
topping up with the Revlon Photoready insta-fix highlighting stick and pink
light to get some more sheen to the skin and really pick up the light especially
on the cheekbones at where it was quite a brightened area there
set with the Revlon Photoready translucent finisher and you can add a
bit of powder bronzer if you want a bit more color through the cheeks and time
for brows I often go hardcore with contouring but sometimes using just a
small amount of product works better for the illusion for a more sculpted face
because it's more believable I used Revlon Colorstay brow pencil and
soft brown my faux bangs covered them up for the most part but gotta make sure
the head and tail are polished my most use Revlon palette is the Revlon
Photoready rustic palette like I used in my 50s look taking the copper and
bringing this through the crease and into a V it's super pigmented and
I'm using all Revlon brushes just goes to show you don't need super expensive
brushes to create a makeup look, really highlight the brow bone all the
way under to the head of the brow
on an angled brush where you have more control take the bronze shade and line a
bit above your natural crease keep it super rounded like a half moon shape and
this with liner and lashes will give us massive looking eyes, blend the shadows
together slightly without losing that line
and with another Revlon Photoready palette this is watercolors I'm taking
the purple shade the shadow you don't want to press hard on the pan you just
want to lightly glide over and then apply to the lids and I was so impressed
with how much this popped time to line here I'm using the color stay liquid
liner in black for a winged out liner shape extending it past the natural lash
line
following Jean's look at a sharper tip in the inner corner this step I often mess
up with liquid liner so it's a bit safer with pencil but it looks sharpest or
liquid so up to you and with the copper shadow really blend under the eyes we
are going to pop on some bold bottom lashes so it will be balanced out so
don't be afraid to blend outwards and right under the lashes deep enough with
bronze shadow like we used up top for the graphic crease
in the inner corner under the liner follow up with a white cream shadow
bringing this into the waterline - for doll-like eyes one of my favorite products
ever from Revlon are their angled Kajal liners, tightline and defined the bottom
lashes and smoked out with the attached smudger there and again to add the sharp
details liquid liner just drawing on some fake little lashes as well and this
will really make sure the base of the bottom lashes pop we got lots of Revlon
lashes here I'm taking this flared out pair and you can apply this to the
bottom lash line apply it like you would on the top and
then flip it directly upside down and then you can glue it right along at the
bottom lash line just make sure you're getting underneath your lashes
and then add a more dense pair of falsies up top you can also layer lashes
for super thick animated eye adding in some mascara to bring the lashes to life
and blend in with my own lashes and for lips i'm starting with revlon colorstay
a pink lip liner line the outer portion of the upper lip and then also under for
a guide and the lipstick I was debating between these three here when I chose
Rosedew to best suit this look I also blended in a bit of pink in the
afternoon which is also a very Audrey shade as well
and there you have it time for a quick hair makeover plus a
pretty extravagant floral headpiece how I did funny because none of its mine my
hair is in the little bun at the back and I separated extensions in half so
each side was over the left in the right of my face to bring the length shorter
but I'll show you how to get a similar 60s flip curl to the ends of your hair
if your hair is a couple inches shorter than what I have here it will look super
accurate and gravity will help it flip a lot better than what I show but all you
need is a small curling iron and then just curl the ends upwards and then pin
letting the curls cool in its shape
when you take out these curls after cooling start to separate it with your
fingers and then you can brush through in two sections lightly to get a big
uniform curl at the front and then the ends we want flipping right up so I got
a bit of a circular curl at the back I wish I spent a little bit more time
getting it right with hairspray but if you just keep brushing through adding a
little teasing and hairspray you should get that desired flip I'm actually
laughing because my crown is gigantic literally Jean Shrimpton
a head piece times ten but I had fun making it and I did have to do a bit of
photo retouching to get some of the details to appear less large in my
recreation photo but overall here is my Jean Shrimpton iconic vogue recreation
from 1965 to 2018
to get in the room
thanks for watching I hope you guys enjoyed this live boldly look inspired
by swinging 60s icon and Jean Shrimpton and if you did make sure to hit that
thumbs up button and subscribe for more beauty tutorials every week also I would
love to see it you rock a colorful look so if you try this out or are inspired
by any of my tutorials be sure to tag me on Instagram I love to see you guys
switch it up your style and I would love to feature you more so here are some of
my favorite recreations as of recently and thanks for ever on for pushing me to
a try out a bolder tutorial I have done more Revlon tutorials that will be
linked in the downbar like my graphic I look wearable lip art retro style and
it's been awesome to learn more about trends with Revlon and attend their
events so if you want to see the live boldly launched in New York I did vlog
it on my vlog channel so look at the information button as well don't forget
to comment also how you live boldly in your life whether it's with makeup a
quote you live by or a bold a move you've made and I will see you guys in
my next tutorial