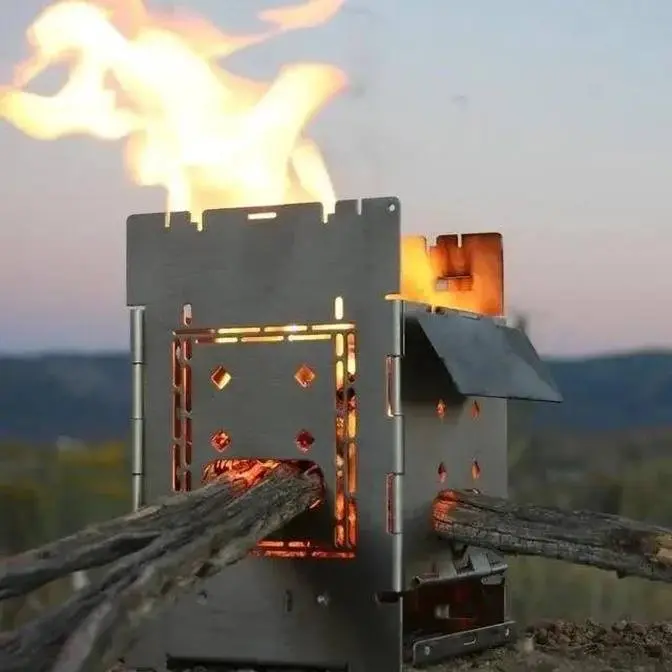
Welcome to the "Firebox Freestyle Instructional Video". I've tried to cover everything from configurations and alternative fuels to how to manage a cooking fire. Here's a list of what I covered and where it can be found within the video: 0:39 "Configuration Tips" These nuggets of information will help you set up your freestyle into different shapes and cooking configurations. 9:56 "Everything Kit" Here I show you what's included in the everything kit and how to organize it in it's Black D-Ring Case. 10:57 "Alternative Fuels" the Firebox Freestyle is capable of utilizing several fueling options. In this section I give you tips on the best way to use each. 16:00 "Wood Burning Basics" Every wood burning stove has unique wood burning characteristics. In this section I teach you how to build and maintain a cooking fire in the Firebox Freestyle. I also specific instructions on fueling the "Triangle Torch" 20:48 "Care & Maintenance" The extreme temperatures of a wood fire cause stainless steel to lose its corrosion resistance and it burns off lubricating oils. In this section I show you the easiest way to apply a light coat of oil to both your Freestyle Stove and the Fire Pan Tin. I also show you how I clean up my cooking pot after cooking over a wood fire. 28:22 "Bonus Information" Some extra information you'll be glad to know as well as how to use the "locking fire sticks" to get creative in making custom set ups with your Firebox Freestyle.
More Than Six Ways To Freestyle! #1- 3" Tri Torch: The ultralight (Ti-4.9oz) option that packs a punch! This little stove cranks out the BTU's! Its fuel loads vertically which creates a micro Swedish fire torch. The resulting thermal column pulls in more combustion air compensating for less oxygen at high elevations or other poor burning condition like wet, cold and or poor-quality wood. Once a bed of coals is established sticks can be fed through the side feed ports (Rocket Stove Style). Designed to work perfectly with the high performance Toaks Siphon Jet alcohol burner (blooms in 5 seconds or less & provides very fast boil times, and only weighs 0.7oz)
#2- 4" Freestyle: A state of the art, multi-fuel, high performance flat folding mid-sized stove that will satisfy your stoving needs with style! Comes in its own "Fire Pan Tin" to conveniently adhere to a "Leave No Trace" ethic. Burns wood which can be fed from the top or through the side feed port—which are offset—allowing sticks to cross inside the burn chamber, which creates flame turbulence, improving burn efficiency. Freestyle has a hinged damper which can be opened to massively increase exhaust capacity allowing high flow burns like a (ever so fun) Swedish Fire Torch. Designed specifically to accommodate both the Trangia alcohol burner or isobutane gas burner attachment, both with correct headspace for optimal performance.
#3- 7" Hexagon Storm: A functional fire-pit/stove. Big enough and round enough to provide a authentic campfire experience. Small enough to make perfect sense as a stove when cooking with a larger pot, fry-pan, or even a wok. This configuration folds down to a single stack which fits neatly into a single Fire-Pan Tin for convenient storage and deployment.
#4- 8" Bushcrafter: Bushcraft mode is all about cooking versatility and being able to "flat lay" longer sticks. Every panel has a fuel feed port so regardless of how you set the stove up you will always have a convenient place to feed sticks in as they burn. This configuration folds down to a single stack which fits neatly into a Fire-Pan Tin for convenient storage and deployment.
#5- 10" Octagon Fire Pit: (shown in Titanium) Two "Stove Kits" and one "Mod Kit" are needed for this configuration. The large square grill is included in the "Mod Kit" When it comes to traditional camping ambience the "Octagon Fire Pit" delivers! Not only do you get a fantastic bonfire, the "Extra Long Firesticks" make this beauty very functional, supporting pots, pans or grills in a variety of arrangements over your wood fueled fire. This configuration folds flat into two connected stacks which will fit into the front pocket of the "D-Ring Organizer Bag" making quick work of making and breaking camp.
#6- 12" Field Kitchen: Versatility is the name of the game! You'll be able to pull off amazing meals with the "Field Kitchen". Being nearly twelve inches long you'll be able to "Flat Lay" some serious lumber in this beauty, "Bushcraft Style!" This configuration folds flat into two connected stacks which will fit into the front pocket of the "D-Ring Organizer Bag" making quick work of making and breaking camp,
The Firebox Freestyle Stove is an advanced framework which provides the ultimate versatility
in stoving functionality. It just wants to fall apart. What a beauty. Welcome to the Firebox
Freestyle tips and tricks instructional video. First off, I keep my fire grate in the position
that it needs to go in to fit in the bottom of the freestyle. The freestyle is comprised of
two shorter panels and two longer panels and the fire grate also has two long sides and two short
sides. The way I locate which direction the stove is actually rotated is I always work from the side
that has the wind damper. I hold that, it gives me a handle and it also tells me which direction
the stove is aiming. It makes it easier when you put your fire grate in to go straight down the
back, right down next to panel number four, go all the way till it touches the fire sticks
and then push it forward. Slide that right down the back, pop it into place and then we just put
that, see how I just brought that straight over, so it is still in that correct position. Put the
ranger band on it and then next time I get this out it'll be ready to go. The triangle torch is
easy to remember because the triangle has three sides. You also need to remove panel number three
so I'll go ahead and pull out the two pins that hold panel number three in,
lift it out of its place and then connect panel two to panel four.
Then we have our triangle. I'm going to switch from two four panel stoves into one six panel stove.
You want to take off the number one panel off of each stove.
Remove that number one panel then you flip one stove over on top of the other and then you
reinsert two of the pins. Then you have a six panel stove. All you need to do is put some fire
sticks across on both ends and you can drop the two-in-one fire grate down in. If you want to do
the hexagon you don't need to move the fire stick position and you just put the hexagon fire grate
down in and you're all set. Now the cool thing about these positions is they will both work
in a single fire pan. So you rotate your feet inward and then that fits and then if you want
to do it as the bushcraft six panel then it fits across here just like this. The other nice thing
about the six panel setups is that it folds flat into a single stack and it fits inside of
a fire tin. Remember when you're folding your stove always fold panel three to touch panel four.
That'll help you get started then the rest will kind of just fall into place.
But you can see this will fit into the fire tin you know very easily. When you're going from six
panels back to four panels you need to remove the center pin. So you can kind of see how there's
three pins there. You want to remove the center and it's the same thing when you're converting
from the eight panel to the four panel you remove the center. See now this one's a little
tricky because these legs aren't lined up so if you line them up it's a little easier to tell
and then you go ahead and pull the center one out and then the stoves will come apart
and then you need to put the number one panel back on and put your legs back in.
Let's go from two separate stoves to a single eight panel stove. I'll go ahead and aim those
towards you and remove the hinge pin from the right hand side of panel number one on both stoves
and go ahead and open the stove up on both of them and then you put one on top of the other
and then those go together. I usually find it's easier to turn it over
to get this other pin in and then once again I like to use these wind dampers as handles
and just to make it easy you can go ahead and open that up put fire sticks in across
in a few places just so it's well supported. The two-in-one fire grate gets hinged open
and then that goes the distance just like that and that needs two fire pan tins
to get full coverage and that's how you would use the fire pan tins to accommodate
the eight panel bushcraft setup. These fire sticks have a little notch on them and what these do is
they hold your panels in position and then push it all the way in until that notch engages down
here on the bottom. That keeps these panels from spreading apart. Let's go ahead and start putting
it into its octagon position. You want to push the fire stick all the way in so that the corner
of the fire stick can go through the hole. Okay so then you kind of keep that straightened out
so it'll stay like that and then you go to the next position and once again you push it all the
way through and then straighten it out with the corner of that fire stick through that hole
then you go to the next spot you go every other panel you cross a panel
go through there and straighten it out and then when you get to this last one there shouldn't
be as much of a bind on it and it should be easier to get in push it in go all the way in
and by going all the way in that relieves some of the spring pressure on the octagon so that it's not
held into the octagon shape but you can easily put the fire grate in and that will hold it
into that octagon shape that gives you fire pan coverage for the octagon fire pit. Panel number
three towards panel number four once you do that it just kind of falls into place now once again
you're removing the center pins in this situation we're talking about here so the center two pins
come out and then it just comes into two stoves put these pins back in these space saver sized
cups are a perfect companion for the firebox freestyle they are a perfect fit to go down
into the stove just a little bit so if you have a windy day and you're trying to heat up some water
you can drop your cup down into the stove closer to the hot coals or closer to a alcohol burner or
whatever other heat source you may be using we've had tokes make a special cup for us that they had
previously discontinued and this is the cup with these up high butterfly handles you can orient
your handles the same direction as your wind damper and that allows you to go really low
down into the stove right next to the hot coals you can also support a stainless steel water bottle
with this inner set of holes this is my personal kit this is the kit i've done all the testing with
let me show you how i have it packed i've got the long fire sticks on this side and i've got a
long handled pot lifter that fits in this side now i don't have the locking fire sticks but they
will fit just right back in here or in here with these fire sticks so i have both of the firebox
freestyles in here there i got it so i have both of my freestyle stoves and then i have all the
fire grates in this front pocket so i've got the octagon the hexagon i've got the two-in-one
fire grate and then i've got the big square grill tokes siphon jet alcohol burner i like the head
space that the lower row of holes provides let me show you how they go in you slide those across
and you do two of them and that basically gives you a little support right in the center of the
triangle and then you slide the siphon jet down in there like that the transia alcohol burner
and the firebox freestyle are a perfect match for each other if you put this in the second position
down it creates the perfect one inch head space that you're always trying to achieve with the
transia alcohol burner it also gives you full function use of the simmering because it overhangs
the wind damper gives you access to get a hold of your simmering when it's hot you don't need to
have the fire grate in position to hold your stove open once you get your fire sticks through
and you put the transia in position there is enough spring tension against the sides of the
fire sticks that it holds your freestyle in its open position that frees up your fire sticks
so that you can support a small cup or a small pot to use the transia gas burner attachment
run the mounting pins through the second hole down through panel number four into panel number two
that's the outside row of holes then you need to orient your burner so that the hose is aiming in
the opposite direction that you plan on having it exit the stove now the reason you do that is so
that the hose will coil as it goes down and that will prevent the hose from lifting the gas burner
once it's in its position so you always want to lead with the knob once you get the knob through
the side feed port then gently twist the valve and it will find its way through you run it down and
then clip it onto the mounting pins just pull the hose through just a little bit that'll relieve
some of the spring tension and you're ready to get cooking let's put the transia gas burner
in the hexagon fire pit we'll run these long sticks through that second hole down
and then you want to run your hose between the sticks and out the back feed port you run the
knob through first and then gently twist it'll find its way through then as you clip this into
place hold the pins all the way in because they're just barely long enough once you get everything
set then you can let go of the pins and they'll stay in place you can burn esbit tablets one of
two ways i recommend using the transia gel burner in the highest outside position
this puts the esbit tablet fairly close to the bottom of your pot which will slow down the burn
and make it last longer you can also support a chunk chicken can on the fire grate
you would want to put the fire grate in that third hole down once again keeping that esbit
fuel tablet close to the bottom of your pot so that it will burn more efficiently the fire
grate serves two functions it both supports things that are in the burn chamber it also
holds your stove in its open position its height can be adjusted by moving the fire sticks into
any of these whole positions you may want to set it up for charcoal i think that would probably
be about right for charcoal if i were setting it up that's about in the middle of the stove
and then your grill plate would sit on top you will need to hold on to it with something
i like to use the long handled pot gripper this end of it works very well to just hold
on to the grill plate while you're turning your steak oh man that's tender almost wants to pull
apart already the triangle torch is designed to use its wood vertically so you need pieces of
wood that are five and a half inches long if they're longer than five and a half inches
they will start to block the airflow so i would keep them between five inches and five and a half
inches and then you go ahead and just run those right down to the ground now if you have a saw
you can use sticks that are larger diameter and you'll get a longer burn time but this is what
i was talking about as far as the airflow when you have the pot on here this rectangular shape
here on the edge is where all of your exhaust will come out that needs to be clear so that the air can
flow up through the fire building speed as it goes and then exhausting out the front just like a
swedish fire torch i really like using the triangle torch in higher elevations where you need a little
bit of a faster fire to compensate for less oxygen find a spot that is sheltered from the wind if it's
windy and you want to make sure that there is no combustible material anywhere near the stove you
want to always practice fire safety have fire safety be your number one priority go ahead and
break up a bunch of sticks that are about the size of your hand like that i want the chunkier stuff
down at the bottom by putting all of this wood horizontally down on the fire grate that will
slow the airflow down just a little bit as well once you have a pretty good base of fairly tightly
stacked wood put a bunch of this in on top this will just help the fire get going these small
sticks have very little thermal mass so they heat up fast and they contribute to the fire
a lot quicker than the bigger pieces we do have a little breeze here as long as you have heat
you may as well use it let's put the pot on okay that did not take very long at all to get to a
rapid boil but now that we have kind of a good bed going we can drop in some of these chunkier pieces
maintaining your fire in the firebox freestyle is all about timing and temperature every piece of
wood you put in has thermal mass so it will cool down the core of your fire you don't want to wait
until your fire is almost going out before you put more wood in because there might not be enough
energy left in the fire that's existing to heat up the new fuel that you've just put in and don't
put too much fuel in at one time or you will overwhelm your fire with this cold fuel and you
can put it out once you have a well-established fire you can start feeding fuel in from the side
now it may help to stabilize your stove by putting a little pressure on your pot
or holding your pan as your sticks burn gently feed them further in once again remember to
stabilize your pot or your pan before you start pushing your sticks further in sometimes when
you're boiling water in a pot like this creosote will form on the bottom of the pot and it will
cause the pot to stick to your stove a little bit so you don't want to pick your pot straight up
or that can pick up your whole stove you know the stove is very lightweight this one is made out of
titanium so it's especially light so what you want to do is you want to kind of pick up one corner
of your pot and then pick up the other corner so you're kind of holding your stove down with one
corner and you're breaking loose the pot from the stove by lifting the other corner of your pot
to properly maintain your firebox tin and your firebox freestyle i recommend a light coat of
oil between uses this is extra virgin olive oil non-stick cooking spray i find this is just really
convenient to just give a really light misting onto your firebox tin and then wipe it down with
a napkin or a paper towel and you're basically wiping all that oil back off you don't want your
fire pan tin to be you know really oily you just want to clean it up and you want to leave it with
a very light coat of oil you'll want to get a light coat of oil on the inside of it and on the
outside so once you have the inside finished i just close it up that way you can hold on to it
and i don't spray more on i just use what's left on the paper towel or the napkin
and just run over the whole thing and make it look nice and pretty now every once in a while
you're going to grill something that has a lot of fat in it or perhaps cook hot dogs which can be
quite messy and you're going to need to use soap and water to get it clean dry it with a paper towel
and then put it in the oven at 400 degrees for about 10 minutes when you get it out of the oven
it will be completely dry and it will be ready to oil that will give it a really nice finish
and protect it from corrosion you want to give the firebox freestyle a similar treatment
now this is the titanium version so you don't need to oil it to prevent corrosion
but it is a good idea to put a little bit of oil on it every once in a while it
helps the hinges function well and just keeps keeps things working nicely
so what i'm going to do is i'm going to go ahead and remove the pin between panel number one and
panel number four and then i'm just going to go ahead and open the whole thing up keep track of
your your leg your pin and then with it opened up it's real easy to wipe it down i'm going to go
and treat this as though it were stainless steel and just give it a light coat of oil with the
spray and then wipe it down with a napkin or paper towel the oil just helps pick up
the soot it helps clean things just a little bit better so you're oiling it and you're cleaning it
at the same time i'm going to go ahead and put this back together
and one thing that may be helpful if your hinge pins if your legs feel a little bit stiff
or a little bit tight when you're putting them in and out just pull them out one at a time
and just put a little bit of extra virgin olive oil on them and wipe them down clean them you
know a little bit of cleaning them and oiling them will make a world of difference in how they
function so you can see that one already goes in smoother than it was seeing that one just felt a
little bit tight what happens when you have a hot fire in there is that burns off all the oils
that were ever on the the hinge pins and so just getting a little bit of oil back on there
just helps them operate more smoothly but i recommend pulling them out one at a time
that titanium sure is beautiful if this were stainless steel you would want to put a light
coat of oil on it just maintain it with just a little bit of oil between uses
it'll just keep it looking nice and it will prevent corrosion so once you have your fire grate
your stove maybe you'd want to wipe down your fire sticks get them cleaned up then you're
ready to go ahead and package it back up i like to put the fire sticks on both sides of this hinge
then i put the fire grate on top once again you can see this is in the orientation that i will
put it in the stove this is the long side and this is the long side and so i just always keep it in
that orientation just to make it easy i get asked a lot how do i clean up my pot after cooking over
a wood fire i just wipe it down with either paper towel or napkin and you just need to remove this
loose soot so if you just wipe the whole thing down one time around is usually enough there's
quite a bit of soot there in that spot i wipe that down with the paper towel or a napkin
and then you can see it it doesn't come off you know there's kind of a glaze that's left behind
but all you really need to get off is the loose stuff it's best to just embrace the black wipe
off the loose soot clean off the stuff that is going to be messy and when you get home you can
go over it with soap and water and get a little bit more of it off but i never try to get all the
black off i really do like the black they say that it runs more efficiently and absorbs heat better
when it's black so i embrace the black we wanted it to be easy to put your stove in so we made the
bag a little bit loose the other reason we made the bag this particular size was because we wanted
the ability for the bag to actually hold the whole entire case so you can slide your case into the
bag like that as well let me show you how you can get creative with these locking fire sticks so
these are the fire sticks that have the little notch cut into them so i'm going to set this up
this direction i'm going to use the locking fire stick right here and i'm going to snap it into its
position i'm going to use another fire stick here and one here on the end and then what i'm going
to do is put the hexagon on this end and we'll just put the regular fire grate right here i call
this the keyhole position or the keyhole configuration or shape or you know whatever
you want to call it but this way you can have kind of a maybe a boiling station going here
with a pot sitting here and then maybe you have a grilling project going on over on this side
doing stuff like this gets a little bit more tricky because you have to put the fire sticks
in in a very particular order to make them work so this is one of the locking fire sticks
so let's go ahead and lock it up right there and then i run another locking fire stick
across right here i could actually run this one from this side and run that right there
until that locks in and then that locks this into position but then i would need
a fire stick maybe going across here on an angle to hold to hold that fire grate up
and then let's put one here on this end let's see if we can find a go ahead and use our two
in one fire grate here and just the regular fire grate right there so that's kind of fun