
Oil Painting Tutorial | Grisaille Techniques. PORTRAIT STUDY For Beginners and onwards.
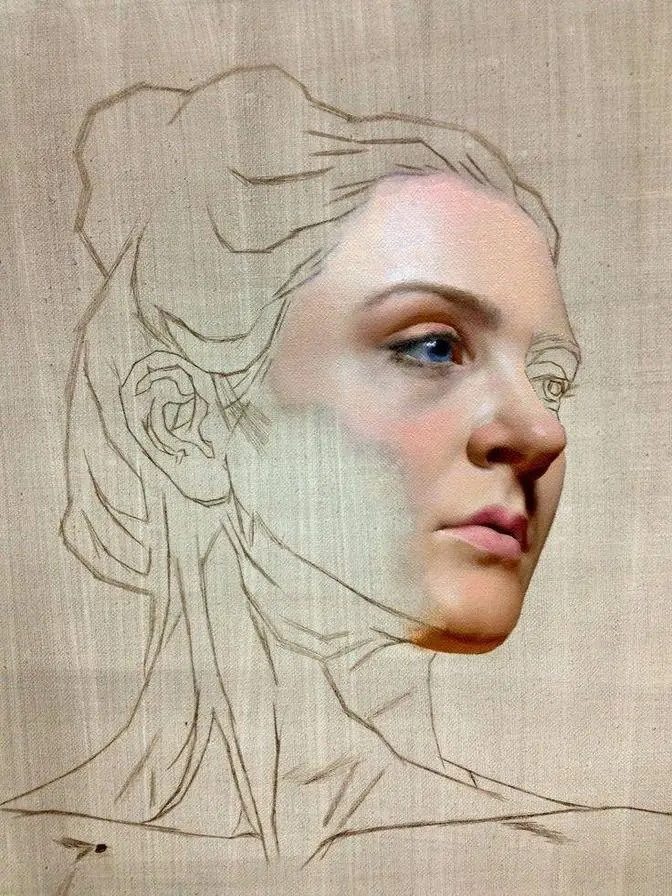
3 Video Views·Apr 3, 2026
AI GeneratedMay contain errors
Hi there, thank you so much for clicking the thumbnail and being interested in my work.
In this video I share with you this oil painting study of the Grise technique. So be sure to watch
it right through to the end because here and there I'll be slowing things down in real time
so you can take a closer look. So let's dive in and take a look. Now for this study I'm using a
canvas board I've made. It's flax canvas stuck onto MDF. Now there's a video in Patreon and also
in YouTube explaining everything about this, how I prepare for the boards. So if you want to check
that out later. So what I've done is a freehand drawing here but to save time I've gone straight
to the outline rather than me showing you how I do the freehand. So I want to spend more time
focusing on applying the paint. So let's dive in and take a look at that. Now I use Michael
Harding paints. I've got Ivory Black here and Titanium White. And the medium I'm using is
Liquin Original. Now the brushes I'm using are Hog Hair rounds, size number four, three of,
and number two, three of, and also synthetic rounds there. Separate the brushes in between
your fingers so you don't get all the brushes covered in paint. So it's the easier way to do
it. It keeps everything nice and clean. Mixing is quite straightforward. Just put plenty on there
so don't starve your palette. And it's just a case of creating tones from dark to light really,
basically that's all it is. You're creating a mid-tone, the dark and the white. I usually start
with the lights first, so just picking out a few highlights here and there, the white of the eyes
and the highlights on the forehead and cheeks. I generally then go for the sort of mid-tones
and then try and get a few darks in there and then focus on the darkest area which will be the actual
pupils of the eyes. So just focusing on that. So you're getting an extreme sort of value and then
you can work out in between then so you've got something to actually compare to. Now a really
important factor here is that I've primed it with a non-absorbent primer. Now this is from Michael
Harding and you only need a couple of coats and it's amazing. It doesn't absorb, the paint doesn't
absorb into the actual surface so it keeps everything nice and fresh and you don't get dull
colours then and it makes it so you can move the paint around easier. So check out that video I
mentioned earlier, I'll just shine it up again so you can visually see it. Now the Hogair brushes
are best brushes for this job, just putting the basic sort of structure in there because they can
scrub that tone in there as well. It makes it easier to move paint around because if you started
using like those synthetic rounds or flats here they'd sort of bend over and it won't be able to
manipulate the paint. So the Hogair brushes are better but what I'm tending to do here
is trying to get the overall tones in there so I'm blocking in, I'm not bothered about the detail at
moment, just sort of getting it all roughed in in blocks of sort of tones and once I've got all the
paint in there then I'll go smaller with the brushes and then eventually smaller with the
synthetic rounds just to tighten the details up and just to make it more accurate. It's just like
my pastel work where the under drawing is actually to correct the outline so what I'm doing is
correcting what I've drawn because it's freehand so I'm checking everything making sure everything's
all right and then getting a basic feel. Now I'm opening my heart as well I'm connecting to the
energy of the subject so the more you can open up the more you can send this open heart feeling
to the subject or the reference image there's an energy that comes back from that and you absorb
that and it goes through your body out your hands into your work. Just showing the palette in view
now so you can see how I'm manipulating the paint and mixing it. Now it comes to a stage where
everything gets a little bit thin and sticky so you have to remix paint so you can make sure
you've got plenty of pigment on your palette because if it gets too thin it gets a little
bit sort of unmanageable it starts to get tacky too much and sticky and and you can't move things
around so make sure you've got plenty of paint on your palette always. If you're enjoying this video
why not subscribe it's absolutely free then you're sure not to miss any of my future videos.
Here you can see me using the little hog hair brushes now just to sort of you know sort of
tighten things up I'm doing little circles little sort of movements and I'm mirroring what I'm
seeing so I'm letting the movements just happen so I'm not thinking about it I'm just sort of
letting it just develop on its own. Now with the little synthetic rounds here I'm just tidying
everything up just making sure that things are in the right place it's all preparation then for when
you start putting the colour on the more accurate you can get here the better it will be when you
start putting the colour on so it's worth taking your time to make sure everything's in the correct
place. Now coming to the end of the first stage now just leave this to dry now for two or three
days before you start with the next colour stage. Now I've named all the colours on screen for you
I'm starting off with the cadmium red and then I'm going to use a mixture of yellow ochre and
cadmium red together with white just making sort of tints as we go down and then yellow ochre so
you've got yellow ochre then red and then in between then it's burnt umber and red and then
ultramarine blue and brown for the greys. Now to desaturate the red I'm using a green as a
complementary colour so it creates a nice sort of subtle greys and then just tinting it with
white because if you want to desaturate a pink you just put a light green with it.
So let's just get a bit of colour down first I start with little brushes to start with and
just see what happens so I've got a little bit of liquid here look so I'm going to work on the
lighter area first then so just get a bit of see I can pick a bit a bit of red from there
a little bit of yellow ochre from there look and make a slightly lighter colour than that so you
can play about move it around I'm just going to get some pigment down to start with and these
lighter areas it's a bit too light squint your eyes it's more more there so I'm just sort of
just putting some colour notes in to start with does change the colour we're putting over this
sort of different tones of grey though it's amazing how different it is you won't think it
but it is right I'm just going to put a bit of brown and red in here to start with I'm only
putting translucent paint you see because using that grey underneath we've already put in I'm only
going to do this section as well as I mentioned so I'm just laying some colour on like that so
just blocking it in interested in seeing this study completely like you've just heard real-time
audio real-time video it is on my patreon in three parts so if you wanted to check that out
the link is in the description below now the shadow here I'm just mixing the green and the
red together I'm putting that over and just basically getting some areas here and there
similar colour getting a feel for the balance of where these tones and values are so it's a case
of just playing and just seeing what works but using the same formula as what I do with my
pastels really using yellow ochre warm red and desaturate with green so initially I'm just
blocking over the grey with colour but just using a little bit of liquid but more or less scrubbing
on there with the actual hog air brushes the hog air brushes seem to be better than the
the sort of synthetic rounds because you can you can scrub the colour in and you can apply more
quickly with hog air brushes too now for the eyes I'm using ultramarine blue yellow ochre and a
touch of red in there to start with and then what I did then is mix up a purple to create more of a
purpley bluey colour so using a bit of ultramarine elysium crimson now using brown and blue for
around the iris and then inside the iris I'm using ultramarine blue with a bit of lemon yellow
because it's got greeny eyes and then just basically just glazing over with that brown and
blue rather than using black I mix the black using brown and blue now I've used like a burnt sienna
colour so I've mixed it to make it look like a burnt sienna colour and put that around the actual
pupil because it gives it life you see creates that sort of feeling of depth to the the pupil
there now I'm slowing it down to real time now so you can actually see me putting these little
marks in the eyes again very thin paint using burnt umber and ultramarine blue and just feeling
my way and just glazing here and there and then just putting them fine details over the top of
that always take my time when I'm doing these sort of things and really open up your heart
and connect to the soul of the person by just sensing what's behind these eyes and let that
feeling come into you let it flow through out of the hands into the actual painting and really
just sort of take your time and just mix in very very thinly just build it up slowly but surely
so after you've initially put down the colour on this grey you'll notice it looks a bit wishy-washy
so after in places really put a little bit more pigment in there to create more of a chroma ready
for the next stage because you have to think when you glaze over the top of that it needs to be
for it to feel right so I've added more pigment now now this looks a little bit red on the cheek
here but I will settle that up later I'm just working on the ear so I'm just sort of basically
getting some pigment down again but more richer in certain areas adding more shadowing now by
again the green mix with the red and then add a little bit of white to tint it a little bit as
well in places so you have to keep sort of playing about keep squinting your eyes and just getting a
general feel for it now I'm using the dry brush now just to soften up those freckles and marks
there just to soften it up a bit before the next sort of coat and then just putting a little bit
of subtlety in there just preparing it all now for the second coat of colour just putting the odd
little bit of detail in here and there if you're enjoying this video why not give it a like and
share it with your friends it would mean so much to me as this would help the channel to grow
when you're blending the colours it's best to wipe your brush onto like a kitchen paper or
something like that put so put a bit of pigment wipe your brush and then just blend in with it
now this is the end of the first coat of colour so just need to leave that to dry now for two or
three days all right so this is a start of the second layer plus the details so I've laid the
colour out exactly the same as before but not so much of it so you can see there's not some bigger
piles and it's a case of laying it down thinly in places and thickly in other places so the more
brighter it is the thicker the paint and the more sort of shatter it is the thinner the paint really
so the more sort of pigment you've got in there the more brighter it is so basically what I'm
doing here is starting off with the highlights getting the highlights correct first so I'm
squinting the eyes and sort of getting overall balance so I'm picking out these areas that are
the lightest area now I'm not just pulling pure white in there I'm mixing it either with yellow
or a bit of red and might be adding a little bit of lemon yellow with it as well just to give it
that sort of zinginess in places now I'm just moving the actual brush in little circles or dots
just swizzles just to create a little bit of texture and interest in these highlights
so now I'm going into the shadow area so I'm going from one extreme to other so now I'm using the
green and red mix so if it needs to be a little bit warmer I'm adding a bit of the yellow ochre
with it if it needs a bit more redder and cooler I'm adding a bit of blue and red together to
create purples so there's all sorts of colors in these shadows it's not just like a dark red
there's all sorts of subtleties there is a close-up view of it now I've slowed it down so
you can actually see the actual different subtleties and colors in there there's yellows
pinks purples greens there's all sorts of different shades of skin tone in there it's
really interesting just to sort of mix on your actual canvas so I'm just picking up colors and
just mixing them like a water for our pastels doing pastels you know so it's just a matter of
just applying the same sort of rules really and just blending them in just mix a color blend it
to the other color and just creating the right sort of temperature and subtlety really by adding
that yellow if it wants to be warmer blue if it wants to be cooler and desaturating with the green
if it needs it just like to take this opportunity to thank all my patreons for their wonderful
support can't thank you enough it means a lot to me if you're interested in joining me on patreon
and would like the benefit of longer slower more in-depth videos please check out the link in the
description below for more details I find it really important as well to get the shadows correct
because if the shadows are not dark enough it'll just throw everything out so really got to get
those lights and the darks right and then everything else just falls into place then
now in the shadow areas it's very thin color I'm just scrubbing it in really but there's
all sorts of subtleties there's the sort of blue purples reflected light you see this
shining on there it's creating all these like rainbow colors in the flesh tone so here's a
close-up view of it and now I'm mixing it so just more or less scrubbing it in really not much
pigment and not much actual liquid as well so it's more or less straight out of tube really and
just scrubbing it in to what you've already put in there and just letting it sort of mix in
now if you make a mistake like that just rub it in dry your brush what you don't see me do is keep
wiping my brush tip as well so I put a bit of pigment down dry my brush then scrub it in so
I'm doing that constantly putting a bit of paint down and then if it's too thickly put on I just
wipe the paint off the tip of the brush and then just use that as a blending tool then
just using the smaller brushes now to fine-tune things preparing your way because the last
details at the right at the end with these eyelashes here I just put placement but there
will be more detail put into these at the later on in this video so it's just preparation really
there with the hair I put in deeper sort of dark shadow in there using the brown and blue
and then just highlighting them with a mixture of yellow ochre red and blue so it's just a
combination of all the three colours now for the details on the eyebrows there so I'll scrub some
colour in there first it makes it easier then to actually use a paint over the top because if you
try and put detail over dry paint it tends to be a little bit hard work so if you use like a scrubbed
colour underneath it acts as a vehicle then for when you start putting these fine details on
now I'm using at the moment here a flat synthetic brush it's good for getting those sort of loose
sort of details in I will be using a synthetic round for the finer details but for just getting
this sort of idea of the movement and the flow of the eyebrows because you have to be careful not
to put too much detail in it's just a case of just seeing what's there and painting what's there and
just letting it flow like everything else I do I don't name it I don't think oh I've got to do the
eyebrows now I know I'm naming it here because obviously I've got to communicate but when I'm
painting I just switch off all names and I just see what's there so I see the highlights the detail
and just paint what I see and just let it flow rather than trying to get every hair the same
I'm just getting that feeling and movement of the eyebrows same thing with the eyelashes here just
very very thin paint using brown and blue again and just feeling my way keep wiping my brush as
well so if I don't want to get too much paint on there so just make it so it's just enough
so it's just a case of just being aware of that it's a very very thin paint hardly any on the
brush at all but they can add more to it as you go along you see best to have a little amount to
start with and then build it up and then I'm just putting a few highlights in between those eyelashes
there and just you know putting that sort of little bit of sort of detail and finesse to it at the end
now I tend to sort of step back a lot these stages here and sort of take photograph of it
with mobile phone maybe look through the mirror over my shoulders and see what it looks like
so just sort of getting an overall sort of a fresh look at it just squinting your eyes to
see the value open your eyes to see the colour and these little fine details do make a difference
just adding those subtleties there just a highlight in the corner of the eye as well
there's always a little bit of redness to the the flesh inside the corner of the eyes and there's
always a highlight there as well so but it's not pure white I've added red to that so it's a bit
pinky white thank you so much for watching the video right till the end and if you want to see
the full probably six to seven hours of this real-time video real-time audio it is on my
patreon now in the oil painting section so please check that out the link is in the description below
and if you want to see more of my youtube videos
please check out this link here take care bye for now