
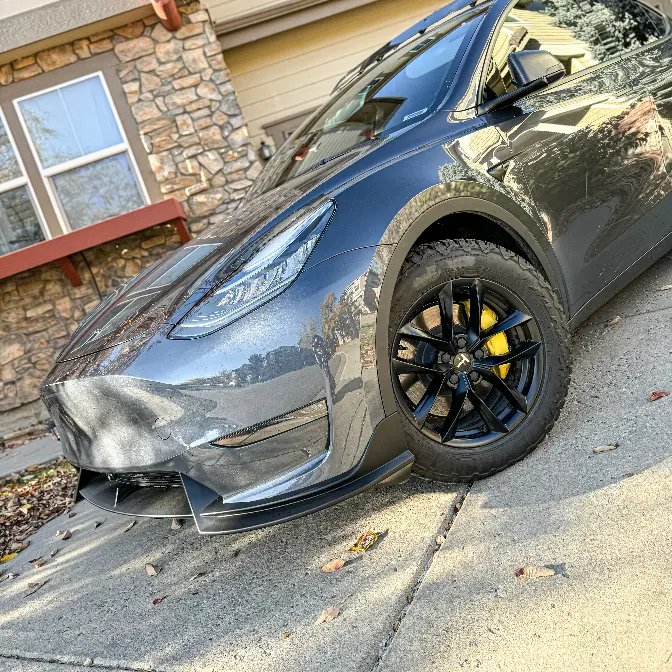
New 2024 Model Y Performance Front Lip with Easy Installation in Just 15 Mins! #tesla
Tesla Referral Program is back!
Use referral link here: http://ts.la/paul79872
and get $2,000 off on your new Tesla.
Here is the link for Model Y front lip / Use Code: DADTC for 20% off!
https://evbase.biz/3S8aDBE
Enjoy the Video?
Support the channel by buying me a COFFEE to fuel my creativity ☕️https://www.buymeacoffee.com/dadstoyscars
Thank you for your awesome support! ❤️
#thenewaero #tesla #teslamodel3 #model3accessories #modelyaccessories #teslamodely
Thank you for watching!
Facebook: Dad's Toys & Cars
Follow me on Instagram: dadstoys_cars
Please LIKE, SUBSCRIBE & SHARE :)
Hey guys, Paul here.
Welcome back to the channel.
I have this brand new Tesla Model Y front lip to share with you today.
This is a plastic matte finish front lip for Tesla Model Y.
This front lip is probably the easiest front lip I ever installed on my car or on Tesla.
I have done a few of them before.
This is the third one and this is the only one that I could install it by myself the
whole process.
So in today's video, I'll show you what comes in the box and step-by-step installation.
And then at the end, I'll show you how it looks on my Tesla Model Y.
Now let's go.
Let's see what comes in the box of this new front lip for Tesla Model Y from EVbase.
And here what came in the box.
Let's take a closer look.
So I picked a matte black option for this new front lip for the Model Y.
This one I like the most the design because really a lot less lower compared to the rest
and this one you just basically insert into the lower lip or the lower bumper instead
of you know attaching from the bottom because attaching from the bottom the adhesive more
likely to get loosened after a while and it might just eventually drop which I already
had the experience on my Tesla Model 3.
I like the matte finish look so it looks like you know the rest of the trim on the Model
Y that came with the car.
It has that matte plastic around the car so this will go well with it and they also have
a gloss which I have here to compare.
So they have a gloss black or matte black finish as you can see here and I also have
the side mirror cover matte carbon fiber so that will go well with the matte finish look
and it will give a good contrast on my midnight server Tesla Model Y too.
So this is the gloss black and matte black.
It came also came in pre-installed with the double sided tape it came in small double
sided tape if you're not sure you can install extra double sided tape yourself before you
install it.
Also a bag of hardware so a bag of a plastic clips and also the screws.
You could either install the screw underneath or I will see how well it sticks to the bottom
of the bumper.
If it needs extra security I'll just install the screw on the bottom so it will look something
like this.
I like this style because even though it came in three pieces as you can see but when you
actually install it you can't really tell.
Now let me show you where you can get this new front lip for your Tesla Model Y.
You can get this new front lip for Tesla Model Y from EVbase or EVbase.com.
As you can see here there are four different options you can choose from gloss black, matte
black, matte carbon fiber texture, it's still ABS plastic but with carbon fiber texture
overlay on it and gloss carbon fiber texture.
And if you are interested you can use my special discount code DATTC for extra 20% discount
so this is the final price after the discount which is really awesome price for a front
lip.
Now let's go and install it on my Tesla Model Y.
Let's start with the installation before we actually install the front lip on Tesla front
bumper.
You have to put the three pieces together first let me show you.
So it came with all the screws that you need to put the pieces together so it's basically
three screws on each side so two right here one two as you can see just attach it together
and then at the bottom there's one more on the bottom it's the same same thing on both
sides two screws here one on the bottom really straightforward.
Now we are ready to install on my Model Y.
First step here before we install the front lip we have to clean the surface first so
use the clean towel to clean the surface and a cleaning solution.
So just you know spray it everywhere you want to install the front lip.
I just washed the car but still I have to make sure it's super clean no dust in between
the surface and the attached part of the front lip.
After the surface clean use the rubbing alcohol and then apply on the towel and clean the
surface with rubbing alcohol again this will make sure everything is ready and surface
is clean.
After you are done cleaning up the surface just use the flathead screwdriver to remove
these tabs right here four tabs.
There's one as you can see right there it's a plastic tab because we will be replacing
with a longer tab that came in the package so four different tabs.
These are the tabs that we just removed that came with the car as you can see it's shorter
and these are the new tabs that will be installing after we place on the front lip as you can
see a lot longer because it adds the thickness to this part so you need a longer plastic
tab.
Save this when you want to you know remove it and then put it back in.
Next step here we just have to remove all of the adhesive tapes the double-sided tape
around and then install it basically just remove all the small tabs all small part out
entirely and then the longer part I just leave it hanging like halfway like so now we are
ready to install it.
I would start from the center of the bumper because it has this kind of cut right here
so you find the center easily and then just slowly place it and just remove the adhesive
corners on this side and just slowly gently push it in and make sure you push it in all
the way and it's in the middle and then align the bottom cut out so the middle part is pretty
much done as you can see I wouldn't push it in yet we have to do the side first let's
do this side real quick and now attach on the right side pull the tabs out top and bottom
this one's a lot easier to install since it's actually clamped on to the front bumper instead
of attaching from the bottom so you have a lot of place for the adhesive to grab onto
so the right side is pretty much done same thing here pull out the adhesive top and bottom
and then make sure you pull it all the way to this side and then attach it that's it
so now we're gonna go around the the front lip and then try to you know hold on each spot for
like a good 30 seconds and we are done attaching the adhesive part seems look this one's so much
easier to install I wish they have the same similar design for the monitor I would definitely
switch to this one you can see it matches the matte black or matte finish plastic on the trim
of the model Y that's why I went with a matte finish so it's kind of flow with the rest of
the car and I also have a matte finish carbon fiber side view mirror too now we have to put
these clips on that's it attaching the clips done super simple so there are four screws left
you can either leave just an adhesive to do the work or you can screw two more screws right here
so one right here and one right here so you can screw them on they are attaching to the bottom
plastic which is this this one right here the plastic so as you're not attached like you're
not screwing on the painted part of the car so it should be fine if you don't want to you don't
have to and I'll just it stays seems to stays really well I'll screw them on just to be sure
alright the last step here I just put the painters tape on you know attached between the bumper and
the front lip all the way down there so it attached on both top and bottom all around just
to be sure I would normally leave it for a few hours better to just leave it overnight to make
sure it's attaching really well the adhesive underneath and the front bumper this one looks
really good really really easy to install I did it all by myself I didn't even need help to do
than I thought not only that I love how easy it was to install this front lip you see the contrast
between the gloss and matte I'm glad I went with matte finish you see this it's continual it's
kind of darker a shade or two darker than the trim of the model Y you see model Y has that
plastic matte finish trim all around the car so that's kind of match with that so it doesn't look
out of place even though it's different finish gloss and matte but it looks so good only one
thing I wish they did a little better right here you see this cut right here should have gone you
know more rounded cut so it's a little bit more smooth on the transition here between this and
this but otherwise as you can see you know we saw at the beginning it was three pieces right but now
after I install it it doesn't you can't really tell it's three pieces it looks really seamless
connection between all three pieces and I love this design much better than the one that you
know you actually attaching to the bottom because you actually attaching but you it grabs on to the
bumper instead of attaching to the bottom so this way it's less likely you know to get loosen
or you accidentally drop these probably these probably gonna stay for a while I'm sure this
thing it's gonna stay over the winter here with the snow in Colorado and another thing I like
about this front lip is that you get the same clearance let me show you so the original clearance
it's right there so it's the same clearance basically when you park you don't have to worry
about you know your front lip being scraped and it looks still looks really good with you know
non lower car I didn't do anything with my car but still this front bumper probably one of those
that still looks good even though you don't lower or your back put the airbag on your car I'm glad
I picked this finish and I picked this front bumper design this one awesome looking front lip
for your Tesla Model Y as you can see in the video this new front lip for Tesla Model Y was
really simple to install easy step-by-step installation that I show you can actually do
it by yourself just like I did in the video today and turned out really really good too I love the
contrast that matte black finish that blend in with the rest of the trim of Tesla Model Y and
contrast with the paint the gloss finish paint looks really cool similar to the new Model 3
Highland performance that has like a little lower lip that is matte finish contrast to the paint of
the car let me know in the comment down below what you think about this new front lip for Tesla
Model Y and I'll make sure to put the link of this front lip from EV base in the description
down below and special discount code for you to thank you so much guy for watching today's video
make sure to click like if you liked the video make sure to subscribe for
more awesome contents like this we'll see you on the next video peace