Hey guys, Paul here. Welcome back to the channel.
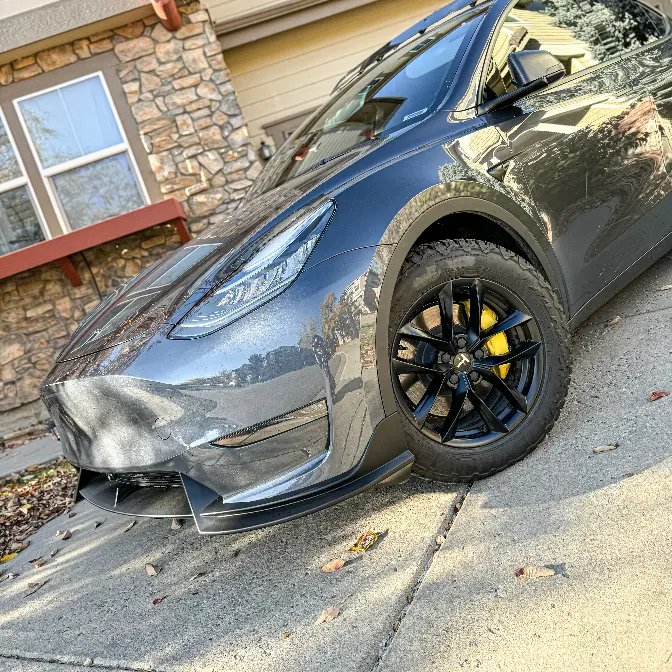
Behind me is a 2024 Tesla Model 3 or Tesla Model 3 Highland. I know a few of
you might already been driving a car for a
while and a few of you might still waiting
for your delivery of the car but if you're still
looking for good accessories for your brand new Tesla Model 3
do not skip this video because today I will share
all of the accessories that you would need
for your new Tesla Model 3 both interior and exterior of the car.
Some of them would enhance your driving experience
with your new Model 3 Highland and some of them might even
improve efficiency of the car. So today I will share all of the
accessories plus quick installation guide, how to use
them and how to install them. So don't miss
today's video. Now let's go!
This video is sponsored by AMBER. AMBER offers
modern extended warranty for your high mileage
Tesla which will cover battery, drive units
and much more without long-term commitment or huge
fees upfront and if you are interested you can get a quick
over the air diagnostic and a quick coat
right on your phone. You can use my special discount code
PAW5 for 5% off on your premium plan or you can click the link
in the description down below. Now let's continue
with the video. Alright let's start with the exterior
accessories first. Something you would definitely need
and it's quite important than you think. Those are the mud flaps.
The stock car that came from the factory does not have a mud flap with the car
so what it does is helping you know protect your side
panels right here all the way on both door panels
to get dirt or rocks kicking up while you drive and then scratch
your paint. So I think really essential to install
the mud flap first thing first. So I have these new mud flaps
six actually six mud flaps that you can install
for the front and these mud flaps they're really compact so they
won't affect the aerodynamic of the car at all.
So one in the front as you can see here and two
in the rear so one right behind the rear wheel
there and then right one right in front of
the rear wheel because most of the power from the battery or from the motors
are in the rear wheel so it will kick up a lot of dirt
so it keeps protecting front and rear so this is something new
and it's super compact too really easy to install let me show you all around
as you can see on this side too so it does not
stand out that much but it helps protect your car especially the paint
on the side. Alright let me show you how to install
these mud flaps. How you install the mud flap in the front
so turn your wheel on to the left side of the car to create more
space here and then use one of the tools that
came in the box to remove a plastic locking clips
like this so remove three of these out because we'll be replacing
from this to this one these ones are longer
because we added a little thickness from the mud flap next just insert the
new mud flap in put in the new locking clips
to the same spot and then just lock it in place now the front mud flap
installation is done do the same thing on the rear now we
have front mud flap
and rear mud flaps install not only the rear the back of the wheel
part also the front of the wheel part too
so you have protection on both sides of the back of the car so now your side
the side of the car less likely to get all the splashes and
the rocks to scratch on the bottom side of your
car anymore and the next exterior accessories
that i would highly recommend are these wheel covers
they not only give you a cool design on the wheels it also helps
protect the rims on the inside because the inside
actually alloy wheels that came with the car
i have two different design or style to share with you today so these
are the new designs that actually make it look
bigger than it is the stock 18 alloy wheels
from tesla this is the tesla model 3 long range so this actually looks
really similar to a nova 19 inch alloy wheels which is a
$1,000 upgrade from tesla but now you can just
switch the wheel covers it looks exactly just like nova
wheels but it is black so it's cooler color if so you want a black you can't
even get a black color from tesla they only
offer silver version and this is what it
looks like front and rear look at the front it
actually makes the wheels look bigger
because it covers the whole rim on inside
and plus it protects of course protects the rims from getting scratched so if
you have any accident curbing anything or scratch your wheels
it will scratch on the wheel cover first before it goes into your alloy wheels on
the inside and i have two different design so this
is the first one this one i don't think it will improve
efficiency of the car but of course it will help protect your rims and improve
the look for sure and the next one another wheel covers is
are these wheel covers so it's really really cool see how they
look on here so these are directional actually and
i have tested really similar design to these
on my model y and they actually provided better efficiency
than a stock wheel covers on my model y so
i i'm pretty sure these will too because they are directional
meaning both sides left and right are facing
the same direction which is this way so it's like a turbine right you're
spinning this direction so it should go in the
same direction on the other side let me show you
so this is the wheel covers for the left hand side which
spin the same direction as you can see so it goes this direction this way
goes to the front and then spin this way same exact
on that side so these will provide a better efficiency because
you see spin the same direction and also protect your rims
still and gives a better look a better design on the
overall looks of your wheels to on your tesla
model 3 and let me show you a quick installation guide
for these wheel covers and here how to remove
the original wheel covers and install the new wheel covers first
remove the original wheel covers just grab hold
um onto one of the spokes use two hands
and then pull it towards yourself like so and then just go
around the wheels there you go then the whole thing should come out
and to install the new wheel covers before you
install it in the package it came with this protective
tapes that you can install on the inside of the wheel covers
so this will help protect the wheel covers
from scratching on your alloy wheels on the inside and also prevent
from creating noise at low speed so to install
locate a valve stem cutout as you can see right here
and then find your valve stem on your wheel
and then aim it there and it should fall in place and then just pop it
in that's it you're done with the installation
really easy to install as you can see it protects
the wheel the rims the alloy wheels on the inside too so if you get a
curb rash or scratch on the wheels you will not scratch the actual
alloy wheel on the inside just scratch the wheel cover which
you can just easily change it and last but not least
for the exterior accessory or improvement is this awesome carbon fiber
rear spoiler for your tesla model 3 this is really similar
or same design as you seen on the new tesla model 3 performance it has this
really cool cutting edge design as you can see this line
flow with the design of the car in the rear it's really nice
and it's actually wider than the previous
model 3 performance spoiler it comes out all the way
out here and also wider this way too so it comes out a little bit more on the
side i love this a little angle design here with
the quality looks really really good real carbon fiber a dry carbon fiber
with matte finish and i believe you can even choose
a gloss finish on the carbon fiber too and it's really easy to install
it shouldn't take longer than 20 minutes to install this spoiler
first you basically have to clean all the area that will be attaching
your spoiler to then clean again with rubbing alcohol after that just try to
match it and then mark it with a masking tape or
painter's tape that comes in the package on both sides
so when you actually install it you make sure you put it on the right
spot then peel off a double-sided tape cover
on the back like halfway and then place it on
and then slowly remove the tapes and put the pressure on and leave it on
for a couple hours and that's it you're done it's really
really simple installation easy to install and with the
quality of the product and the price this is
actually less than half of the official tesla spoiler
you know both are real carbon fiber official tesla spoiler it's $500
but with EV base with the discount code it's 183
that's less than half of what you can get
from tesla website all right so we're done with the exterior
upgrades exterior accessories now let's go and start with the interior
accessory or upgrades for your tesla model 3
and the first interior accessory is definitely
a must-have it's a timber glass screen protector
for actually the package came with both the front display and the rear passenger
display and it came with everything you need
all the wipes and the squeegee installation is really simple first
apply clean the display with the wet wipe
first oh one more thing before we do that
go to display and screen clean mode then you can just wipe and clean
and you can see all the dust because display turn
black let it dry and then you can use a dry
wipe to clean the display again then you can remove the film in the back
and apply the screen protector after that just use the squeegee came in
the package to remove all the bubbles then repeat the same
process for the rear smaller display
now both rear and front main display are well protected especially the one in
the rear because you have your kids playing with
this their feet may be up here so it will be
easy to damage the rear display but believe it or not i actually crack
a front display before thank god i had a screen protector on so it cracked
screen protector instead of the screen itself
and the next accessory here it's mainly for the look but
it makes it looks really cool for your interior
this is a performance brake paddles and accelerator pad as you can see
it's aluminum with a rubber grip on it looks really cool one side has
off and one side has on which is accelerator
really really cool and nice design i love that like a darker
aluminum on the pads itself installing the new paddles are really simple
first just have to remove the oem paddle from
the brake pads first there you go you don't have to remove the accelerator
paddle because there's nothing on it and then just
replace it with the new ones both brake and
accelerator and here it is you're done with the
installation if the rubber in the back it's a little
too hard to move around i would highly recommend
to maybe put in a boiled water just to soften the rubber in the back so you can
actually put it in easier and the next interior accessories
are really essential because you have this big
storage area on inside the center console but how can you
make it organized so here's your answer a tray organizer now you can
manage two levels of storage spaces so the top so you have this tray with
a rubber grip or a rubber cover so when it gets really dirty you can just
pull the rubber cover out and then just wash it
basically and it has three different dividers so you can put
so many stuff in there your key change you know
your cards or i mean your key cards or even a slot for glasses or sunglasses as
you can see right there very cool
and one more storage tray is the one in the back here so
same here three different dividers so it's more
organized you can put more stuff here on the first layer and you can put
more stuff on the bottom of it same thing
on this tray it has a rubber grip or a rubber pads that you can just
you know easily take it off you can see and then wash it out
and for the top you have the top layer with the organizer tray and you still
have a bottom layer put more just more of
your stuff there so if you want to hide something i
would put in the back here because if you know someone don't know
tesla to try to open find something that they're looking for
something that's more valuable they won't even know what's
in the back or and on the bottom of this tray
and the next accessory would be this really cool
gear shift knob or gear selector knob for your tesla motor 3 because the new
tesla motor 3 is different now it doesn't have a shift
stock anymore both the turn signal and the gear shifter you would have to
shift with the display and park with the
display so we're going to reverse then just press in reverse
but a tricky is if you want to park you have to press
you see at the right spot to park the car
i think it's more conventional for most people
to have a gear shifter if they don't have the stocks here
would have the gear shifter right in the center console
of your car so now i can just turn the knob change to
neutral or drive as you can see change to drive
or reverse and just use the knob press
and then we'll shift to park so now i can just easily
use the knob for you know the gear that i wanted instead of the screen
really a lot more convenient and a lot more
conventional in my opinion now i can just park the car
by pressing the knob it's bigger area to control your gear selector
of course the model 3 has this emergency
gear selector up here which is not really convenient to look up and press
up here i think this is really cool and plus
you get extra four charging ports so the model 3 highland
in the main center console only has a 12 volt socket no usb
c or usb a you only have usb c in the back
right here only one only one usb c in the back here now with this
gear shifter gear selector you have extra two usb a and two usb c ports
to charge your devices you know for for your passenger
or for rear passenger or for yourself it's a fast charger
because it connects directly to a 12 volt
socket in the center console and the installation
it's really easy to do this is how you install this new
gear shifter install a center console gear shifter or gear selector
it's really simple so first you have to fly open
the top headliner just right above the optional gear selector or gear
shifter on the top and pry open this part and
then release these buttons this whole thing right
here it just eclipses no screw at all after
you release and then plug in the wire harness that
came with the gear selector or gear shifter
and connect the wireless box to it after that
hide the wireless box up on the top then close everything
back in and the last step here just plug into
the 12 volt sockets in the center console
then slide in the new gear shifter right in the middle of your center console
and that's it now you can use it to shift the gear
on the center console better than using your main display to shift the gear
the next accessory for interior that you should have would be a
sunshade for your glass roof as you can see
the model 3 both model 3 and model Y both the new and the old one has this
big glass roof it looks really cool you know you can
see through during the day but when you park the
car or when it's really hot especially in the
summer you would want to cover it so this one
has really good uv protection this is a
reflector that you would put it face up the the glass roof and
this is the inside you will see in the car
and it came with both front and rear and it has these clips that you clip
it on your headliner you don't have to
remove it you just install once and oh it came with the storage bag too
so when you remove it you don't need it anymore
put in storage bag and then you put it away so first you have to install these
clips on your sunshade first you can see make
sure this side is facing the glass roof and then
make sure this is the front and the one in the back
do the same thing front and back and then just insert
the clips on to between the headliner and the glass roof and this is what
looks like after the installation it fits really
well front and rear and as you can see those
clips are there so the clips you just install on the sunshade once
and you don't have to install again so when you remove it you remove the
whole thing with the clips on the sunshade just like that
and then put it back in your storage bag that came in the
package and the next interior accessories would be
these all-weather format for your Tesla Model 3 Highland
I would highly recommend over a stock carpet format that might come
with your car or might not I believe the long range
would come with a carpet standard range doesn't come with it the
new 2024 I'm not sure
but this is the stock OEM one that came with the car is really hard to clean
it's basically the same material that's in
the car I mean underneath it is this this really hard to clean carpet
material so to have a all-weather format
such a world different for cleaning it see really really good
high quality with a texture so it creates that extra
grip on your feet when you drive
or when you sit and it's really easy to clean
super thick and it's fully recyclable material eco-friendly
let me try to fit all these so the whole set came with everything
two front the rear passenger the the trunk mat also
front trunk and sub trunk in the back let me put everything in
and I'll show you the fitment and how they look
in the Model 3 let's check out the driver's side first
it's actually fits perfectly well with the shape of
the footwell of the driver's seat I mean
overall I'll show you later so it looks really well clean
and it has this back lip as you can see this
right here so when you spill water drinks it contains inside the mat
so it doesn't spill off or the water doesn't come out
from the mat so you can just quickly wipe it off
and that's it you're done and it looks really really good look at that
fitment I don't see any little space at all around the edges
of the floor mat love the look of the floor mat too let's check out the
rear seat real quick the rear passenger seat okay so here
is the rear passenger seat also perfectly fit to the space and the
shape they use this 3D technology to scan
of course before you they produce this floor mat
as you can see it fits it goes all the way inside here
so it's super nice and clean now super easy to clean back here
especially when you have kids or dogs and here
is the passenger side same thing here look no gaps
at all around the floor mats really really nice nicely fit
nicely made really good material love the texture
and check out the front trunk real quick you asked why do we need
a front trunk mat it has this plastic you see on the bottom right but guess
what when you make it dirty you're gonna have to clean the plastic
and it has the bolts metal bolts you don't want that to get wet
so usually you know I would put like a wet cloth
wet shoes you know from the beach or snow
when I go up skiing or snowboarding I would put
ski shoes or snowboarding boots in the front trunk here
it's perfectly fit a couple of pairs of snowboarding or ski
boots in the front and let's check out the rear trunk mat
as you can see here looks really really good
the materials a little bit different here
seem to be I don't know a little thinner than the front
but back here you don't need that extra cushions you just need the protection
remember and the sub trunk same thing same story
with the sub trunk you can put you know wet stuff
something dirty you can just take off the the mat and then just clean it
looks really really nice good quality so far one more thing
as you can see the back of your second row seat
also that yucky I don't want to say yucky but it's so hard to clean
the carpet material so when you try to put something
that is hard to clean back here or you have a dog
and you fold the seat down and you want your dog to have more space
in the back of your model 3 highland you might want to protect this this is
a back seat cover or back seat protection pads
or mats it came with this velcro material in the back so you basically just
stick to the back of your model 3 the back seat
let me stick it on real quick and I will show you the final result so this is
what it looks like after I apply on the back of the second
row passenger seat as you can see it's all
well protected super easy to clean now if you have a dog open it up more space
for the dog now the whole back rear trunk and the
back of your seat is protected and
the fur the dog hair it doesn't stuck to this fussy carpet material anymore
now just gonna wipe it to clean it really really cool I have
this on all of my teslas and last but not
least for the interior this is one of the nice upgrade for your
car remember your car has that cloth I'll
show you material it's not only for the look
it makes it a lot easier to clean too it has this
clay cloth it came with the car and if you accidentally I don't know it
might you know happen spill water oh it's gonna
soak on this cloth and it's so hard to clean or get it off so
the next one is the real carbon fiber and matte carbon fiber
dashboard replacement so this replaced that cloth over there this is a real
matte carbon fiber to match with that exterior
rear spoiler matte carbon fiber on this model 3 this is how you install
it first just use a plastic plier to to help removing this dashboard
there's no screw at all just a whole bunch of plastic clips between the
dashboard and the bottom part so plier pop it out
open and then just keep going side to side
until the whole thing come out I'll just do it slowly
after all the clips are removed you should be able to just lift it up
and remove the whole panel after that just replace
it with the new carbon fiber one aligning all the clips first make sure
everything it's well aligned and then just
press it in
now you have this beautiful real carbon fiber
interior in your tesla model 3 super easy to install
but it made a huge difference the look and you know of the interior
wise and it's so much easier to clean now
because you can just wipe it off with a cloth look at that
really really nice love the carbon fiber look
in the car and it's super sleek and clean so those are
all the accessories that I would definitely
get for my tesla model 3 highland or new 2024 tesla model 3
some of them are like I mentioned before help improve the look
efficiency or enhance your driving experience
with your new car let me know in the comment
down below what you think about these new accessories
for your new tesla model 3 and I'll make sure to put
all the links of all of those accessories that I mentioned in the
video in the description down below with
special discount codes for you too thank you so much guys for
watching today's video make sure to click like if you like the
video make sure to subscribe for more awesome contents like this
and enjoy your new ride peace