
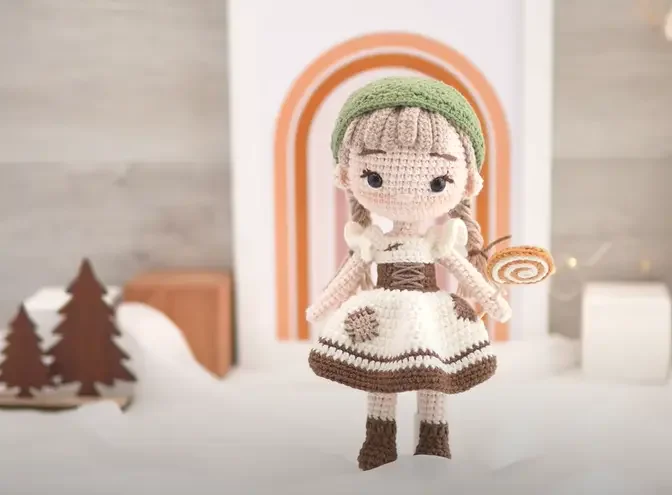

Hello dear visitors, I am here again with new amigurumi molds for you. I am sharing amigurumi patterns for you here for free. You can make your children happy by making these patterns. Amigurumi toys are very popular lately and are the most beautiful toys that don’t harm your kids. Your kids will love them. Let’s move on to our pattern and give them this gift.
Materials
0.55 mm crochet hook or right size crochet hook suitable for youryarn of choice.
Leylak 4-ply yarn red, orange, skin colour, brown, Dark Navyblue
The yarn brand I use for the large Kiki Schachenmayr Catania and 2 mm hook
Alternative yarn brand is Yarnart Canarias and 0.6 mm hook (anyfine cotton lace yarn)
2.5 mm safety eyes or the eye size varies with the thickness of the yarn.
Sewing needleBlack and white thread to embroider eyes
Fabric glueScissors
Fiberfill
Fiber tweezers
Abbreviatons
Mr : Magic ring
Sc : Single crochet
Inc : Increase
Dec : Decrease
Slst : Slip stitch
Blo : Back loop only
Flo : front loop only
Hdc : half double crochet
Hdcinc : Increase half double crochet
Dc : double crochet
Dcinc : Increase double crochet
ARMS
Start with skin color. Get help from the scissors to turn the lever in
the 2nd round. Don’t stuff arms.
1- 6 sc in MR (6)
2- (1 sc,inc)x3 (9)
3,4- 9 sc (9) 2 rounds
5- 3-dc bobble st, 8 sc (9)
6- dec, 7 sc (8)
7,20- 8 sc (8) [14 rounds]

EARS
1- 6 sc in MR
We sew the ears to the head at a distance of 7 from the eyes. We do
the sewing process after inserting the eyes. It will be easier if we sew
the ears before filling the head.
LEG
Start with orange yarn.
R1- Make ch 6, from the second chain 4 sc , 3 sc
in the last chain, continue on the other side of
chain: 3 sc, inc (12)
R2- inc, 3 sc, 3 inchdc, 3 sc, 2 inc (18)
R3- 18 sc (18)
R4- 5 sc, 3 dec, 7 sc (15)
Change to skin color and cut orange color.
R5- BLO 4 sc, 3 dec, 5 sc (12)
Start filling the foot after this round.
Progress by filling up every five rounds.
R6- 4 sc, 2 dec, 4 sc (10)
R7- 10 sc (10)
R8- 9 sc, inc (11)
R9- 11 sc (11)
R10- 10 sc, inc (12)
R11,12- 12 sc (12) [2 rounds]
R13- 11 sc, inc (13)
R14- 13 sc (13)
R15- 12 sc, inc (14)
R16,18- 14 sc (14) [3 rounds]
R19- 12 sc, inc, sc (15)
R20,21- 15 sc [2 rounds]
Cut the thread of the first leg. Let’s continue
without cutting the thread of the second leg.
BODY and HEAD
R22- Make 3 chains. 15 sc into first leg, 3 sc into chains, 15 sc into
second leg, 3 sc into chains (36)
The loop marker should be on the back of the body.
R23,24- 36 sc (36) [2 rounds]
R25- 7 sc, dec, 15 sc, dec, 10 sc (34)
R26- 34 sc (34)
R27- 6 sc, dec, 15 sc, dec, 9 sc (32)
R28- 5 sc, dec,14 sc, dec, 9 sc (30)
R29- 30 sc (30)
R30- (3 sc,dec)x6 (24)
R31,36- 24 sc (24) [6 rounds]
After this round, we join the arms. Fill the lower part of the body.
The loop marker should be right in the middle of the back.
R37- 4 sc on the body, 4 sc on the body and arm together, 8 sc on the chest, 4 sc
on the body and arm together, 4 sc on the back of the body (24)
R38- 4 sc on the body, 4 sc remaining loops of the arm, 8 sc on the body, 4 sc
remaining loops of the arm, 4 sc on the body (24)
R39- (2 sc, dec)x6 (18)
R40- (sc, dec)x6 (12)
Fill the body tightly.
R41- (2 sc, dec)x3 (9)
R42,44- 9 sc (9) [3 rounds]
R45- 9 inc (18)
R46- (sc, inc)x9 (27)
R47- (2 sc, inc)x6 (36)
R48- (5 sc, inc)x6 (42)
R49- 3 sc, inc (6 sc,inc)x5, 3 sc (48)
R50- (7 sc, inc)x6 (54)
R51,63- 54 sc (54) [13 rounds]
Fasten safety eyes between rounds 54 and 55 leaving 9 stitches apart. After
inserting the eyes you should see 7 stitches between them. After wearing the safe
eyes, you can carefully seal the back of the eyes with the help of a lighter.I
recommend sewing the ears after the eyes are attached.

Nose
Embroider a nose between rounds 52 and 53.
Eyebrows.
Use my pictures to embroider the eyebrows in position.
work the eyebrows
2 rounds above the eyes, 4 stitches wide
R64- (7sc,dec)x6 (48)
R65- (6 sc, dec)x6 (42)
R66- (5 sc, dec)x6 (36)
R67- (4 sc, dec)x6 (30)
R68- (3 sc, dec)x6 (24)
Start filling the head. Fill homogeneously. Fill as needed in each row.
R69- (2 sc, dec)x6 (18)
R70- (1 sc, dec)x6 (12)
R71- 6 dec
Cut the thread ,fasten off, pull the opening closed into the front loopsusing
a needle.
DRESS
Before you start, leave a long thread . We will use this thread to sew the back of
the dress.
R1- Make 31 chains, from the second chain (2 sc, inc)x10 (40)
Every row starts with 1 ch and turn.
R2- 5 sc, 4 chain, skip 10 stitch, 10 sc, 4 chain, skip 10 stitch, 5 sc (28)
R3,4- 28 sc (28) [2 row]
R5- 6 sc, inc,14 sc, inc,7 sc (30)
R6- 30 sc (30) [3 row]
R7- (Dc, dcinc)x 15 (45)
From this row we crochet in rounds. slst, 2 ch. Each round ends with slst
and make 2 ch.
R8,9- 45 Dc (45) [2 rounds]
R10- (8 Dc, Dcinc)x5 (50)
R11,13- 50 Dc (50) [3 rounds]
Sew the back of the dress and hide the thread.
Sleeves of the dress
The starting point should coincide with the middle of the armpit.
R1- 1 ch, 14 sc, slst. (14)
R2- 2 ch, (Dc, Dcinc)x7 slst. (21)
R3- 2 ch, 21 Dc, slst. (21)
R4- 2 ch, 22 Dc, slst. (21)
R5- 1 ch (sc, dec)x7, slst.(14) Cut the yarn.

HAİR/WİG
R1- 6 sc into MR
R2- 6 inc (12)
R3- (sc, inc)x6 (18)
R4- FLO (2sc, inc)x6 (24)
We will start making the hair strands from this row.
S1- Ch24 , from the second chain: 23 hdc, slst into next stitch. (23)
S2- Ch16, from the second chain: 15 hdc, slst into next stitch. (15)
S3- Ch22, from the second chain: 21 hdc, slst into next stitch. (21)
S4- Ch13, from the second chain: 12 hdc, slst into next stitch. (12)
S5,8- Ch12, from the second chain: 11 hdc, slst into next stitch. (11) [4 strands of hair]
S9- Ch13, from the second chain: 12 hdc, slst into next stitch. (12)
S10- Ch22, from the second chain: 21 hdc, slst into next stitch. (21)
S11- Ch16, from the second chain: 15 hdc, slst into next stitch. (15)
S12,24- Ch24, from the second chain: 23 hdc, slst into next stitch. (23) [13 strands of hair]
Top hair; Let’s start with the first loop of the BLO 3rd round.
S25- Ch25 from the second chain: 24 hdc, skip 1 stitch and slst next stitch on round 4 (24)
S26- Ch14, from the second chain: 13 hdc, skip 1 stitch and slst next stitch on round 4 (13)
S27- Ch14, from the second chain: 13 hdc, skip 1 stitch and slst next stitch on round 4 (13)
S28- Ch25 from the second chain: 24 hdc, skip 1 stitch and slst next stitch on round 4 (24)
Cut the yarn, fasten off and and weave the ends. . Fix the hair with the help of fabric glue so that
the reverse side of the wig. Bangs should be above the eyebrows. (for the location of the
eyebrows, see the photo.)
Bow
Begin with red color. Work in rounds. Slst and ch2 at the end of each
round.
Make 40 chains and join wiht a slst to the first chain to create a circle.
R1,5- 40 Dc (40) [5 rounds]
I made 100 chains for the ribbon. you can determine the number of
chains by trying on the toy’s head.
Bag
Begin with orange color.
R1- Make ch 11, from the second chain 9 sc , 3 sc in the last chain, continue on
the other side of chain: 9 sc, inc (23)
R2,8- 23 sc (23) [7 rounds]
From this round we will cover the bag. Ch1, turn.
R9- 11 sc, ch 1 and turn. (11)
R10- 11 sc ch1 and turn. (11)
R11- 11 sc, ch 1 and turn. (11)
R12- Skip 1 sc, 10 sc, ch 1 and turn. (10)
R13- Skip 1 sc, 9 sc, ch 1 and turn. (9)
R14- Skip 1 sc, 8 sc, slst and cut the yarn. (8)
make 40 chains for the handle of the bag and fix it on the side of the bag
Source: Free amigurumi blogkb
Comments